HP DesignJet T730 User guide - Page 110
Recalibrate the paper advance, Recalibrating the paper advance procedure
 |
View all HP DesignJet T730 manuals
Add to My Manuals
Save this manual to your list of manuals |
Page 110 highlights
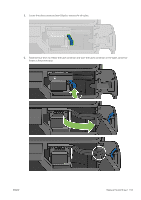
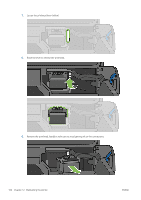
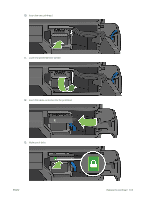
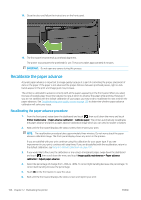
14. Close the door and follow the instructions on the front panel. 15. The front panel recommends a printhead alignment. The printer now prepares the printhead for use. The process takes approximately 6 minutes. IMPORTANT: Do not open any covers during this process. Recalibrate the paper advance Accurate paper advance is important to image quality because it is part of controlling the proper placement of dots on the paper. If the paper is not advanced the proper distance between printhead passes, light or dark bands appear in the print and image grain may increase. The printer is calibrated to advance correctly with all the papers appearing in the front panel. When you select the type of loaded paper, the printer adjusts the rate at which to advance the paper while printing. However, if you are not satisfied with the default calibration of your paper, you may need to recalibrate the rate at which the paper advances. See Troubleshooting print-quality issues on page 136 to determine whether paper advance calibration will solve your issue. Recalibrating the paper advance procedure 1. From the front panel, swipe down the dashboard and touch , then scroll down the menu and touch Printer maintenance > Paper advance calibration > Calibrate paper. The printer automatically recalibrates the paper advance and prints a paper advance calibration image which you can send to stacker or basket. 2. Wait until the front panel displays the status screen, then re-print your print. NOTE: The recalibration procedure takes approximately three minutes. Do not worry about the paper advance calibration image. The front-panel display shows any errors in the process. If you are satisfied with your print continue using this calibration for your paper type. If you see improvement in your print, continue with step three. If you are dissatisfied with the recalibration, return to the default calibration, see Return to default calibration on page 107. 3. If you would like to fine-tune the calibration or are using a transparent paper, swipe down the dashboard and touch , then scroll down the menu and touch Image quality maintenance > Paper advance calibration > Adjust paper advance. 4. Select the percentage of change from -99% to +99%. To correct light banding decrease the percentage. To correct dark banding increase the percentage. 5. Touch OK on the front panel, to save the value. 6. Wait until the front panel displays the status screen and reprint your print. 106 Chapter 12 Maintaining the printer ENWW
-
 1
1 -
2
-
3
-
4
-
5
-
6
-
7
-
8
-
9
-
10
-
11
-
12
-
13
-
14
-
15
-
16
-
17
-
18
-
19
-
20
-
21
-
22
-
23
-
24
-
25
-
26
-
27
-
28
-
29
-
30
-
31
-
32
-
33
-
34
-
35
-
36
-
37
-
38
-
39
-
40
-
41
-
42
-
43
-
44
-
45
-
46
-
47
-
48
-
49
-
50
-
51
-
52
-
53
-
54
-
55
-
56
-
57
-
58
-
59
-
60
-
61
-
62
-
63
-
64
-
65
-
66
-
67
-
68
-
69
-
70
-
71
-
72
-
73
-
74
-
75
-
76
-
77
-
78
-
79
-
80
-
81
-
82
-
83
-
84
-
85
-
86
-
87
-
88
-
89
-
90
-
91
-
92
-
93
-
94
-
95
-
96
-
97
-
98
-
99
-
100
-
101
-
102
-
103
-
104
-
 105
105 -
 106
106 -
 107
107 -
 108
108 -
 109
109 -
 110
110 -
 111
111 -
 112
112 -
 113
113 -
 114
114 -
 115
115 -
116
-
117
-
118
-
119
-
120
-
121
-
122
-
123
-
124
-
125
-
126
-
127
-
128
-
129
-
130
-
131
-
132
-
133
-
134
-
135
-
136
-
137
-
138
-
139
-
140
-
141
-
142
-
143
-
144
-
145
-
146
-
147
-
148
-
149
-
150
-
151
-
152
-
153
-
154
-
155
-
156
-
157
-
158
-
159
-
160
-
161
-
162
-
163
-
164
-
165
-
166
-
167
-
168
-
169
-
170
-
171
-
172
-
173
-
174
-
175
-
176
-
177
-
178
-
179
-
180
-
181
-
182
-
183
-
184
-
185
-
186
-
187
-
188
-
189
-
190
-
191
-
192
-
193
-
194
-
195
-
196
-
197
-
198
-
199
-
200
-
201
-
202
-
203
 |
 |
