HP LaserJet Enterprise MFP M633 User Guide
HP LaserJet Enterprise MFP M633 Manual
 |
View all HP LaserJet Enterprise MFP M633 manuals
Add to My Manuals
Save this manual to your list of manuals |
HP LaserJet Enterprise MFP M633 manual content summary:
- HP LaserJet Enterprise MFP M633 | User Guide - Page 1
LaserJet Enterprise MFP M631, M632, M633 User Guide M631dn Flow M631h M632h M633fh M631z M632fht Flow M632z Flow M633z www.hp.com/support/ljM631MFP www.hp.com/support/ljM632MFP www.hp.com/support/ljM633MFP - HP LaserJet Enterprise MFP M633 | User Guide - Page 2
- HP LaserJet Enterprise MFP M633 | User Guide - Page 3
HP LaserJet Enterprise MFP M631, M632, M633 User Guide - HP LaserJet Enterprise MFP M633 | User Guide - Page 4
to change without notice. The only warranties for HP products and services are set forth in the express warranty statements accompanying such products and services. Nothing herein should be construed as constituting an additional warranty. HP shall not be liable for technical or editorial errors - HP LaserJet Enterprise MFP M633 | User Guide - Page 5
Interface ports ...5 Control-panel view ...5 How to use the touchscreen control panel 8 Printer specifications ...9 Technical specifications ...9 Supported operating systems ...11 Mobile printing solutions ...13 Printer dimensions ...14 Power consumption, electrical specifications, and acoustic - HP LaserJet Enterprise MFP M633 | User Guide - Page 6
Load and print labels ...34 Introduction ...34 Manually feed labels ...34 Label orientation ...35 Configure the Use the HP Embedded Web Server (EWS) to disable the Cartridge Protection feature .... 46 Troubleshoot Cartridge Protection control panel error messages 46 Replace the toner cartridge ... - HP LaserJet Enterprise MFP M633 | User Guide - Page 7
Automatically print on both sides (OS X) ...59 Manually print on both sides (OS X) ...59 Print multiple pages up Scan to Email ...82 Introduction ...82 Before you begin ...82 Step one: Access the HP Embedded Web Server (EWS 82 Step two: Configure the Network Identification settings 83 Step three: - HP LaserJet Enterprise MFP M633 | User Guide - Page 8
) ...110 Introduction ...110 Before you begin ...110 Step one: Access the HP Embedded Web Server (EWS 110 Step two: Enable Save to SharePoint® and Set ...116 Introduction ...116 Step one: Access the HP Embedded Web Server (EWS 116 Step two: Add and manage Quick Sets ...117 Add a Quick Set ...117 - HP LaserJet Enterprise MFP M633 | User Guide - Page 9
Manage the printer ...145 Advanced configuration with HP Embedded Web Server (EWS 146 Introduction ...146 How to access the HP Embedded Web Server (EWS 146 HP Troubleshooting tab ...151 Security tab ...152 HP Web Services Manually configure IPv4 TCP/IP parameters from the control panel 156 Manually - HP LaserJet Enterprise MFP M633 | User Guide - Page 10
configure the printer to use 1 watt or less of power 160 Set the sleep schedule ...161 HP Web Jetadmin ...162 Software and firmware updates ...163 9 Solve problems ...165 Customer support ...166 Control panel help system ...167 Restore factory settings ...168 Introduction ...168 Method one: Restore - HP LaserJet Enterprise MFP M633 | User Guide - Page 11
page ...204 Visually inspect the toner cartridge ...205 Check paper and the printing environment 205 Step one: Use paper that meets HP specifications 205 Step two: Check the environment 205 Step three: Set the individual tray alignment 206 Try a different print driver ...206 Check the EconoMode - HP LaserJet Enterprise MFP M633 | User Guide - Page 12
using a phone company voice-messaging service or an answering machine? . 233 Does your phone line have a call-waiting feature 234 Check fax accessory status ...234 General fax problems ...235 The fax failed to send displays 235 Not able to locate the Fax settings in HP Web Jetadmin 235 x ENWW - HP LaserJet Enterprise MFP M633 | User Guide - Page 13
The header is appended to the top of the page when the overlay option is enabled .... 235 A mix of names and numbers is in the recipients box 235 A one-page fax prints as two pages 235 A document stops in the document feeder in the middle of faxing 236 The volume for sounds coming from the fax - HP LaserJet Enterprise MFP M633 | User Guide - Page 14
xii ENWW - HP LaserJet Enterprise MFP M633 | User Guide - Page 15
.com/ support/ljM631MFP, www.hp.com/support/ljM632MFP, or www.hp.com/support/ljM633MFP. HP's all-inclusive help for the printer includes the following information: ● Install and configure ● Learn and use ● Solve problems ● Download software and firmware updates ● Join support forums ● Find warranty - HP LaserJet Enterprise MFP M633 | User Guide - Page 16
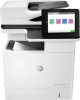
Printer views ● Printer front view ● Printer back view ● Interface ports ● Control-panel view Printer front view 1 12 11 13 14 15 23 4 5 6 1 7 8 2 9 10 21 22 20 23 2 19 3 24 3 16 17 18 1 Control panel with color touchscreen display (tilts up for easier viewing) 2 Document- - HP LaserJet Enterprise MFP M633 | User Guide - Page 17
Tray 3 17 Tray 4 18 Tray 5 19 3x550-sheet tray (included with the M631z; optional for the M631dn, M631h, M632h, and M633fh) 20 HP Stapling Mailbox (included with the M631z, M632z, and M633z) 21 Hardware integration pocket (for connecting accessories and third-party devices) 22 Keyboard - HP LaserJet Enterprise MFP M633 | User Guide - Page 18
Printer back view 1 2 3 4 5 1 Document feeder cover release latch 2 Document-feeder cover (access for clearing jams) 3 Cartridge door release button 4 Cartridge door (access to the toner cartridge) 5 Serial number and product number label 4 Chapter 1 Printer overview ENWW - HP LaserJet Enterprise MFP M633 | User Guide - Page 19
Interface ports 1 2 3 4 1 Host USB port for connecting external USB devices (this port might be covered) NOTE: For easy-access USB printing, use the USB port near the control panel. 2 Hi-Speed USB 2.0 printing port 3 Local area network (LAN) Ethernet (RJ-45) network port 4 Fax port (fax - HP LaserJet Enterprise MFP M633 | User Guide - Page 20
only when an optional wireless accessory is installed). ● Ethernet: View or change Ethernet connection settings. ● HP Web Services: View information to connect and print to the printer using HP Web Services (ePrint). ● Fax Number: View the printer fax number (fax models only). 6 Chapter 1 Printer - HP LaserJet Enterprise MFP M633 | User Guide - Page 21
6 Help button 7 Current time 8 Start Copy button 9 Copy count 10 Home-screen page indicator 11 Keyboard (Flow models only) 12 Easy-access USB port 13 Hardware integration pocket (HIP) Touch the Help button to open the embedded help system. Displays the current time. Touch the Start Copy button to - HP LaserJet Enterprise MFP M633 | User Guide - Page 22
How to use the touchscreen control panel Use the following actions to use the printer touchscreen control panel. Action Touch Description Example Touch an item on the screen to select that item or open that menu. Also, when scrolling through menus, briefly touch the screen to stop the scrolling. - HP LaserJet Enterprise MFP M633 | User Guide - Page 23
, but they are subject to change. For current information, see www.hp.com/support/ljM631MFP, www.hp.com/support/ljM632MFP, or www.hp.com/support/ljM633MFP. ● Technical specifications ● Supported operating systems ● Mobile printing solutions ● Printer dimensions ● Power consumption, electrical - HP LaserJet Enterprise MFP M633 | User Guide - Page 24
to change. For the most current information, go to www.hp.com/support/ljM631MFP, www.hp.com/support/ljM632MFP, or www.hp.com/support/ ljM633MFP Integrated HP Wi-Fi Direct accessory for printing from mobile devices HP Jetdirect 2900nw Print Server Accessory for wireless connectivity 16 GB eMMC - HP LaserJet Enterprise MFP M633 | User Guide - Page 25
.hp.com/support/ljM631MFP, www.hp.com/support/ljM632MFP, or www.hp.com/support/ ljM633MFP. OS X: Mac computers are supported with this printer. Download HP Easy Start either from 123.hp.com/LaserJet or from the Printer Support page, and then use HP Easy Start to install the HP print driver. HP Easy - HP LaserJet Enterprise MFP M633 | User Guide - Page 26
Go to 123.hp.com/LaserJet. 2. Follow the steps provided to download the printer software. Linux: For information and print drivers for Linux, go to www.hp.com/go/linuxprinting. UNIX: For information and print drivers for UNIX®, go to www.hp.com/go/unixmodelscripts. Table 1-1 Supported operating - HP LaserJet Enterprise MFP M633 | User Guide - Page 27
from 123.hp.com/LaserJet. 1. Go to 123.hp.com/LaserJet. 2. Follow the steps provided to download the printer software. NOTE: For a current list of supported operating systems, go to www.hp.com/support/ljM631MFP, www.hp.com/support/ljM632MFP, or www.hp.com/support/ljM633MFP for HP's all-inclusive - HP LaserJet Enterprise MFP M633 | User Guide - Page 28
HP ePrint via email (Requires HP Web Services to be enabled and the printer to be registered with HP Connected) ● HP ePrint app (Available for Android, iOS, and Blackberry) ● HP All-in-One Remote app for iOS and Android devices ● HP mm (26.15 in) Weight (with toner cartridge) 52.5 kg (115.8 lb) - HP LaserJet Enterprise MFP M633 | User Guide - Page 29
48.5 in) Depth 658 mm (25.9 in) Width 661 mm (26 in) Weight (with toner cartridge) 64.3 kg (141.8 lb) Printer fully opened 1,500 mm (59.1 in) 890 mm in) Depth 558 mm (22 in) Width 512 mm (20.15 in) Weight (with toner cartridge) 40 kg (88.2 lb) Printer fully opened 1,010 mm (39.8 in) 890 - HP LaserJet Enterprise MFP M633 | User Guide - Page 30
35 in) Width 660 mm (26 in) 1,030 mm (40.5 in) Weight (with toner cartridge) 57.7 kg (127.2 lb) Table 1-13 Dimensions for the envelope feeder cassette Depth 558 mm (22 in) Width 512 mm (20.15 in) Weight (with toner cartridge) 39.6 kg (87.3 lb) Printer fully opened 1,010 mm (39.8 in - HP LaserJet Enterprise MFP M633 | User Guide - Page 31
.15 in) 1,030 mm (40.5 in) Weight (with toner cartridge) 39.8 kg (87.7 lb) 1 These values are subject to change. For current information, go to www.hp.com/support/ljM631MFP, www.hp.com/support/ljM632MFP, or www.hp.com/support/ljM633MFP. Power consumption, electrical specifications, and acoustic - HP LaserJet Enterprise MFP M633 | User Guide - Page 32
installation For basic setup instructions, see the Hardware Installation Guide that came with the printer. For additional instructions, go to HP support on the Web. Go to www.hp.com/support/ljM631MFP, www.hp.com/support/ljM632MFP, or www.hp.com/support/ljM633MFP for HP's all-inclusive help for - HP LaserJet Enterprise MFP M633 | User Guide - Page 33
.com/ support/ljM631MFP, www.hp.com/support/ljM632MFP, or www.hp.com/support/ljM633MFP. HP's all-inclusive help for the printer includes the following information: ● Install and configure ● Learn and use ● Solve problems ● Download software and firmware updates ● Join support forums ● Find warranty - HP LaserJet Enterprise MFP M633 | User Guide - Page 34
Introduction CAUTION: Do not extend more than one paper tray at a time. Do not use paper tray as a step. Keep hands out of paper trays when closing. All trays must be closed when moving the printer. 20 Chapter 2 Paper trays ENWW - HP LaserJet Enterprise MFP M633 | User Guide - Page 35
load paper in Tray 1. CAUTION: To avoid jams, never add or remove paper from Tray 1 during printing. 1. Open Tray 1. 2. Pull out the tray extension to support the paper. ENWW Load paper to Tray 1 (multipurpose tray) 21 - HP LaserJet Enterprise MFP M633 | User Guide - Page 36
on page 22. Make sure that the paper fits under the fill line on the paper guides. NOTE: The maximum stack height is 10 mm (0.4 in), or approximately 100 sheets m2 (20 lb) paper. 4. Using the blue adjustment latch, adjust the side guides so that they touch the paper stack, but do not bend it. Tray - HP LaserJet Enterprise MFP M633 | User Guide - Page 37
Table 2-1 Tray 1 paper orientation (continued) Paper type Image orientation Duplex mode Automatic 2-sided printing or with Alternative Letterhead Mode enabled Paper size How to load paper Letter, Legal, Executive, Oficio (8.5 x 13), A4, A5, RA4, B5 (JIS), Oficio (216 x 340), 16K 195 x 270 mm, - HP LaserJet Enterprise MFP M633 | User Guide - Page 38
Table 2-1 Tray 1 paper orientation (continued) Paper type Image orientation Prepunched Portrait and landscape Duplex mode 1-sided printing Automatic 2-sided printing or with Alternative Letterhead Mode enabled Paper size How to load paper Letter, Legal, Executive, Statement, Oficio (8.5 x - HP LaserJet Enterprise MFP M633 | User Guide - Page 39
control-panel menus 1. From the Home screen on the printer control panel, open the Settings menu. 2. Open the following menus: ● Print/Copy ● Manage Trays ● Alternative Letterhead Mode 3. Select Enabled, and then touch the Save button or press the OK button. ENWW Load paper to Tray 1 (multipurpose - HP LaserJet Enterprise MFP M633 | User Guide - Page 40
is in use. 2. Adjust the paper-length and paper-width guides by squeezing the blue adjustment latches and sliding the guides to the size of the paper being used. 3. Load paper into the tray. Check the paper to verify the guides touch the stack, but do not bend it. For information about - HP LaserJet Enterprise MFP M633 | User Guide - Page 41
4. Close the tray. 5. The tray configuration message displays on the printer control panel. 6. Touch the OK button to accept the detected type and size, or touch the Modify button to choose a different paper size or type. For custom-size paper, specify the X and Y dimensions for the paper when the - HP LaserJet Enterprise MFP M633 | User Guide - Page 42
Table 2-2 Tray 2 and the 550-sheet trays paper orientation (continued) Paper type Image orientation Duplex mode Landscape 1-sided printing Paper size How to load paper Letter, Legal, Executive, Statement, Oficio (8.5 x 13), 4 x 6, 5 x 7, 5 x 8, A4, A5, A6, RA4, B5 (JIS), B6 (JIS), L (90 x - HP LaserJet Enterprise MFP M633 | User Guide - Page 43
-panel menus 1. From the Home screen on the printer control panel, open the Settings menu. 2. Open the following menus: ● Copy/Print or Print ● Manage Trays ● Alternative Letterhead Mode 3. Select Enabled, and then touch the Save button or press the OK button. ENWW Load Tray 2 and the 550-sheet - HP LaserJet Enterprise MFP M633 | User Guide - Page 44
Load the 2,100-sheet high-capacity input tray The following information describes how to load paper in the high-capacity input tray. This tray is part of the 1x550-sheet and 2,100-sheet high-capacity input feeder, which is included with the M632z and M633z models. This tray holds up to 2,100 sheets - HP LaserJet Enterprise MFP M633 | User Guide - Page 45
3. Load paper into the tray. NOTE: To prevent jams, do not overfill the tray. Be sure that the top of the stack is below the tray full indicator. NOTE: If the tray is not adjusted correctly, an error message might appear during printing or the paper might jam. 4. Close the tray. 5. The tray - HP LaserJet Enterprise MFP M633 | User Guide - Page 46
feeder accessory holds 75 envelopes, depending on envelope design and environmental conditions. To print envelopes using the manual feed option, follow these steps to select the correct settings in the print driver, and then load the envelopes into the tray after sending the print job to the printer - HP LaserJet Enterprise MFP M633 | User Guide - Page 47
● In the Paper size drop-down list, select the correct size for the envelopes. ● In the Paper type drop-down list, select Envelope. ● In the Paper source drop-down list, select Tray 3 or Tray 4-whichever tray corresponds to the envelope feeder. 5. Click the OK button to close the Document Properties - HP LaserJet Enterprise MFP M633 | User Guide - Page 48
labels, use Tray 2 or one of the optional 550-sheet trays. NOTE: Tray 1 does not support labels. To print labels using the manual feed option, follow these steps to select the correct settings in the print driver, and then load the labels into the tray after sending the print job to the printer - HP LaserJet Enterprise MFP M633 | User Guide - Page 49
Label orientation Tray Trays 2-5 How to load labels Face-up Top edge at the right of the tray ENWW Load and print labels 35 - HP LaserJet Enterprise MFP M633 | User Guide - Page 50
Configure the stapling mailbox accessory The following information describes how to load staples and configure the options for the stapling mailbox accessory. The stapling mailbox accessory can staple documents in the upper left or upper right corners, and it can stack up to 1,000 sheets of paper in - HP LaserJet Enterprise MFP M633 | User Guide - Page 51
the menu. 2. Open the following menus: ● Manage Stapler/Stacker ● Operation Mode 3. Select a mode , or fax jobs. To configure the HP print driver for the selected operation mode, complete the . NOTE: Newer V4 drivers do not support Update Now. For these drivers, manually configure the operation mode - HP LaserJet Enterprise MFP M633 | User Guide - Page 52
3. Select the printer, and then select Options & Supplies. Select Driver. 4. Manually configure the Accessory Output Mode. 38 Chapter 2 Paper trays ENWW - HP LaserJet Enterprise MFP M633 | User Guide - Page 53
. For current information, see www.hp.com/ support/ljM631MFP, www.hp.com/support/ljM632MFP, or www.hp.com/support/ljM633MFP. HP's all-inclusive help for the printer includes the following information: ● Install and configure ● Learn and use ● Solve problems ● Download software and firmware updates - HP LaserJet Enterprise MFP M633 | User Guide - Page 54
Original LaserJet Toner Cartridge HP 37A Black Original Standard-capacity replacement toner cartridge 37A LaserJet Toner Cartridge HP Staple Cartridge Refill Replacement staple cartridge Not applicable Accessories 1 GB Memory DIMM Kit Memory upgrade kit Not applicable HP LaserJet 550 - HP LaserJet Enterprise MFP M633 | User Guide - Page 55
personnel to perform the repair. For these parts, on-site or return-to-depot support is not provided under the HP product warranty. ● Parts listed as Optional self-replacement can be installed by HP service personnel at your request for no additional charge during the product warranty period. ENWW - HP LaserJet Enterprise MFP M633 | User Guide - Page 56
Keyboard Overlay Kit for Simplified Chinese and Traditional Chinese HP LaserJet Keyboard Overlay Kit Sweden Description Keyboard overlay for China Keyboard overlay for Sweden Self-replacement options Part number Mandatory A7W12A Mandatory A7W14A 42 Chapter 3 Supplies, - HP LaserJet Enterprise MFP M633 | User Guide - Page 57
to proceed. ● Cartridge Protection: This feature permanently associates toner cartridges with a specific printer, or fleet of printers, so Settings menu. 2. Open the following menus: ● Manage Supplies ● Cartridge Policy 3. Select Authorized HP. Use the printer control panel to disable the Cartridge - HP LaserJet Enterprise MFP M633 | User Guide - Page 58
website. Accessing this website will not harm the computer. 2. Open the Copy/Print tab. 3. From the left navigation pane, select Manage Supplies. 4. In the Supply Settings area, select Authorized HP from the Cartridge Policy drop-down list. 5. Click the Apply button to save the changes. Use the - HP LaserJet Enterprise MFP M633 | User Guide - Page 59
HP toner cartridge. If you believe you purchased a genuine HP supply, visit www.hp.com/go/anticounterfeit to determine if the toner cartridge is a genuine HP , open the Settings menu. 2. Open the following menus: ● Manage Supplies ● Cartridge Protection 3. Select Protect Cartridges. 4. When the - HP LaserJet Enterprise MFP M633 | User Guide - Page 60
Manage Supplies. 4. In the Supply Settings area, select Off from the Cartridge Protection drop-down list. 5. Click the Apply button to save the changes. Troubleshoot cartridge with a new toner or fleet of printers that initially protected it cartridge. using HP Cartridge Protection. The Cartridge - HP LaserJet Enterprise MFP M633 | User Guide - Page 61
replacement instructions. Reinsert the toner cartridge into the printer and close the cover. Table 3-1 Toner cartridge information Item Description Cartridge number HP 37Y Extra High Yield Black Original LaserJet Extra high-capacity replacement toner cartridge 37Y Toner Cartridge HP 37X - HP LaserJet Enterprise MFP M633 | User Guide - Page 62
on clothing, wipe it off by using a dry cloth and wash the clothes in cold water. Hot water sets toner into fabric. NOTE: Information about recycling used toner cartridges is on the toner cartridge box. 1. Press the cartridge door release button to open the door. 2. Pull out the cartridge drawer - HP LaserJet Enterprise MFP M633 | User Guide - Page 63
4. Remove the new toner cartridge from its protective bag. 5. Hold both ends of the toner cartridge and rock it 5-6 times. 6. Remove the cartridge shipping cover. 7. Place the toner cartridge in the cartridge drawer. ENWW Replace the toner cartridge 49 - HP LaserJet Enterprise MFP M633 | User Guide - Page 64
8. Close the toner cartridge drawer. 9. Close the cartridge door. 10. Pack the used toner cartridge into the box that the new cartridge came in. Adhere the prepaid shipping label to the box, and return the used cartridge to HP for recycling. 50 Chapter 3 Supplies, accessories, and parts ENWW - HP LaserJet Enterprise MFP M633 | User Guide - Page 65
Replace the staple cartridge 1. Open the stapler door. 2. Pull the colored handle on the staple cartridge, and then pull the staple cartridge straight out. 2 ENWW Replace the staple cartridge 51 - HP LaserJet Enterprise MFP M633 | User Guide - Page 66
3. Insert the new staple cartridge into the stapler and push on the colored handle until it snaps into place. 2 4. Close the stapler door. 52 Chapter 3 Supplies, accessories, and parts ENWW - HP LaserJet Enterprise MFP M633 | User Guide - Page 67
.com/ support/ljM631MFP, www.hp.com/support/ljM632MFP, or www.hp.com/support/ljM633MFP. HP's all-inclusive help for the printer includes the following information: ● Install and configure ● Learn and use ● Solve problems ● Download software and firmware updates ● Join support forums ● Find warranty - HP LaserJet Enterprise MFP M633 | User Guide - Page 68
Print option. 2. Select the printer from the list of printers. To change settings, click the Properties or Preferences button to open the print driver. NOTE: The name of the button varies for different software programs. NOTE: To access these features from a Windows 8 or 8.1 Start screen app, select - HP LaserJet Enterprise MFP M633 | User Guide - Page 69
3. Clickthe tabs in the print driver to configure the available options. For example, set the paper orientation on the Finishing tab, and set the paper source, paper type, paper size, and - HP LaserJet Enterprise MFP M633 | User Guide - Page 70
to print on paper types that the duplexer does not support, print on both sides manually. 1. From the software program, select the Print option , and then click the Properties or Preferences button to open the print driver. NOTE: The name of the button varies for different software programs. - HP LaserJet Enterprise MFP M633 | User Guide - Page 71
select the Print option. 2. Select the printer from the list of printers, and then click the Properties or Preferences button to open the print driver. NOTE: The name of the button varies for different software programs. NOTE: To access these features from a Windows 8 or 8.1 Start screen app, select - HP LaserJet Enterprise MFP M633 | User Guide - Page 72
Additional print tasks Go to www.hp.com/support/ljM631MFP, www.hp.com/support/ljM632MFP, or www.hp.com/support/ ljM633MFP. Instructions are available for performing specific print tasks, such as the following: ● Create and use printing shortcuts or presets ● Select the paper size, or use a custom - HP LaserJet Enterprise MFP M633 | User Guide - Page 73
software programs. 4. Select a binding option from the Two-Sided drop-down list. 5. Click the Print button. Manually print on both sides (OS X) NOTE: This feature is available if you install the HP print driver. It might not be available if you are using AirPrint. 1. Click the File menu, and then - HP LaserJet Enterprise MFP M633 | User Guide - Page 74
. ● EconoMode: Select this option to conserve toner when printing drafts of documents. 5. Click the Print button. Additional print tasks Go to www.hp.com/support/ljM631MFP, www.hp.com/support/ljM632MFP, or www.hp.com/support/ ljM633MFP. Instructions are available for performing specific print tasks - HP LaserJet Enterprise MFP M633 | User Guide - Page 75
● Print the first or last pages of the document on different paper ● Print watermarks on a document ENWW Print tasks (OS X) 61 - HP LaserJet Enterprise MFP M633 | User Guide - Page 76
sent to printer for Job Accounting purposes Create a stored job (Windows) Store jobs on the printer for private or delayed printing. NOTE: The print driver might look different than what is shown here, but the steps are the same. 1. From the software program, select the Print option. 2. Select the - HP LaserJet Enterprise MFP M633 | User Guide - Page 77
3. Click the Job Storage tab. 4. Select a Job Storage Mode option. ● Proof and Hold: Print and proof one copy of a job, and then print more copies. ● Personal Job: The job does not print until you request it at the printer control panel. For this jobstorage mode, you can select one of the Make Job - HP LaserJet Enterprise MFP M633 | User Guide - Page 78
or delayed printing. 1. Click the File menu, and then click the Print option. 2. In the Printer menu, select the printer. 3. By default, the print driver displays the Copies & Pages menu. Open the menus drop-down list, and then click the Job Storage menu. 4. In the Mode drop-down list, select - HP LaserJet Enterprise MFP M633 | User Guide - Page 79
Settings menu. 2. Open the following menus: ● Copy/Print or Print ● Manage Stored Jobs ● Temporary Job Storage Limit 3. Use the keypad to enter the purposes Printing jobs sent from drivers on the client (e.g., PC) may send personally identifiable information to HP's Printing and Imaging devices. - HP LaserJet Enterprise MFP M633 | User Guide - Page 80
Wireless Direct Print and NFC (Near Field Communication) printing for printers with a supported HP Jetdirect 3000w NFC/Wireless Accessory. This accessory is available as an option for HP LaserJet printers that include a hardware-integration pocket (HIP). Wireless Direct Print and NFC printing - HP LaserJet Enterprise MFP M633 | User Guide - Page 81
must be enabled on the printer, and the printer must be registered with HP Connected. Follow this procedure to enable HP Web Services and register with HP Connected: 1. Open the HP Embedded Web Server (EWS): a. From the Home screen on the printer control panel, touch the Information icon, and - HP LaserJet Enterprise MFP M633 | User Guide - Page 82
select the arrow next to PDF (in the bottom left of the driver screen). Select HP ePrint. For Windows, the HP ePrint software supports TCP/IP printing to local network printers on the network (LAN or the Google Play > Android apps and install the HP Print Service Plugin. 68 Chapter 4 Print ENWW - HP LaserJet Enterprise MFP M633 | User Guide - Page 83
For more information on how to use Android embedded printing and which Android devices are supported, go to www.hp.com/go/LaserJetMobilePrinting. ENWW Mobile printing 69 - HP LaserJet Enterprise MFP M633 | User Guide - Page 84
The printer accepts standard USB flash drives in the USB port near the control panel. It supports the following types of files: ● .pdf ● .prn ● .pcl ● .ps two: Enable the USB port from the HP Embedded Web server (network-connected printers only) 1. Open the HP Embedded Web Server (EWS): a. From the - HP LaserJet Enterprise MFP M633 | User Guide - Page 85
4. Select the Enable Retrieve from USB check box. 5. Click Apply. Print USB documents 1. Insert the USB flash drive into the easy-access USB port. NOTE: The port might be covered. For some printers, the cover flips open. For other printers, pull the cover straight out to remove it. 2. From the Home - HP LaserJet Enterprise MFP M633 | User Guide - Page 86
72 Chapter 4 Print ENWW - HP LaserJet Enterprise MFP M633 | User Guide - Page 87
.com/ support/ljM631MFP, www.hp.com/support/ljM632MFP, or www.hp.com/support/ljM633MFP. HP's all-inclusive help for the printer includes the following information: ● Install and configure ● Learn and use ● Solve problems ● Download software and firmware updates ● Join support forums ● Find warranty - HP LaserJet Enterprise MFP M633 | User Guide - Page 88
Make a copy 1. Place the document face-down on the scanner glass, or place it face-up in the document feeder and adjust the paper guides to fit the size of the document. 2. From the Home screen on the printer control panel, select Copy. 3. In the Options pane, select the number - HP LaserJet Enterprise MFP M633 | User Guide - Page 89
Use this button to add a page to the document. The printer prompts to scan additional pages. Use this button to clear the changes made in the preview and start over. Touch this button to collapse the preview screen and return to the Copy screen. 7. When the document is ready, touch Start to begin - HP LaserJet Enterprise MFP M633 | User Guide - Page 90
both sides (duplex) 1. Place the document face-down on the scanner glass, or place it face-up in the document feeder and adjust the paper guides to fit the size of the document. 2. From the Home screen on the printer control panel, select Copy. 3. In the Options pane, select Sides. 4. Select - HP LaserJet Enterprise MFP M633 | User Guide - Page 91
Use these buttons to zoom in or out on the selected page. NOTE: Select only one page at a time to use these buttons. Use this button to rotate the page 180 degrees. NOTE: This button is available only in the thumbnail view. Use this button to delete the selected pages. NOTE: This button is available - HP LaserJet Enterprise MFP M633 | User Guide - Page 92
following settings are available in the Options list when copying. NOTE: The following list contains the master set of options available for HP LaserJet Enterprise MFP printers. Some options are not available on all printers. Number of Copies Specify the number of copies to make. Load and Save - HP LaserJet Enterprise MFP M633 | User Guide - Page 93
Paper Path Select a specific paper path: For printers that have an option to flip pages inside the paper path. Face-up (straightest path): Pages output to the bin in the opposite order that they were placed in the document feeder. Face-down (correct order): Pages are stacked in the same order as - HP LaserJet Enterprise MFP M633 | User Guide - Page 94
Additional copy tasks Go to www.hp.com/support/ljM631MFP, www.hp.com/support/ljM632MFP, or www.hp.com/support/ ljM633MFP. Instructions are available for performing specific copy tasks, such as the following: ● Copy or scan pages from books or other bound documents ● Copy mixed-size documents ● - HP LaserJet Enterprise MFP M633 | User Guide - Page 95
.com/ support/ljM631MFP, www.hp.com/support/ljM632MFP, or www.hp.com/support/ljM633MFP. HP's all-inclusive help for the printer includes the following information: ● Install and configure ● Learn and use ● Solve problems ● Download software and firmware updates ● Join support forums ● Find warranty - HP LaserJet Enterprise MFP M633 | User Guide - Page 96
, SMTP port number, or authentication information, contact the email/Internet service provider or system administrator for the information. SMTP server names and your account if you exceed your sending limit. Step one: Access the HP Embedded Web Server (EWS) 1. From the Home screen on the printer - HP LaserJet Enterprise MFP M633 | User Guide - Page 97
2. Open a web browser, and in the address line, type the IP address or host name exactly as it displays on the printer control panel. Press the Enter key on the computer keyboard. The EWS opens. NOTE: If the web browser displays a message indicating that accessing the website might not be safe, - HP LaserJet Enterprise MFP M633 | User Guide - Page 98
configuration using the Email Setup Method one: Basic configuration using the Email Setup Wizard This option opens the Email Setup Wizard in the HP Embedded Web Server (EWS) for basic configuration. 1. Using the EWS top navigation tabs, click Scan/Digital Send. 2. In the left-navigation pane, click - HP LaserJet Enterprise MFP M633 | User Guide - Page 99
3. In the Email and Scan to Network Folder Quick Setup Wizards dialog, click the Email Setup link. NOTE: If a message displays indicating that the Scan to Email feature is disabled, click Continue to proceed with the configuration and enable the Scan to Email feature upon completion. 4. On the - HP LaserJet Enterprise MFP M633 | User Guide - Page 100
cases, the default port number does not need to be changed. NOTE: If you are using a hosted SMTP service such as Gmail, verify the SMTP address, port number, and SSL settings from the service provider's website or other sources. Typically, for Gmail, the SMTP address is smtp.gmail.com, port number - HP LaserJet Enterprise MFP M633 | User Guide - Page 101
Option Subject (Optional) Message (Optional) Description Provide a default subject line for the email messages. Create a custom message. To use this message for all emails sent from the printer, clear the User editable check box for Message. 6. In the Configure File Scan Settings area, set the - HP LaserJet Enterprise MFP M633 | User Guide - Page 102
Method two: Advanced configuration using the Email Setup 1. Using the EWS top navigation tabs, click Scan/Digital Send, and then click Email Setup in the left navigation pane. NOTE: By default, the Email Setup page displays the basic settings for Scan to Email setup. To access additional settings, - HP LaserJet Enterprise MFP M633 | User Guide - Page 103
problems can be prevented by entering a number in Split emails if larger than (MB). NOTE: In most cases, the default port number does not need to be changed. However, when using the Enable SMTP SSL Protocol option, port 587 must be used. NOTE: If you are using Google™ Gmail for email service - HP LaserJet Enterprise MFP M633 | User Guide - Page 104
Field Restrictions1 Specify whether users must select an email address from an address book or whether users are allowed to enter in an email address manually. CAUTION: If Users must select from address book is selected, and any of the address fields are also set as User editable, changes to those - HP LaserJet Enterprise MFP M633 | User Guide - Page 105
Feature Attribute for Recipient Public Key Use the recipient public key certificate to verify the recipient Description Enter which attribute to use to retrieve the recipient's public key certificate from LDAP. Select this setting to use the recipient's public key certificate to verify the - HP LaserJet Enterprise MFP M633 | User Guide - Page 106
Feature Description Add numbering when job has Select this setting to add numbering to a file name when the job is only one file instead of multiple just one file (ex. _1-1)1 files. File Type Select the file format for the saved file. Select the User editable check box to make this setting - HP LaserJet Enterprise MFP M633 | User Guide - Page 107
Step five: Set up Send to Email to use Office 365 Outlook (optional) Introduction Microsoft Office 365 Outlook is a cloud-based email system provided by Microsoft which uses Microsoft's Simple Mail Transfer Protocol (SMTP) server to send or receive emails. Complete the following to enable the - HP LaserJet Enterprise MFP M633 | User Guide - Page 108
necessary to connect to the server dialog, in the Port Number field, type 587. NOTE: Some servers have problems sending or receiving emails that are larger than 5 megabytes (MB). These problems can be prevented by entering a number in Split emails if larger than (MB). 12. Select the Enable SMTP - HP LaserJet Enterprise MFP M633 | User Guide - Page 109
Introduction ● Before you begin ● Step one: Access the HP Embedded Web Server ● Step two: Set up Scan to in this context refers to the computer where the shared folder resides. Step one: Access the HP Embedded Web Server 1. From the Home screen on the printer control panel, touch the Information - HP LaserJet Enterprise MFP M633 | User Guide - Page 110
: Set up Scan to Network Folder Method one: Use the Scan to Network Folder Wizard This option opens the setup wizard that is in the HP Embedded Web Server (EWS) for the printer. The setup wizard includes the options for basic configuration. NOTE: Before you begin: To display the printer's IP - HP LaserJet Enterprise MFP M633 | User Guide - Page 111
click Finish. Method two: Use Scan to Network Folder Setup This option enables advanced configuration of the Save to Network Folder feature using the HP Embedded Web Server (EWS) for the printer. NOTE: Before you begin: To display the printer's IP address or host name, touch the Information icon - HP LaserJet Enterprise MFP M633 | User Guide - Page 112
Step two: Configure the Scan to Network Folder settings 1. On the Scan to Network Folder Setup page, select the Enable Scan to Network Folder check box. If this box is not selected, the feature is unavailable at the printer control panel. 2. In the Scan to Network Folder area of the left navigation - HP LaserJet Enterprise MFP M633 | User Guide - Page 113
There are two types of folder permissions to select from: ● Read and write access ● Write access only The following information describes how to configure the folder settings. Configure the destination folder for scanned documents Option 1: Shared folders or FTP folders To save scanned documents to - HP LaserJet Enterprise MFP M633 | User Guide - Page 114
NOTE: For more information about creating shared network folders see Set up a shared folder (c04431534). 1. If it is not already selected, select Save to a standard shared network folder. 2. In the UNC Folder Path field, type a folder path. The folder path can either be the fully-qualified domain - HP LaserJet Enterprise MFP M633 | User Guide - Page 115
is no Domain Name Server (DNS). In this case, it is best to set up a static IP address on the shared PC to alleviate the problem of DHCP assigning a new IP address. On a typical home router, this is done by setting a static IP address that is on the same subnet, but - HP LaserJet Enterprise MFP M633 | User Guide - Page 116
documents to a folders configured for read and write access, complete the following steps: NOTE: Send only to folders with read and write access supports folder verification and job notification 1. If it is not already selected, select Send only to folders with read and write access. 2. To require - HP LaserJet Enterprise MFP M633 | User Guide - Page 117
to a folder configured for write access only, complete the following steps: NOTE: Allow sending to folders with write access only does not support folder verification or job notification NOTE: If this option is selected, the printer cannot increment the scan filename. It sends the same filename - HP LaserJet Enterprise MFP M633 | User Guide - Page 118
Dialog four: Scan Settings On the Scan Settings dialog, set the default scanning preferences for the Quick Set, and then click Next. Scan settings: Feature Original Size Original Sides Optimize Text/Picture Content Orientation Background Cleanup Darkness Contrast Sharpness Image Preview Cropping - HP LaserJet Enterprise MFP M633 | User Guide - Page 119
Feature Resolution Quality and File Size Color/Black Suppress blank pages Meta Data File Format Create Multiple Files Description Set the resolution for the file. Higher resolution images have more dots per inch (dpi), so they show more detail. Lower resolution images have fewer dots per inch and - HP LaserJet Enterprise MFP M633 | User Guide - Page 120
to USB Drive ● Introduction ● Step one: Access the HP Embedded Web Server ● Step two: Enable Scan to USB The feature is not available until it has been configured through the HP Embedded Web Server (EWS). Step one: Access the HP Embedded Web Server 1. From the Home screen on the printer control - HP LaserJet Enterprise MFP M633 | User Guide - Page 121
the Security tab. 2. Scroll to Hardware Ports and make sure that Enable Host USB plug and play is enabled. 3. Select the Copy/Print tab for MFP models or the Print tab for SFP models. 4. Select the Enable Save to USB check box. 5. Click Apply at the bottom of the page. NOTE - HP LaserJet Enterprise MFP M633 | User Guide - Page 122
6. Choose the Scan Settings for the Quick Set, and then click Next. NOTE: For more information on the available scan settings, see Default scan settings for Scan to USB Drive setup on page 108 7. Choose the File Settings for the Quick Set, and then click Next. NOTE: For more information on the - HP LaserJet Enterprise MFP M633 | User Guide - Page 123
Table 6-2 File settings for Save to USB Setup: (continued) Option name Description File Name Preview Enter a file name, and then click the Update Preview button. File Numbering Format Select a file name format for when the job is divided into multiple files. Add numbering when job has just - HP LaserJet Enterprise MFP M633 | User Guide - Page 124
drive, or email message, and then manually upload the files to the SharePoint site. Save to SharePoint® supports all scanning options, including the ability folder. Save to SharePoint® is disabled by default. Step one: Access the HP Embedded Web Server (EWS) 1. From the Home screen on the printer control - HP LaserJet Enterprise MFP M633 | User Guide - Page 125
Step two: Enable Save to SharePoint® and create a Save to SharePoint Quick Set Follow these steps to enable the feature Save to SharePoint feature and create a Save to SharePoint Quick Set: 1. Using the top navigation tabs, click Scan/Digital Send. 2. In the left navigation pane, click Save to - HP LaserJet Enterprise MFP M633 | User Guide - Page 126
NOTE: Use credentials of user to connect after Sign In at the control panel is selected in the Authentication Settings drop-down menu, the logged-in user must have permissions to write to the specified SharePoint site. NOTE: For security purposes, the printer does not display credentials entered in - HP LaserJet Enterprise MFP M633 | User Guide - Page 127
a Microsoft® SharePoint site 1. Place the document face-down on the scanner glass, or place it face-up in the document feeder and adjust the paper guides to fit the size of the document. 2. From the Home screen on the printer control panel, select Scan, and then select Scan to SharePoint®. NOTE - HP LaserJet Enterprise MFP M633 | User Guide - Page 128
Use this button to add a page to the document. The printer prompts to scan additional pages. Use this button to clear the changes made in the preview and start over. Touch this button to collapse the preview screen and return to the Copy screen. 7. Touch the Start button to save the file. Quick - HP LaserJet Enterprise MFP M633 | User Guide - Page 129
Table 6-4 File settings for Save to SharePoint (continued) Feature Description File Name Preview Enter a file name, and then click the Update Preview button. File Numbering Format Select a file name format for when the job is divided into multiple files. Add numbering when job has just one - HP LaserJet Enterprise MFP M633 | User Guide - Page 130
● Step one: Access the HP Embedded Web Server (EWS) ● Step two: Add and manage Quick Sets Introduction Quick Sets are to configure and save commonly used settings for saving jobs to a USB device. ● Copy (MFPs only) - Use Copy Quick Sets to configure and save commonly used settings for copy jobs. - HP LaserJet Enterprise MFP M633 | User Guide - Page 131
Step two: Add and manage Quick Sets Add a Quick Set Use the following steps to add a General EWS tab. ● Scan to Email ● Scan to Fax ● Scan to Network Folder ● Scan to USB Drive ● Copy (MFPs only) ● Save to SharePoint® (workflow printers only) 5. Enter a title for the Quick Set in the Quick Set Name - HP LaserJet Enterprise MFP M633 | User Guide - Page 132
7. Select a Quick Set Start Option to determine what occurs after selecting a Quick Set on the printer control panel, and then click Next. 8. Select settings and complete tasks in Quick Sets Setup. Click Next to proceed to the next page of available options until reaching the Summary page. NOTE: The - HP LaserJet Enterprise MFP M633 | User Guide - Page 133
● Quick Set Name ● Quick Set Description ● Quick Set Start Option 5. Select settings and complete tasks in Quick Sets Setup. Click Next to proceed to the next page of available options until reaching the Summary page. NOTE: The settings available in Quick Sets Setup vary by the type of Quick Set - HP LaserJet Enterprise MFP M633 | User Guide - Page 134
Table 6-5 Address and Message Field Control - Scan to Email Quick Sets (continued) Option Description To: Use these drop-down lists to set the email recipient, CC (carbon copy) and BCC (blind carbon copy) values. CC: The options for each of these fields are: BCC: ● User's address (sign-in - HP LaserJet Enterprise MFP M633 | User Guide - Page 135
Table 6-7 Scan settings - Scan to Email, Scan to Fax, Scan to Network Folder, Scan to SharePoint®, and Scan to USB Quick Sets (continued) Option Description Original Sides Select whether the original document is single-sided or double-sided. Optimize Text/Picture Optimize the job for the type - HP LaserJet Enterprise MFP M633 | User Guide - Page 136
only) Use the drop-down list to select the file format for meta-data information. The options for this field are: ● None ● XML ● HPS Create Multiple Files Select this setting to scan pages into separate files based on a predetermined maximum number of pages per file. Table 6-9 Copy settings - HP LaserJet Enterprise MFP M633 | User Guide - Page 137
printer automatically scales the image to fit the paper size in the tray. ● Manual: To reduce the image, type a scaling percentage that is less than 100 and select whether to Borders on each page. Collate For printers that support print-job finishing, each set of copied pages are assembled in the - HP LaserJet Enterprise MFP M633 | User Guide - Page 138
Adjust to increase or decrease the difference between the lightest and darkest color on the page ● Background Cleanup: Adjust if you are having trouble copying a faint image ● Sharpness: Adjust to sharpen or soften the image. For example, increasing the sharpness could make text look clearer, but - HP LaserJet Enterprise MFP M633 | User Guide - Page 139
email addresses. Before using this feature, use the HP Embedded Web Server to enable it and set it up in the document feeder and adjust the paper guides to fit the size of the document. 2. From recipients by using one of these methods: Enter addresses manually ▲ Enter the address in the To field. To - HP LaserJet Enterprise MFP M633 | User Guide - Page 140
Use these buttons to toggle between single-page view and thumbnail view. More options are available in thumbnail view than in single-page view. Use these buttons to zoom in or out on the selected page. NOTE: Select only one page at a time to use these buttons. Use this button to rotate the page 180 - HP LaserJet Enterprise MFP M633 | User Guide - Page 141
a shared folder on the network. Before using this feature, use the HP Embedded Web server to enable the feature and configure the shared folders. The glass, or place it face-up in the document feeder and adjust the paper guides to fit the size of the document. 2. From the Home screen on the printer - HP LaserJet Enterprise MFP M633 | User Guide - Page 142
Use these buttons to toggle between single-page view and thumbnail view. More options are available in thumbnail view than in single-page view. Use these buttons to zoom in or out on the selected page. NOTE: Select only one page at a time to use these buttons. Use this button to rotate the page 180 - HP LaserJet Enterprise MFP M633 | User Guide - Page 143
and save it on a USB flash drive. Before using this feature, use the HP Embedded Web server to enable and configure it. Scan and save the document to glass, or place it face-up in the document feeder and adjust the paper guides to fit the size of the document. 2. Insert the USB flash drive into - HP LaserJet Enterprise MFP M633 | User Guide - Page 144
Use these buttons to zoom in or out on the selected page. NOTE: Select only one page at a time to use these buttons. Use this button to rotate the page 180 degrees. NOTE: This button is available only in the thumbnail view. Use this button to delete the selected pages. NOTE: This button is available - HP LaserJet Enterprise MFP M633 | User Guide - Page 145
archival of electronic documents. All format information in the document is self-contained. HP LaserJet Enterprise Flow MFP printers or MFP printers that are connected to a digital send software (DSS) server also support the following OCR file types: ● Text (OCR): Text (OCR) creates a text file by - HP LaserJet Enterprise MFP M633 | User Guide - Page 146
Edges Cropping Options Automatically Straighten Blank Page Suppression Multi-feed Detection Create Multiple Files Notification Signing and Encryption NOTE: This feature is supported for scan to email only. Specify whether the scanned image will be in color, black and gray, or black only. Standard - HP LaserJet Enterprise MFP M633 | User Guide - Page 147
, including healthcare, financial services, manufacturing, and public sector, manage a fleet of printers and scanners. HP JetAdvantage Solutions include: ● HP JetAdvantage Security solutions ● HP JetAdvantage Management solutions ● HP JetAdvantage Workflow solutions ● HP JetAdvantage Mobile Printing - HP LaserJet Enterprise MFP M633 | User Guide - Page 148
Additional scan tasks Go to www.hp.com/support/ljM631MFP, www.hp.com/support/ljM632MFP, or www.hp.com/support/ ljM633MFP. Instructions are available for performing specific scan tasks, such as the following: ● Copy or scan pages from books or other bound documents ● Send a scanned document to a - HP LaserJet Enterprise MFP M633 | User Guide - Page 149
.com/ support/ljM631MFP, www.hp.com/support/ljM632MFP, or www.hp.com/support/ljM633MFP. HP's all-inclusive help for the printer includes the following information: ● Install and configure ● Learn and use ● Solve problems ● Download software and firmware updates ● Join support forums ● Find warranty - HP LaserJet Enterprise MFP M633 | User Guide - Page 150
to a phone line (for analog fax) or to an Internet or network fax service. Set up fax by using the printer control panel 1. From the Home screen enabled at a time. To use analog fax when LAN fax is enabled, use the HP Embedded Web Server to disable LAN fax. 3. Select the location from the list on the - HP LaserJet Enterprise MFP M633 | User Guide - Page 151
Change fax configurations NOTE: The settings configured using the control panel override any settings made in the HP Embedded Web Server. ● Fax dialing settings ● General fax send settings ● Fax receive settings Fax dialing settings 1. From the Home screen on the printer control panel, - HP LaserJet Enterprise MFP M633 | User Guide - Page 152
of the fax be sent again. The Error Correction Mode feature is enabled by default. You should turn it off only if you are having trouble sending or receiving a fax and if you are willing to accept the errors in the transmission and a probable quality reduction in the image. Turning off - HP LaserJet Enterprise MFP M633 | User Guide - Page 153
Description The Receive Mode setting determines how the fax accessory receives fax jobs. Select one of the following options: ● Automatic ● TAM ● Fax/Tel ● Manual The Rings to Answer setting determines the number of times the phone rings before the call is answered by the fax accessory. NOTE: The - HP LaserJet Enterprise MFP M633 | User Guide - Page 154
, or place it face-up in the document feeder and adjust the paper guides to fit the size of the document. 2. From the Home screen on password. 3. Specify the recipients by using one of these methods: Enter recipients manually ▲ Touch the Fax Recipients text field, and then use the keypad to enter - HP LaserJet Enterprise MFP M633 | User Guide - Page 155
Use this button to rotate the page 180 degrees. NOTE: This button is available only in the thumbnail view. Use this button to delete the selected pages. NOTE: This button is available only in the thumbnail view. Use these buttons to rearrange the pages within the document. Select one or more pages - HP LaserJet Enterprise MFP M633 | User Guide - Page 156
are available in the Options list when faxing. NOTE: The following list contains the master set of options available for HP LaserJet Enterprise MFP printers. Some options are not available on all printers. Original Sides Resolution Original Size Content Orientation Image Adjustment Optimize Text - HP LaserJet Enterprise MFP M633 | User Guide - Page 157
Additional fax tasks Go to www.hp.com/support/ljM631MFP, www.hp.com/support/ljM632MFP, or www.hp.com/support/ ljM633MFP. Instructions are available for performing specific fax tasks, such as the following: ● Create and manage fax speed dial lists ● Configure fax billing codes ● Use a fax printing - HP LaserJet Enterprise MFP M633 | User Guide - Page 158
144 Chapter 7 Fax ENWW - HP LaserJet Enterprise MFP M633 | User Guide - Page 159
.com/ support/ljM631MFP, www.hp.com/support/ljM632MFP, or www.hp.com/support/ljM633MFP. HP's all-inclusive help for the printer includes the following information: ● Install and configure ● Learn and use ● Solve problems ● Download software and firmware updates ● Join support forums ● Find warranty - HP LaserJet Enterprise MFP M633 | User Guide - Page 160
to access the HP Embedded Web Server (EWS) ● HP Embedded Web Server features Introduction Use the HP Embedded Web Server to manage printing functions from The HP Embedded Web Server works when the printer is connected to an IP-based network. The HP Embedded Web Server does not support IPX-based - HP LaserJet Enterprise MFP M633 | User Guide - Page 161
a list of all printer events and errors. Use the HP Instant Support link (in the page footer on all HP Embedded Web Server pages) to connect to a set of dynamic Web pages that help solve problems. These pages also show additional services available for the printer. ENWW Advanced configuration with - HP LaserJet Enterprise MFP M633 | User Guide - Page 162
the primary contact who will receive information about the printer. Set the language in which to display the HP Embedded Web Server information. Set the date and time or synchronize with a network time server. Set or printer cause it to wake from sleep mode. 148 Chapter 8 Manage the printer ENWW - HP LaserJet Enterprise MFP M633 | User Guide - Page 163
firmware upgrade files. Quota and Statistics Services Provides connection information about third-party job-statistics services. Copy/Print tab Table 8-3 HP Embedded Web Server Copy/Print tab Menu Description Print from USB Drive Settings Manage Stored Jobs Default Print Options Restrict - HP LaserJet Enterprise MFP M633 | User Guide - Page 164
● Default file settings for jobs saved on a USB flash drive Manage contacts, including the following: ● Add email addresses into the printer computer to use as a data backup, or import the records onto another HP printer. Email and Save to Network Folder Quick Setup Wizards Digital Sending Software - HP LaserJet Enterprise MFP M633 | User Guide - Page 165
● Settings for using a LAN fax service ● Settings for using an Internet fax service Manage speed dials, including the following: Fax Receive problems with the printer. Configure settings for Fax, OXPd, and Auto Recovery. Link to HP cloud-based online help to assist in troubleshooting printing - HP LaserJet Enterprise MFP M633 | User Guide - Page 166
HP Web Services tab Use the HP Web Services tab to configure and enable HP Web Services for this printer. It is necessary to Enable HP Web Services to use the HP ePrint feature. Table 8-8 HP Embedded Web Server HP Web Services tab Menu Description Web Services Setup Connect this printer to HP - HP LaserJet Enterprise MFP M633 | User Guide - Page 167
print server model. Other Settings Configure general printing protocols and services supported by the print server. The available options depend on the to configuration parameters. ● Request, install, and manage digital certificates on the HP Jetdirect print server. ● Limit host access to - HP LaserJet Enterprise MFP M633 | User Guide - Page 168
search for help on various topics. Shop for Supplies Connect to the HP SureSupply website for information on purchasing original HP supplies, such as cartridges and paper. HP Instant Support Connect to the HP website to find solutions to printer problems. 154 Chapter 8 Manage the printer ENWW - HP LaserJet Enterprise MFP M633 | User Guide - Page 169
control panel ● Manually configure IPv6 TCP/IP parameters from the control panel ● Link speed and duplex settings Printer sharing disclaimer HP does not support peer-to-peer networking, as the feature is a function of Microsoft operating systems and not of the HP printer drivers. Go to Microsoft - HP LaserJet Enterprise MFP M633 | User Guide - Page 170
Manually configure IPv4 TCP/IP parameters from the control panel Use the control-panel Settings menus to manually Manual option, and then touch the Save button. 4. Open the Manual Settings . 2. To enable manual configuration, open the following . 4. Select the Enable Manual Settings option, and then - HP LaserJet Enterprise MFP M633 | User Guide - Page 171
6. Use the keypad to enter the address, and then touch the OK button. 7. Touch Save. Link speed and duplex settings NOTE: This information applies only to Ethernet networks. It does not apply to wireless networks. The link speed and communication mode of the print server must match the network hub. - HP LaserJet Enterprise MFP M633 | User Guide - Page 172
support: HP High Performance Secure Hard Disks Security statements The printer supports the HP Embedded Web Server so that unauthorized users cannot change the printer settings. 1. Open the HP Embedded contact HP Support at support.hp.com for the assistance required to completely reset - HP LaserJet Enterprise MFP M633 | User Guide - Page 173
a slot that you can use to attach a security cable. Locking the formatter prevents someone from removing valuable components from it. Encryption support: HP High Performance Secure Hard Disks The hard disk provides hardware-based encryption so you can securely store sensitive data without impacting - HP LaserJet Enterprise MFP M633 | User Guide - Page 174
EconoMode can use less toner. However, using EconoMode can also reduce print quality. HP does not recommend the full toner cartridge. NOTE: If this option is not available in the print driver, set it using the printer control panel. Configure EconoMode from the print driver Manage the printer ENWW - HP LaserJet Enterprise MFP M633 | User Guide - Page 175
● General Settings ● Energy Settings ● Sleep Settings 3. Select Sleep after Inactivity to specify the number of minutes the printer is inactive before it enters sleep mode. Enter the appropriate time period. NOTE: The sleep-mode default time is 0 minutes. Zero (0) indicates that the printer will go - HP LaserJet Enterprise MFP M633 | User Guide - Page 176
-winning, industry-leading tool for efficiently managing a wide variety of networked HP products, including printers, multifunction printers, and digital senders. This single solution allows you to remotely install, monitor, maintain, troubleshoot, and secure your printing and imaging environment - HP LaserJet Enterprise MFP M633 | User Guide - Page 177
take advantage of the most current features, update the printer firmware. Download the most recent firmware update file from the Web: Go to www.hp.com/support/ljM631MFP, www.hp.com/support/ljM632MFP, or www.hp.com/support/ ljM633MFP. Click Drivers & Software. ENWW Software and firmware updates 163 - HP LaserJet Enterprise MFP M633 | User Guide - Page 178
164 Chapter 8 Manage the printer ENWW - HP LaserJet Enterprise MFP M633 | User Guide - Page 179
. For current information, see www.hp.com/ support/ljM631MFP, www.hp.com/support/ljM632MFP, or www.hp.com/support/ljM633MFP. HP's all-inclusive help for the printer includes the following information: ● Install and configure ● Learn and use ● Solve problems ● Download software and firmware updates - HP LaserJet Enterprise MFP M633 | User Guide - Page 180
for your country/region Have the printer name, serial number, date of purchase, and problem description ready Get 24-hour Internet support, and download software utilities and drivers Order additional HP service or maintenance agreements Register the printer Country/region phone numbers are on the - HP LaserJet Enterprise MFP M633 | User Guide - Page 181
procedures, such as clearing paper jams. If the printer alerts of an error or warning, touch the Help button to open a message that describes the problem. The message also contains instructions to help solve the problem. ENWW Control panel help system 167 - HP LaserJet Enterprise MFP M633 | User Guide - Page 182
operation completes. Method two: Restore factory settings from the HP Embedded Web Server (networkconnected printers only) 1. Open the HP Embedded Web Server (EWS): a. From the Home screen on The printer restarts automatically after the reset operation completes. 168 Chapter 9 Solve problems ENWW - HP LaserJet Enterprise MFP M633 | User Guide - Page 183
instructions. Reinsert the toner cartridge into the printer and close the cover. Cartridge is very low: The printer indicates when the toner cartridge level is very low. Actual toner . Once an HP toner cartridge has reached Very Low, HP's Premium Protection Warranty on that toner cartridge has ended - HP LaserJet Enterprise MFP M633 | User Guide - Page 184
service or support provider. To access, in a supported web browser on your computer, enter the printer IP address or host name in the address/URL field. The EWS contains a link to the HP SureSupply web site, which provides options for purchasing Original HP supplies. 170 Chapter 9 Solve problems - HP LaserJet Enterprise MFP M633 | User Guide - Page 185
Printer does not pick up paper or misfeeds Introduction The following solutions can help solve problems if the printer is not picking up paper from the tray or is picking up multiple sheets of paper at one time. Either of these - HP LaserJet Enterprise MFP M633 | User Guide - Page 186
tray. NOTE: Do not adjust the paper guides tightly against the paper stack. Adjust them to the indentations or markings in the tray. The following images show examples of the paper-size indentations in the trays for various printers. Most HP printers have markings similar to these. Figure 9-1 Size - HP LaserJet Enterprise MFP M633 | User Guide - Page 187
Figure 9-3 Technique for flexing the paper stack 1 2 6. Check the printer control panel to see if it is displaying a prompt to feed the paper manually. Load paper, and continue. 7. The rollers above the tray might be contaminated. Clean the rollers with a lint-free cloth dampened with warm water - HP LaserJet Enterprise MFP M633 | User Guide - Page 188
the tray. Figure 9-5 Technique for flexing the paper stack 1 2 2. Use only paper that meets HP specifications for this printer. 3. Verify that the humidity in the room is within specifications for this damaged. If necessary, use paper from a different package. 174 Chapter 9 Solve problems ENWW - HP LaserJet Enterprise MFP M633 | User Guide - Page 189
return some of the paper to the tray. The following images show examples of the stack-height markings in the trays for various printers. Most HP printers have markings similar to these. Also make sure that all sheets of paper are below the tabs near the stack-height marks. These tabs - HP LaserJet Enterprise MFP M633 | User Guide - Page 190
tray. NOTE: Do not adjust the paper guides tightly against the paper stack. Adjust them to the indentations or markings in the tray. The following images show examples of the paper-size indentations in the trays for various printers. Most HP printers have markings similar to these. Figure 9-8 Size - HP LaserJet Enterprise MFP M633 | User Guide - Page 191
picks up multiple sheets of paper NOTE: This information applies to MFP printers only. ● The original might have something on it, such more than the maximum number of pages. Make sure the paper stack fits below the guides in the input tray, and remove pages from the output bin. ● Verify that there - HP LaserJet Enterprise MFP M633 | User Guide - Page 192
Clear paper jams Introduction The following information includes instructions for clearing paper jams from the printer. ● Paper jam locations ● Auto- Clear paper jams in the envelope feeder ● Clear paper jams in the HP Stapling Mailbox ● Clear staple jams 178 Chapter 9 Solve problems ENWW - HP LaserJet Enterprise MFP M633 | User Guide - Page 193
Paper jam locations 1 2 1 3 2 4 6 1 Document feeder 2 Duplexer and fuser 3 Tray 1 4 Output bin, HP Stapling Mailbox 5 2,100-sheet HCI feeder 6 Trays 2-5 Envelope feeder (not shown) 2 3 3 5 ENWW Clear paper jams 179 - HP LaserJet Enterprise MFP M633 | User Guide - Page 194
instructions on the control panel. When you complete a step, the printer displays instructions HP guides so they are touching the paper stack without bending it. 6. Make sure that the tray is fully inserted in the printer. 7. If you are printing on heavy, embossed, or perforated paper, use the manual - HP LaserJet Enterprise MFP M633 | User Guide - Page 195
Clear paper jams in the document feeder The following information describes how to clear paper jams in the document feeder. When a jam occurs, the control panel displays the following message and an animation that assists in clearing the jam. ● 31.13.XX Jam in Document Feeder 1. Lift the latch to - HP LaserJet Enterprise MFP M633 | User Guide - Page 196
paper. 4. Close the document-feeder cover. 1 NOTE: To avoid jams, make sure the guides in the document-feeder input tray are adjusted tightly against the document. Remove all staples and paper jam more frequently than originals that are printed on plain paper. 182 Chapter 9 Solve problems ENWW - HP LaserJet Enterprise MFP M633 | User Guide - Page 197
Clear paper jams in Tray 1 The following information describes how to clear a paper jam in Tray 1. When a jam occurs, the control panel displays the following message and an animation that assists in clearing the jam. ● 13.A1.XX Jam in Tray 1 1. If jammed paper is visible in Tray 1, clear the jam by - HP LaserJet Enterprise MFP M633 | User Guide - Page 198
3. Gently pull out any jammed paper. 4. Close the right door. 2 1 2 184 Chapter 9 Solve problems ENWW - HP LaserJet Enterprise MFP M633 | User Guide - Page 199
Clear paper jams in Trays 2, 3, 4, or 5 The following information describes how to clear a paper jam in Trays 2, 3, 4, or 5. When a jam occurs, the control panel displays one of the following messages and an animation that assists in clearing the jam. ● 13.A2.XX Jam in Tray 2 ● 13.A3.XX Jam in Tray - HP LaserJet Enterprise MFP M633 | User Guide - Page 200
3. Remove any paper from the feed rollers inside the printer. 4. Reinsert and close the tray. 5. Open the right door. 1 2 186 Chapter 9 Solve problems ENWW - HP LaserJet Enterprise MFP M633 | User Guide - Page 201
6. Remove any jammed paper. 2 7. Remove the fuser by grabbing the two side latches and pulling the fuser straight out of the printer. CAUTION: The fuser can be hot while the printer is in use. Wait for the fuser to cool before handling it. 8. Remove any jammed paper from the fuser opening. ENWW - HP LaserJet Enterprise MFP M633 | User Guide - Page 202
jam. ● 13.AY.XX Jam in Tray Y, where Y equals the tray number assigned to the HCI ● 13.FF.EE Door Open Jam 188 Chapter 9 Solve problems ENWW - HP LaserJet Enterprise MFP M633 | User Guide - Page 203
1. Open the 2,100-sheet high-capacity input tray. 2. Remove and discard any damaged sheets. 3. Remove the paper from the tray. ENWW Clear paper jams 189 - HP LaserJet Enterprise MFP M633 | User Guide - Page 204
4. Lift the tray up and then pull it straight out to remove it. 5. If jammed paper is in the feed area, pull it down to remove it. 190 Chapter 9 Solve problems ENWW - HP LaserJet Enterprise MFP M633 | User Guide - Page 205
6. Reinstall the tray, and then load full reams of paper into the tray. The tray holds 2,100 sheets of paper. NOTE: For best results, load full reams of paper. Avoid dividing reams into smaller sections. 7. Close the tray. ENWW Clear paper jams 191 - HP LaserJet Enterprise MFP M633 | User Guide - Page 206
the printer is in use. Wait for the fuser to cool before clearing jams. 1. Open the right door. 1 2 2. Remove any jammed paper. 2 192 Chapter 9 Solve problems ENWW - HP LaserJet Enterprise MFP M633 | User Guide - Page 207
3. Remove the fuser by grabbing the two side latches and pulling the fuser straight out of the printer. CAUTION: The fuser can be hot while the printer is in use. Wait for the fuser to cool before handling it. 4. Remove any jammed paper from the fuser opening. ENWW Clear paper jams 193 - HP LaserJet Enterprise MFP M633 | User Guide - Page 208
5. Reinstall the fuser. 6. Close the right door. 1 2 194 Chapter 9 Solve problems ENWW - HP LaserJet Enterprise MFP M633 | User Guide - Page 209
Clear paper jams in the output bin The following information describes how to clear a paper jam in the output bin. When a jam occurs, the control panel displays the following message and an animation that assists in clearing the jam. ● 13.E1.XX Jam at Standard Output Bin 1. If paper is visible in - HP LaserJet Enterprise MFP M633 | User Guide - Page 210
messages and an animation that assists in clearing the jam. ● 13.A3.XX Jam in Tray 3 ● 13.A4.XX Jam in Tray 4 196 Chapter 9 Solve problems ENWW - HP LaserJet Enterprise MFP M633 | User Guide - Page 211
1. Pull the tray completely out of the printer by pulling and lifting it up slightly. 2. Remove any jammed or damaged envelopes from the tray. ENWW Clear paper jams 197 - HP LaserJet Enterprise MFP M633 | User Guide - Page 212
a paper jam in the HP Stapling Mailbox. When a jam occurs, the control panel displays one of the following error messages and an animation that assists in clearing the jam. ● 13.E1.XX Jam at Standard Output Bin ● 13.70.XX MBM Jam ● 13.8X Stapler/Stacker Jam 198 Chapter 9 Solve problems ENWW - HP LaserJet Enterprise MFP M633 | User Guide - Page 213
1. Remove any jammed paper from the HP Stapling Mailbox bins. 2. Open the jam-access door on the back side of the HP Stapling Mailbox. If jammed paper is visible inside the jam-access door, pull it straight out to remove it. 3. Close the HP Stapling Mailbox jam access door. ENWW Clear paper jams - HP LaserJet Enterprise MFP M633 | User Guide - Page 214
Clear staple jams The following information describes how to clear a staple jam in the HP Stapling Mailbox. When a jam occurs, the control panel displays an animation that assists in clearing the staple cartridge, and then pull the staple cartridge straight out. 2 200 Chapter 9 Solve problems ENWW - HP LaserJet Enterprise MFP M633 | User Guide - Page 215
3. Lift up on the small lever at the back of the staple cartridge. 4. Remove the jammed staples. 5. Close the lever at the back of the staple cartridge. Be sure that it snaps into place. ENWW Clear paper jams 201 - HP LaserJet Enterprise MFP M633 | User Guide - Page 216
6. Insert the staple cartridge into the stapler and push on the colored handle until it snaps into place. 2 7. Close the stapler door. 202 Chapter 9 Solve problems ENWW - HP LaserJet Enterprise MFP M633 | User Guide - Page 217
status ● Print a cleaning page ● Visually inspect the toner cartridge ● Check paper and the printing environment ● Try a different print driver ● Check the EconoMode settings ● Adjust print density If the printer is having print-quality problems, try the following solutions in the order presented to - HP LaserJet Enterprise MFP M633 | User Guide - Page 218
the printer. 3. By default, the print driver displays the Copies & Pages menu. Open the problems can occur when using a toner cartridge that is at its estimated end of life. The supplies status page indicates when a supply level is very low. After an HP supply has reached the very low threshold, HP - HP LaserJet Enterprise MFP M633 | User Guide - Page 219
Visually inspect the toner cartridge Follow these steps to inspect each toner cartridge. 1. Remove the toner cartridges from the HP specifications Some print-quality problems arise from using paper that does not meet HP specifications. ● Always use a paper type and weight that this printer supports - HP LaserJet Enterprise MFP M633 | User Guide - Page 220
then follow the instructions on the printed drivers from the HP Web site: www.hp.com/support/ljM631MFP, www.hp.com/ support/ljM632MFP, or www.hp.com/support/ljM633MFP. HP PCL.6 driver HP PCL 6 driver HP PCL-6 driver HP UPD PS driver ● Provided as the default driver on the printer CD. This driver - HP LaserJet Enterprise MFP M633 | User Guide - Page 221
PCL versions and older HP LaserJet printers ● The best choice print quality, and printer feature support for most users ● Developed to toner cartridge. NOTE: This feature is available with the PCL 6 print driver for Windows. If you are not using that driver, you can enable the feature by using the HP - HP LaserJet Enterprise MFP M633 | User Guide - Page 222
1. From the Home screen on the printer control panel, select the Settings menu. 2. Open the following menus: ● Copy/Print or Print ● Print Quality ● Toner Density 3. Move the slider toward either Less or More to the desired density setting. 208 Chapter 9 Solve problems ENWW - HP LaserJet Enterprise MFP M633 | User Guide - Page 223
Image defects table Table 9-1 Image defects table quick reference Table 9-2 Light print on page 211 Table 9-3 Gray background or dark print on page 211 Table 9-4 Blank page - No print on page 212 Table 9-5 Black page on page 212 Table 9-6 Banding defects on page 213 Table 9-7 Streak defects - HP LaserJet Enterprise MFP M633 | User Guide - Page 224
the cartridge. 3. Make sure that the driver and tray print mode settings match the supported by the printer. See the printer support page at support.hp.com for a list of the supported paper sizes and types for the printer. NOTE: The term "fusing" refers to the part of the printing process where toner - HP LaserJet Enterprise MFP M633 | User Guide - Page 225
panel, go to the Adjust Toner Density menu, and then adjust the toner density to a lower level. 5. Make sure that the printer is in within the supported operating temperature and humidity range. 6. Replace the cartridge. 7. If the problem persists, go to support.hp.com. ENWW Image defects table - HP LaserJet Enterprise MFP M633 | User Guide - Page 226
type in the paper tray and adjust the printer settings to match. If necessary, select a lighter paper type. 5. If the problem persists, go to support.hp.com. Possible solutions 1. Visually inspect the cartridge to check for damage. 2. Make sure that the cartridge is installed correctly. 3. Replace - HP LaserJet Enterprise MFP M633 | User Guide - Page 227
.com. Possible solutions 1. Reprint the document. 2. Remove the cartridge, and then shake it to redistribute the toner. 3. If the problem persists, go to support.hp.com. NOTE: Both light and dark vertical streaks can occur when the printing environment is outside the specified range for temperature - HP LaserJet Enterprise MFP M633 | User Guide - Page 228
recurrence. Fixing/fuser Poor fusing: Toner rubs off along either edge of guides are adjusted to the correct size for the paper. Do not adjust the paper guides tightly against the paper stack. Adjust them to the indentations or markings in the tray. 5. If the problem persists, go to support.hp - HP LaserJet Enterprise MFP M633 | User Guide - Page 229
freshly opened paper. 3. Print in duplex mode. 4. If the problem persists, go to support.hp.com. 1. Reprint the document. 2. Extend the output bin extension. 3. If the defect is caused by extreme paper curl, complete the troubleshooting steps for Output curl. 4. Use a different paper type. 5. Use - HP LaserJet Enterprise MFP M633 | User Guide - Page 230
feeder, load the original document into the feeder correctly, using the paper guides, to avoid unclear or skewed images. If the problem still exists, try these additional solutions. If they do not fix the problem, see "Improve print quality" for further solutions. Check the scanner glass for - HP LaserJet Enterprise MFP M633 | User Guide - Page 231
platen. They might seep and damage the printer. NOTE: If you are having trouble with streaks on copies when you are using the document feeder, be sure to . NOTE: When using the document feeder, make sure to adjust the guides in the input tray so they are against the original document. 1. From the - HP LaserJet Enterprise MFP M633 | User Guide - Page 232
steps if copied pages have smears, fuzzy or dark print, curled paper, scattered dots of toner, loose toner, or areas where toner has dropped out. Check the paper size and type configuration 1. From the Home screen on in relation to the other pages, the resulting 218 Chapter 9 Solve problems ENWW - HP LaserJet Enterprise MFP M633 | User Guide - Page 233
scanned image has all pages right-side-up. If some of the pages have a landscape orientation, the printer rotates the image so that the top of the page is at the top of the image. 1. From the Home screen on the printer control panel, select Copy. 2. In the Options list, scroll to and select Image - HP LaserJet Enterprise MFP M633 | User Guide - Page 234
feeder, load the original document into the feeder correctly, using the paper guides, to avoid unclear or skewed images. If the problem still exists, try these additional solutions. If they do not fix the problem, see "Improve print quality" for further solutions. Check the scanner glass for - HP LaserJet Enterprise MFP M633 | User Guide - Page 235
damage the printer. Do not place liquids directly on the glass or platen. They might seep and damage the printer. NOTE: If you are having trouble with streaks on copies when you are using the document feeder, be sure to clean the small strip of glass on the left side of - HP LaserJet Enterprise MFP M633 | User Guide - Page 236
. Optimize scan quality for text or pictures Optimize the scan job for the type of image being scanned: text, graphics, or photos. 222 Chapter 9 Solve problems ENWW - HP LaserJet Enterprise MFP M633 | User Guide - Page 237
1. From the Home screen on the printer control panel, select Scan. 2. Select one of the following Scan features: ● Save to Device Memory ● Scan to E-mail ● Scan to Network Folder ● Scan to USB ● Scan to SharePoint® 3. Touch the Options button. 4. In the Options pane, scroll to and select Optimize - HP LaserJet Enterprise MFP M633 | User Guide - Page 238
feeder, load the original document into the feeder correctly, using the paper guides, to avoid unclear or skewed images. If the problem still exists, try these additional solutions. If they do not fix the problem, see "Improve print quality" for further solutions. Check the scanner glass for - HP LaserJet Enterprise MFP M633 | User Guide - Page 239
damage the printer. Do not place liquids directly on the glass or platen. They might seep and damage the printer. NOTE: If you are having trouble with streaks on copies when you are using the document feeder, be sure to clean the small strip of glass on the left side of - HP LaserJet Enterprise MFP M633 | User Guide - Page 240
-correction settings The Error Correction Mode setting might be disabled, which can reduce image quality. Follow these steps to reenable the setting. 226 Chapter 9 Solve problems ENWW - HP LaserJet Enterprise MFP M633 | User Guide - Page 241
supplies status. Check the sender's fax machine Ask the sender to try sending from a different fax machine. If the fax quality is better, the problem is with the sender's fax machine. If a different fax machine is unavailable, ask the sender to consider making the following changes: ● Make sure the - HP LaserJet Enterprise MFP M633 | User Guide - Page 242
compatibility problems ● The computer or workstation might be set up incorrectly ● The printer is disabled, or other network settings are incorrect NOTE: HP does not support peer-to-peer networking, as the feature is a function of Microsoft operating systems and not of the HP print drivers. For - HP LaserJet Enterprise MFP M633 | User Guide - Page 243
The printer is using incorrect link and duplex settings for the network HP recommends leaving these settings in automatic mode (the default setting). If causing compatibility problems Verify that any new software programs are correctly installed and that they use the correct print driver. The - HP LaserJet Enterprise MFP M633 | User Guide - Page 244
problems troubleshooting information to help resolve issues. NOTE: To determine whether HP the printer is turned on. ● Verify that the service set identifier (SSID) is correct. Print a configuration page printer. Make sure poles, walls, or support columns containing metal or concrete do not separate - HP LaserJet Enterprise MFP M633 | User Guide - Page 245
driver is installed on the computer. ● Verify that you have selected the correct printer port. ● Verify that the computer and printer connect to the same wireless network. ● For OS X, verify that the wireless router supports the printer HP Embedded Web Compare the service set identifier problems 231 - HP LaserJet Enterprise MFP M633 | User Guide - Page 246
to the same network that the computer connects to. a. Print a configuration page. b. Compare the service set identifier (SSID) on the configuration report to the SSID in the printer configuration for the computer. with the wireless printers on the network. 232 Chapter 9 Solve problems ENWW - HP LaserJet Enterprise MFP M633 | User Guide - Page 247
directly to the phone jack on the wall to determine whether the problem is with the surge-protection device. Are you using a phone company voice-messaging service or an answering machine? If the rings-to-answer setting for the messaging service is lower than the rings-to-answer setting for the fax - HP LaserJet Enterprise MFP M633 | User Guide - Page 248
If the Fax Accessory Page does not print, there might be a problem with the analog fax accessory. If you are using LAN fax or fax settings yet. The fax accessory is installed and operational; however, the HP Digital Sending utility has either disabled the printer fax feature or has enabled LAN - HP LaserJet Enterprise MFP M633 | User Guide - Page 249
The following are some common fax problems. The fax failed to send JBIG is enabled, and the list have fax information associated with them. Not able to locate the Fax settings in HP Web Jetadmin Fax settings in HP Web Jetadmin are located under the device's status page drop-down menu. Select Digital - HP LaserJet Enterprise MFP M633 | User Guide - Page 250
The volume setting needs to be adjusted. Adjust the volume in the Fax Send Settings menu and the Fax Receive Settings menu. 236 Chapter 9 Solve problems ENWW - HP LaserJet Enterprise MFP M633 | User Guide - Page 251
Bonjour identifying 146 browser requirements HP embedded Web Server 146 C problems 177 double-sided printing Mac 59 Windows 56 drivers, supported 11 duplex printing Mac 59 duplex printing (double-sided) settings (Windows) 56 Windows 56 duplexer clearing jams 195 duplexing manually (Mac) 59 manually - HP LaserJet Enterprise MFP M633 | User Guide - Page 252
troubleshooting tools 151 HP Embedded Web Server (EWS) features 146 network connection 146 HP ePrint 67 HP ePrint software 67 HP JetAdvantage business solutions 133 HP Stapling Mailbox clear jams 198 clear staple jams 200 HP Web Jetadmin 162 HP Web Services enabling 152 I image quality check toner - HP LaserJet Enterprise MFP M633 | User Guide - Page 253
document feeder 181 HP Stapling Mailbox 198 locations 179 output bin 195 Tray 1 183 Tray 2, 3, 4, and 5 185 Tray 6 188 paper pickup problems solving 171, print drivers, supported 11 print media loading in Tray 1 21 print on both sides Mac 59 manually, Windows 56 Windows 56 print settings HP Embedded - HP LaserJet Enterprise MFP M633 | User Guide - Page 254
185 Tray 6 paper jams 188 trays capacity 9 included 9 locating 2 troubleshooting check toner-cartridge status 204 jams 180 network problems 228 paper feed problems 171 wired network 228 wireless network 230 troubleshooting tools HP Embedded Web Server 151 two-sided printing settings (Windows) 56
-
 1
1 -
 2
2 -
 3
3 -
 4
4 -
 5
5 -
 6
6 -
 7
7 -
8
-
9
-
10
-
11
-
12
-
13
-
14
-
15
-
16
-
17
-
18
-
19
-
20
-
21
-
22
-
23
-
24
-
25
-
26
-
27
-
28
-
29
-
30
-
31
-
32
-
33
-
34
-
35
-
36
-
37
-
38
-
39
-
40
-
41
-
42
-
43
-
44
-
45
-
46
-
47
-
48
-
49
-
50
-
51
-
52
-
53
-
54
-
55
-
56
-
57
-
58
-
59
-
60
-
61
-
62
-
63
-
64
-
65
-
66
-
67
-
68
-
69
-
70
-
71
-
72
-
73
-
74
-
75
-
76
-
77
-
78
-
79
-
80
-
81
-
82
-
83
-
84
-
85
-
86
-
87
-
88
-
89
-
90
-
91
-
92
-
93
-
94
-
95
-
96
-
97
-
98
-
99
-
100
-
101
-
102
-
103
-
104
-
105
-
106
-
107
-
108
-
109
-
110
-
111
-
112
-
113
-
114
-
115
-
116
-
117
-
118
-
119
-
120
-
121
-
122
-
123
-
124
-
125
-
126
-
127
-
128
-
129
-
130
-
131
-
132
-
133
-
134
-
135
-
136
-
137
-
138
-
139
-
140
-
141
-
142
-
143
-
144
-
145
-
146
-
147
-
148
-
149
-
150
-
151
-
152
-
153
-
154
-
155
-
156
-
157
-
158
-
159
-
160
-
161
-
162
-
163
-
164
-
165
-
166
-
167
-
168
-
169
-
170
-
171
-
172
-
173
-
174
-
175
-
176
-
177
-
178
-
179
-
180
-
181
-
182
-
183
-
184
-
185
-
186
-
187
-
188
-
189
-
190
-
191
-
192
-
193
-
194
-
195
-
196
-
197
-
198
-
199
-
200
-
201
-
202
-
203
-
204
-
205
-
206
-
207
-
208
-
209
-
210
-
211
-
212
-
213
-
214
-
215
-
216
-
217
-
218
-
219
-
220
-
221
-
222
-
223
-
224
-
225
-
226
-
227
-
228
-
229
-
230
-
231
-
232
-
233
-
234
-
235
-
236
-
237
-
238
-
239
-
240
-
241
-
242
-
243
-
244
-
245
-
246
-
247
-
248
-
249
-
250
-
251
-
252
-
253
-
254
 |
 |
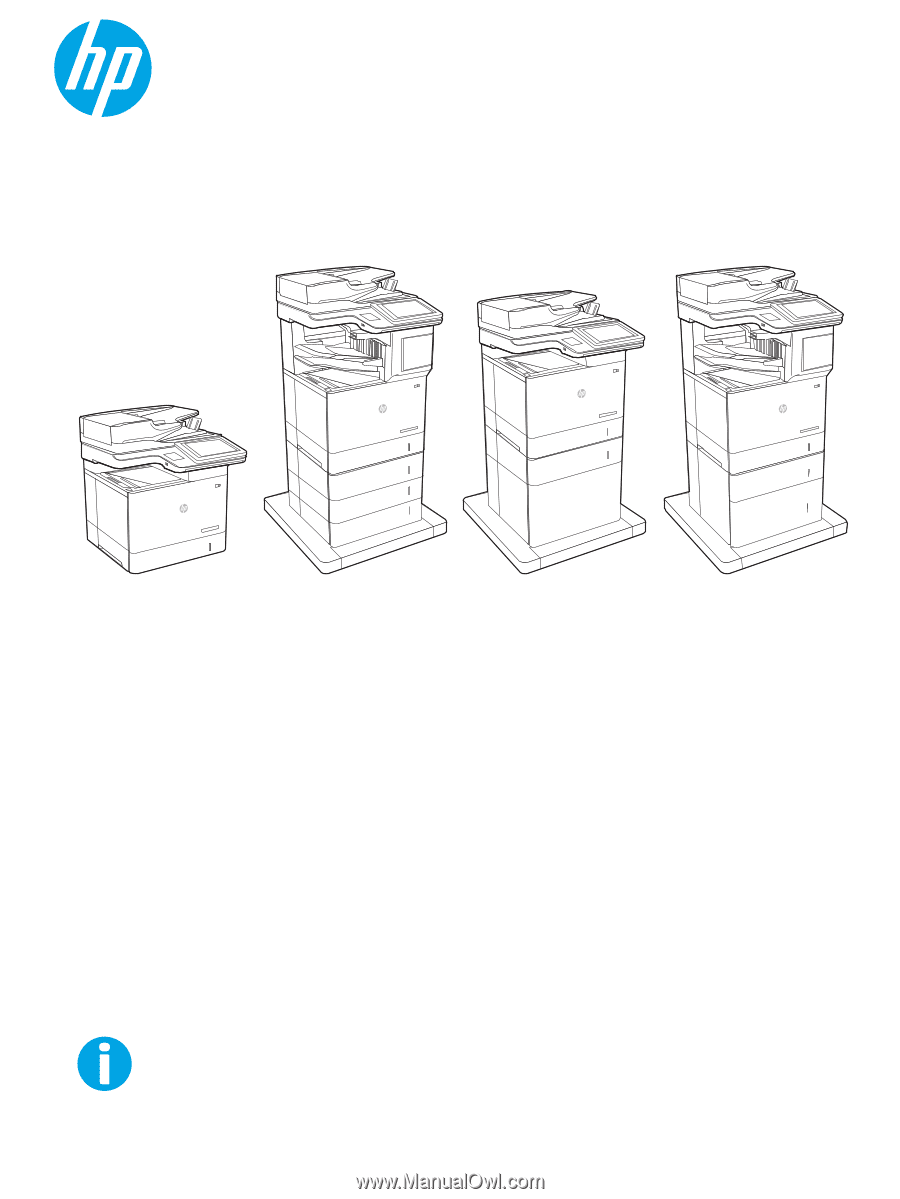
User Guide
LaserJet Enterprise MFP M631, M632, M633
www.hp.com/support/ljM631MFP
www.hp.com/support/ljM632MFP
www.hp.com/support/ljM633MFP
M631dn
Flow M631h
M632h
M633fh
Flow M632z
Flow M633z
M631z
M632fht