HP LaserJet Enterprise MFP M633 User Guide - Page 50
Con the stapling mailbox accessory, Con the default staple location
 |
View all HP LaserJet Enterprise MFP M633 manuals
Add to My Manuals
Save this manual to your list of manuals |
Page 50 highlights
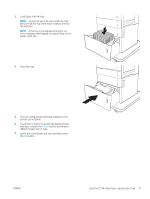
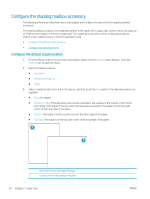
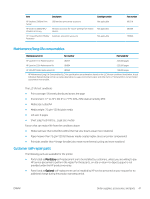
Configure the stapling mailbox accessory The following information describes how to load staples and configure the options for the stapling mailbox accessory. The stapling mailbox accessory can staple documents in the upper left or upper right corners, and it can stack up to 1,000 sheets of paper in the three output bins. The output bins have three mode-configuration options: stacker mode, mailbox mode, or function separator mode. ● Configure the default staple location ● Configure the operation mode Configure the default staple location 1. From the Home screen on the printer control panel, swipe until the Settings menu displays. Touch the Settings icon to open the menu. 2. Open the following menus: ● Copy/Print ● Default Print Options ● Staple 3. Select a staple location from the list of options, and then touch the Save button. The following options are available: ● None: No staples ● Top left or right: If the document has portrait orientation, the staple is in the top left corner of the short edge of the paper. If the document has landscape orientation, the staple is in the top right corner of the long edge of the paper. ● Top left: The staple is in the top left corner of the short edge of the paper. ● Top right: The staple is in the top right corner of the long edge of the paper. 1 2 1 Top left corner of the short edge of the paper 2 Top right corner of the long edge of the paper 36 Chapter 2 Paper trays ENWW
-
 1
1 -
2
-
3
-
4
-
5
-
6
-
7
-
8
-
9
-
10
-
11
-
12
-
13
-
14
-
15
-
16
-
17
-
18
-
19
-
20
-
21
-
22
-
23
-
24
-
25
-
26
-
27
-
28
-
29
-
30
-
31
-
32
-
33
-
34
-
35
-
36
-
37
-
38
-
39
-
40
-
41
-
42
-
43
-
44
-
 45
45 -
 46
46 -
 47
47 -
 48
48 -
 49
49 -
 50
50 -
 51
51 -
 52
52 -
 53
53 -
 54
54 -
 55
55 -
56
-
57
-
58
-
59
-
60
-
61
-
62
-
63
-
64
-
65
-
66
-
67
-
68
-
69
-
70
-
71
-
72
-
73
-
74
-
75
-
76
-
77
-
78
-
79
-
80
-
81
-
82
-
83
-
84
-
85
-
86
-
87
-
88
-
89
-
90
-
91
-
92
-
93
-
94
-
95
-
96
-
97
-
98
-
99
-
100
-
101
-
102
-
103
-
104
-
105
-
106
-
107
-
108
-
109
-
110
-
111
-
112
-
113
-
114
-
115
-
116
-
117
-
118
-
119
-
120
-
121
-
122
-
123
-
124
-
125
-
126
-
127
-
128
-
129
-
130
-
131
-
132
-
133
-
134
-
135
-
136
-
137
-
138
-
139
-
140
-
141
-
142
-
143
-
144
-
145
-
146
-
147
-
148
-
149
-
150
-
151
-
152
-
153
-
154
-
155
-
156
-
157
-
158
-
159
-
160
-
161
-
162
-
163
-
164
-
165
-
166
-
167
-
168
-
169
-
170
-
171
-
172
-
173
-
174
-
175
-
176
-
177
-
178
-
179
-
180
-
181
-
182
-
183
-
184
-
185
-
186
-
187
-
188
-
189
-
190
-
191
-
192
-
193
-
194
-
195
-
196
-
197
-
198
-
199
-
200
-
201
-
202
-
203
-
204
-
205
-
206
-
207
-
208
-
209
-
210
-
211
-
212
-
213
-
214
-
215
-
216
-
217
-
218
-
219
-
220
-
221
-
222
-
223
-
224
-
225
-
226
-
227
-
228
-
229
-
230
-
231
-
232
-
233
-
234
-
235
-
236
-
237
-
238
-
239
-
240
-
241
-
242
-
243
-
244
-
245
-
246
-
247
-
248
-
249
-
250
-
251
-
252
-
253
-
254
 |
 |
