HP LaserJet Enterprise P3015 HP LaserJet Printer Family - Print Media Specific - Page 11
Reading a ream label, Opening and loading paper - duplex
 |
View all HP LaserJet Enterprise P3015 manuals
Add to My Manuals
Save this manual to your list of manuals |
Page 11 highlights
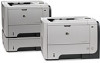
manufacturer name Reading a ream label A ream label is typically placed or printed on the outside of the paper wrapping. The ream label usually lists the weight, size, quantity of sheets, grain direction, and other information. The preferred side for printing might be indicated by an arrow on the ream label, although some manufacturers do not specify a print side. Paper should be loaded into the printer so that the indicated side will be printed (or printed first for duplexing). The preferred side might face-up or face-down in the input tray, depending on the printer model and the input source. (See the support documentation for your printer model to determine the orientation in the input tray.) The following illustration shows an example of a ream label. For more information about the items on the label, see the glossary in Appendix C on page 39. brand name paper size (bold or underline indicates grain direction) quantity orientation of preferred side for printing basis weight paper type grammage surface finish paper color brightness level Opening and loading paper Follow this suggested process when you open paper and load it into the printer input tray: 1 Place the wrapped ream of paper on a flat surface, with the seam side up. 2 Read the ream label that is located on the outside of the paper wrapping and note the direction of the arrow that indicates the preferred print side (if one is included). (See "Reading a ream label" on page 5.) 3 Open the paper wrapping and inspect for any damage to the sheets such as bent corners, wrinkles, nicked edges, or glue contamination. Discard any damaged sheets. 4 Handle the open stack of paper as little as possible. However, before loading the paper into the tray, flex the stack in both directions to "break" any locked edges. Do not fan or separate the paper into several stacks because doing so creates air pockets between the sheets that can cause jams or multiple-sheet feeds. 2 Guidelines for using media 5
-
 1
1 -
2
-
3
-
4
-
5
-
 6
6 -
 7
7 -
 8
8 -
 9
9 -
 10
10 -
 11
11 -
 12
12 -
 13
13 -
 14
14 -
 15
15 -
 16
16 -
17
-
18
-
19
-
20
-
21
-
22
-
23
-
24
-
25
-
26
-
27
-
28
-
29
-
30
-
31
-
32
-
33
-
34
-
35
-
36
-
37
-
38
-
39
-
40
-
41
-
42
-
43
-
44
-
45
-
46
-
47
-
48
-
49
-
50
-
51
-
52
-
53
-
54
-
55
-
56
-
57
-
58
 |
 |