HP Media Center m7200 Upgrading and Servicing Guide - Page 11
For a Serial ATA
 |
View all HP Media Center m7200 manuals
Add to My Manuals
Save this manual to your list of manuals |
Page 11 highlights
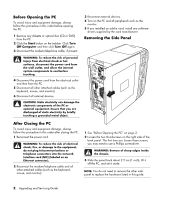
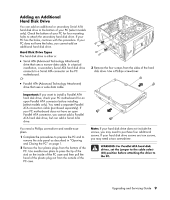
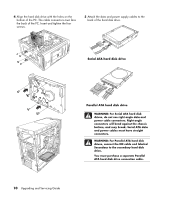
4 Remove the two screws from the back of the drive bay and remove the cable (A). Disconnecting the Parallel ATA hard disk drive cables 6 Remove the two screws on the front of the drive bay. 7 Gently pull back and hold the drive bay release tab while pulling out the drive bay from the front of the PC. 5 Disconnect the power cable and data cable from the back of the hard disk drive (B). For a Serial ATA drive, press the latch (1) (select models only) in the center of each plug and pull the plug (2) from the drive connector. For a Parallel ATA drive, use a gentle rocking motion to free the plug. 8 Gently lay the drive bay flat with the hard disk drive on top. Disconnecting the Serial ATA hard disk drive cables Upgrading and Servicing Guide 7
-
 1
1 -
2
-
3
-
4
-
5
-
 6
6 -
 7
7 -
 8
8 -
 9
9 -
 10
10 -
 11
11 -
 12
12 -
 13
13 -
 14
14 -
 15
15 -
 16
16 -
17
-
18
-
19
-
20
 |
 |

4
Remove the two screws from the back of the drive
bay and remove the cable (
A
).
5
Disconnect the power cable and data cable from
the back of the hard disk drive (
B
). For a Serial ATA
drive, press the latch (
1
) (select models only) in the
center of each plug and pull the plug (
2
) from the
drive connector. For a Parallel ATA drive, use a
gentle rocking motion to free the plug.
Disconnecting the Serial ATA hard disk drive
cables
Disconnecting the Parallel ATA hard disk drive
cables
6
Remove the two screws on the front of the
drive bay.
7
Gently pull back and hold the drive bay release
tab while pulling out the drive bay from the front
of the PC.
8
Gently lay the drive bay flat with the hard disk
drive on top.
Upgrading and Servicing Guide
7