HP Media Center m7200 Upgrading and Servicing Guide - Page 15
Adding Memory
 |
View all HP Media Center m7200 manuals
Add to My Manuals
Save this manual to your list of manuals |
Page 15 highlights
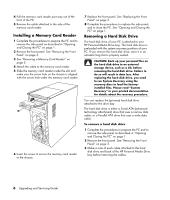
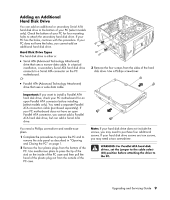
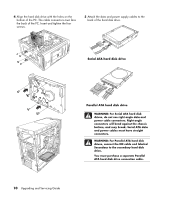
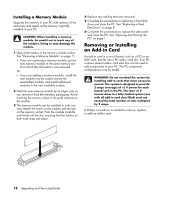
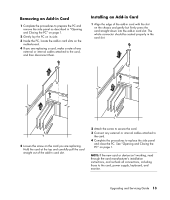
6 Attach the data cable connector end to an open Serial ATA (or Parallel ATA) connector on the PC motherboard. Removing a Memory Module 1 Complete the procedures to prepare the PC and remove the side panel as described in "Opening and Closing the PC" on page 1. 2 Remove the front panel. See "Removing the Front Panel" on page 3. 3 Remove the hard disk drive. See "Removing a Hard Disk Drive" on page 6. 4 Gently lay the PC on its side. 5 Locate the memory sockets on the motherboard. Serial ATA motherboard connector WARNING: Do not to use the connector that was connected to the original Serial ATA drive that was installed in the system. 7 Complete the procedures to replace the side panel, and to close the PC. See "Opening and Closing the PC" on page 1. Adding Memory The motherboard contains sockets for DDR DIMMs (double data rate dual in-line memory modules). The exact number of sockets depends on which model you have. To determine which type and speed of memory module your PC uses, and for specific memory module information and specifications, go to the Web site listed in your Warranty and Support Guide and click the Support link. CAUTION: When handling a memory module, be careful not to touch any of the contacts. Doing so may damage the module. 6 Move any cabling out of the way, if necessary. WARNING: Do not pull the memory module out of the socket. Use the retaining clips to eject the module. 7 Push down the two retaining clips on the ends of the socket until the memory module pops out of the socket. 8 Hold the memory module by its edges only, as you lift it away from the socket. Store it in its antistatic packaging. WARNING: Using the wrong type of memory module could damage the system. Upgrading and Servicing Guide 11
-
 1
1 -
2
-
3
-
4
-
5
-
6
-
7
-
8
-
9
-
 10
10 -
 11
11 -
 12
12 -
 13
13 -
 14
14 -
 15
15 -
 16
16 -
 17
17 -
 18
18 -
 19
19 -
 20
20
 |
 |
