HP Nc2400 HP Compaq nc2400 Notebook PC - Maintenance and Service Guide - Page 192
Backing Up the Entire Hard Drive, Start > All Programs > HP Backup & Recovery >
 |
UPC - 883585088331
View all HP Nc2400 manuals
Add to My Manuals
Save this manual to your list of manuals |
Page 192 highlights
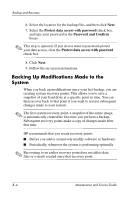
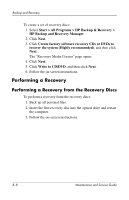
Backup and Recovery 5. Click Next. 6. Click Backup selected files from most common locations (Recommended). - or - Click Advanced Backup (Experienced users) to access advanced filtering techniques. 7. Click Next. 8. Follow the on-screen instructions. Backing Up the Entire Hard Drive When you perform a complete backup of the hard drive, you are saving the full factory image, including the Windows operating system, software applications, and all personal files and folders. ✎ A copy of the entire hard drive image can be stored on another hard drive, on a network drive, or on recovery discs that you create. ✎ This process may take over an hour, depending on your computer speed and the amount of data being stored. To back up your entire hard drive: 1. Select Start > All Programs > HP Backup & Recovery > HP Backup and Recovery Manager. 2. Click Next. 3. Click Back up to protect system settings and important data files, and then click Next. 4. Click Back up entire hard drive, and then click Next. The "Back up entire hard disk" page opens. 5. Click Next. Maintenance and Service Guide B-3
-
 1
1 -
2
-
3
-
4
-
5
-
6
-
7
-
8
-
9
-
10
-
11
-
12
-
13
-
14
-
15
-
16
-
17
-
18
-
19
-
20
-
21
-
22
-
23
-
24
-
25
-
26
-
27
-
28
-
29
-
30
-
31
-
32
-
33
-
34
-
35
-
36
-
37
-
38
-
39
-
40
-
41
-
42
-
43
-
44
-
45
-
46
-
47
-
48
-
49
-
50
-
51
-
52
-
53
-
54
-
55
-
56
-
57
-
58
-
59
-
60
-
61
-
62
-
63
-
64
-
65
-
66
-
67
-
68
-
69
-
70
-
71
-
72
-
73
-
74
-
75
-
76
-
77
-
78
-
79
-
80
-
81
-
82
-
83
-
84
-
85
-
86
-
87
-
88
-
89
-
90
-
91
-
92
-
93
-
94
-
95
-
96
-
97
-
98
-
99
-
100
-
101
-
102
-
103
-
104
-
105
-
106
-
107
-
108
-
109
-
110
-
111
-
112
-
113
-
114
-
115
-
116
-
117
-
118
-
119
-
120
-
121
-
122
-
123
-
124
-
125
-
126
-
127
-
128
-
129
-
130
-
131
-
132
-
133
-
134
-
135
-
136
-
137
-
138
-
139
-
140
-
141
-
142
-
143
-
144
-
145
-
146
-
147
-
148
-
149
-
150
-
151
-
152
-
153
-
154
-
155
-
156
-
157
-
158
-
159
-
160
-
161
-
162
-
163
-
164
-
165
-
166
-
167
-
168
-
169
-
170
-
171
-
172
-
173
-
174
-
175
-
176
-
177
-
178
-
179
-
180
-
181
-
182
-
183
-
184
-
185
-
186
-
 187
187 -
 188
188 -
 189
189 -
 190
190 -
 191
191 -
 192
192 -
 193
193 -
 194
194 -
 195
195 -
 196
196 -
 197
197 -
198
-
199
-
200
-
201
-
202
-
203
-
204
-
205
-
206
-
207
-
208
-
209
-
210
-
211
-
212
-
213
-
214
-
215
-
216
-
217
-
218
-
219
-
220
-
221
-
222
-
223
-
224
-
225
-
226
-
227
-
228
-
229
-
230
 |
 |