HP Neoware e140 TeemTalk® 5.0 for Unix User's Guide - Page 162
The Status Bar
 |
View all HP Neoware e140 manuals
Add to My Manuals
Save this manual to your list of manuals |
Page 162 highlights
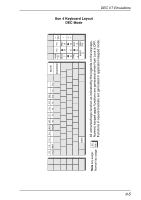
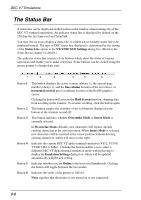
DEC VT Emulations The Status Bar A status line can be displayed on the last line in the window when running any of the DEC VT terminal emulations. An indicator status line is displayed by default on the 25th line the first time you load TeemTalk. You may choose not to display a status line, or enable a host-writable status line to be displayed instead. The type of DEC status line displayed is determined by the setting of the Status Line option in the VT/ANSI/ SCO Settings dialog box. (Refer to the Setup Menus chapter for details.) The indicator status line consists of six buttons which show the status of various operations and enable you to make selections. Some buttons can be clicked using the mouse pointer to change their state. 1 2 3 4 5 6 Button 1: This button displays the active session (always 1), the current page number (always 1), and the line,column location of the text cursor, or horizontal,vertical pixel coordinate location of the ReGIS graphics cursor. Clicking the button will activate the Hold Screen function, stopping data from scrolling in the window. To resume scrolling, click the button again. Button 2: This button toggles the visibility of the soft buttons displayed at the bottom of the window on and off. Button 3: This button indicates whether Overstrike Mode or Insert Mode is currently selected. In Overstrike Mode (default), new characters will replace already existing characters at the cursor position. When Insert Mode is selected, new characters will be inserted at the cursor position without deleting existing characters, which will move to the right. Button 4: Indicates the current DEC VT alpha terminal emulation (VT52, VT100, VT400 7-Bit or 8-Bit). Clicking the button enables you to select a different DEC VT alpha terminal emulation mode without having to display the Emulation Settings dialog box, which will be updated automatically with the new setting. Button 5: Indicates whether you are Online to the host or in Local mode. Clicking the button will toggle between the two modes. Button 6: Indicates the status of the printer as follows: None signifies that the printer is not turned on or not connected. 9-8
-
 1
1 -
2
-
3
-
4
-
5
-
6
-
7
-
8
-
9
-
10
-
11
-
12
-
13
-
14
-
15
-
16
-
17
-
18
-
19
-
20
-
21
-
22
-
23
-
24
-
25
-
26
-
27
-
28
-
29
-
30
-
31
-
32
-
33
-
34
-
35
-
36
-
37
-
38
-
39
-
40
-
41
-
42
-
43
-
44
-
45
-
46
-
47
-
48
-
49
-
50
-
51
-
52
-
53
-
54
-
55
-
56
-
57
-
58
-
59
-
60
-
61
-
62
-
63
-
64
-
65
-
66
-
67
-
68
-
69
-
70
-
71
-
72
-
73
-
74
-
75
-
76
-
77
-
78
-
79
-
80
-
81
-
82
-
83
-
84
-
85
-
86
-
87
-
88
-
89
-
90
-
91
-
92
-
93
-
94
-
95
-
96
-
97
-
98
-
99
-
100
-
101
-
102
-
103
-
104
-
105
-
106
-
107
-
108
-
109
-
110
-
111
-
112
-
113
-
114
-
115
-
116
-
117
-
118
-
119
-
120
-
121
-
122
-
123
-
124
-
125
-
126
-
127
-
128
-
129
-
130
-
131
-
132
-
133
-
134
-
135
-
136
-
137
-
138
-
139
-
140
-
141
-
142
-
143
-
144
-
145
-
146
-
147
-
148
-
149
-
150
-
151
-
152
-
153
-
154
-
155
-
156
-
 157
157 -
 158
158 -
 159
159 -
 160
160 -
 161
161 -
 162
162 -
 163
163 -
 164
164 -
 165
165 -
 166
166 -
 167
167 -
168
-
169
-
170
-
171
-
172
-
173
-
174
-
175
-
176
-
177
-
178
-
179
-
180
-
181
-
182
-
183
-
184
-
185
-
186
-
187
-
188
-
189
-
190
-
191
-
192
-
193
-
194
-
195
-
196
-
197
-
198
-
199
-
200
-
201
-
202
-
203
-
204
-
205
-
206
-
207
-
208
-
209
-
210
-
211
-
212
-
213
-
214
-
215
-
216
-
217
-
218
-
219
-
220
-
221
-
222
-
223
-
224
-
225
-
226
-
227
-
228
-
229
-
230
-
231
-
232
-
233
-
234
-
235
-
236
-
237
-
238
-
239
-
240
-
241
-
242
-
243
-
244
-
245
-
246
-
247
-
248
-
249
-
250
-
251
-
252
-
253
-
254
-
255
-
256
-
257
-
258
-
259
-
260
-
261
-
262
-
263
-
264
-
265
-
266
-
267
-
268
-
269
-
270
-
271
-
272
-
273
-
274
-
275
-
276
-
277
-
278
-
279
-
280
-
281
-
282
-
283
-
284
-
285
-
286
-
287
-
288
-
289
-
290
-
291
-
292
-
293
-
294
-
295
-
296
-
297
-
298
-
299
-
300
-
301
-
302
-
303
-
304
-
305
-
306
-
307
-
308
-
309
-
310
-
311
-
312
-
313
-
314
-
315
-
316
-
317
-
318
-
319
-
320
-
321
-
322
-
323
-
324
-
325
-
326
-
327
-
328
-
329
-
330
-
331
-
332
-
333
-
334
-
335
-
336
-
337
-
338
-
339
-
340
-
341
-
342
-
343
-
344
-
345
-
346
-
347
-
348
-
349
-
350
-
351
-
352
-
353
-
354
-
355
-
356
-
357
-
358
-
359
-
360
-
361
-
362
-
363
-
364
-
365
-
366
-
367
-
368
-
369
-
370
-
371
-
372
-
373
-
374
-
375
-
376
-
377
-
378
-
379
-
380
 |
 |