HP Omni 220-1155xt Wall Mounting Guide - Page 12
CAUTION, Attach the wall-mounting hardware purchased separately according to the manufacturer's - desktop computer
 |
View all HP Omni 220-1155xt manuals
Add to My Manuals
Save this manual to your list of manuals |
Page 12 highlights
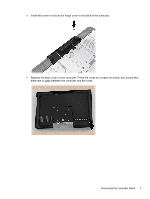
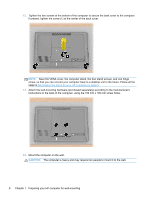
12. Tighten the two screws at the bottom of the computer to secure the back cover to the computer. If present, tighten the screw (1) at the center of the back cover. NOTE: Save the VESA cover, the computer stand, the four stand screws, and one hinge screw, so that you can convert your computer back to a desktop unit in the future. Follow all the steps in Reinstalling the stand on your HP computer on page 9. 13. Attach the wall-mounting hardware (purchased separately) according to the manufacturer's instructions to the back of the computer, using the 100 mm x 100 mm screw holes. 14. Mount the computer on the wall. CAUTION: The computer is heavy and may require two people to mount it to the wall. 8 Chapter 1 Preparing your HP computer for wall-mounting
-
 1
1 -
2
-
3
-
4
-
5
-
6
-
 7
7 -
 8
8 -
 9
9 -
 10
10 -
 11
11 -
 12
12 -
 13
13 -
 14
14 -
 15
15 -
 16
16 -
 17
17 -
18
-
19
 |
 |
