HP Omni 220-1155xt Wall Mounting Guide - Page 14
Replacing the computer stand
 |
View all HP Omni 220-1155xt manuals
Add to My Manuals
Save this manual to your list of manuals |
Page 14 highlights
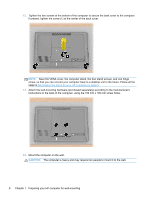
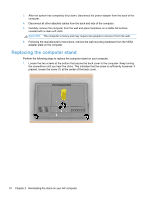
3. After the system has completely shut down, disconnect the power adapter from the back of the computer. 4. Disconnect all other attached cables from the back and side of the computer. 5. Carefully remove the computer from the wall and place facedown on a stable flat surface covered with a clean soft cloth. CAUTION: The computer is heavy and may require two people to remove it from the wall. 6. Following the manufacturer's instructions, remove the wall-mounting hardware from the VESA adapter plate on the computer. Replacing the computer stand Perform the following steps to replace the computer stand on your computer. 1. Loosen the two screws at the bottom that secure the back cover to the computer. Keep turning the screwdriver until you hear five clicks. This indicates that the screw is sufficiently loosened. If present, loosen the screw (1) at the center of the back cover. 10 Chapter 2 Reinstalling the stand on your HP computer
-
 1
1 -
2
-
3
-
4
-
5
-
6
-
7
-
8
-
 9
9 -
 10
10 -
 11
11 -
 12
12 -
 13
13 -
 14
14 -
 15
15 -
 16
16 -
 17
17 -
 18
18 -
 19
19
 |
 |
