HP Pavilion 11 Maintenance and Service Guide - Page 56
Phillips PM2.0×4.6 screws, Lift the left side of the system board
 |
View all HP Pavilion 11 manuals
Add to My Manuals
Save this manual to your list of manuals |
Page 56 highlights
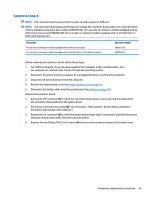
NOTE: If the WLAN antenna cables are not connected to the WLAN module terminals, protective sleeves should be installed on the antenna connectors, as shown in the following illustration. 2. Remove the five Phillips PM2.0×4.6 screws (1) that secure the system board to the bottom cover. 3. Lift the left side of the system board (2) until the RTC battery cable connector is accessible. 4. Disconnect the RTC battery cable (3) from the system board. 48 Chapter 5 Removal and replacement procedures
-
 1
1 -
2
-
3
-
4
-
5
-
6
-
7
-
8
-
9
-
10
-
11
-
12
-
13
-
14
-
15
-
16
-
17
-
18
-
19
-
20
-
21
-
22
-
23
-
24
-
25
-
26
-
27
-
28
-
29
-
30
-
31
-
32
-
33
-
34
-
35
-
36
-
37
-
38
-
39
-
40
-
41
-
42
-
43
-
44
-
45
-
46
-
47
-
48
-
49
-
50
-
 51
51 -
 52
52 -
 53
53 -
 54
54 -
 55
55 -
 56
56 -
 57
57 -
 58
58 -
 59
59 -
 60
60 -
 61
61 -
62
-
63
-
64
-
65
-
66
-
67
-
68
-
69
-
70
-
71
-
72
-
73
-
74
-
75
-
76
-
77
-
78
-
79
-
80
-
81
-
82
-
83
-
84
-
85
-
86
-
87
-
88
-
89
-
90
 |
 |

NOTE:
If the WLAN antenna cables are not connected to the WLAN module terminals, protective
sleeves should be installed on the antenna connectors, as shown in the following illustration.
2.
Remove the
five
Phillips PM2.0×4.6 screws
(1)
that secure the system board to the bottom cover.
3.
Lift the left side of the system board
(2)
until the RTC battery cable connector is accessible.
4.
Disconnect the RTC battery cable
(3)
from the system board.
48
Chapter 5
Removal and replacement procedures