HP Pavilion a6000 Start Here Guide - Page 37
inputs, 6 Channel inputs, CD, DVD, or DVD In., Turn on the receiver/amplifier.
 |
View all HP Pavilion a6000 manuals
Add to My Manuals
Save this manual to your list of manuals |
Page 37 highlights
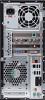
3 Connect the front stereo mini-jack end of a Y adapter cable into the lime green Audio Line Out connector that matches the back of your computer. 3 6 S NOTE: Type 3 is three connectors. Type 6 is six connectors. Type S is sound card. NOTE: Receiver/amplifier input connectors may be labeled Surround, 5.1 Channel inputs, 6 Channel inputs, CD, DVD, or DVD In. Connect the left and right ends of the Y adapter cable into the front left (L) and right (R) inputs on the back of the receiver/amplifier. 4 If you have rear speakers, connect the rear stereo mini-jack end of a Y adapter cable into the Audio Line In (blue) or the Rear Speaker Out (black) connector that matches the back of your computer. 3 6 S Connect the left and right ends of the Y adapter cable into the rear left (L) and right (R) inputs on the back of the receiver/amplifier. 5 If you have a center/subwoofer speaker, connect the stereo mini-jack of a Y adapter cable into the microphone (pink) connector or the center speaker/subwoofer (gold) connector that matches the back of your computer. 3 6 S Connect the left and right ends of the Y adapter cable into the center/subwoofer inputs on the back of the receiver/amplifier (6/5.1 or higher-channel system). Plug the Y adapter cable into the subwoofer connector on the back of the receiver even if a subwoofer is not used. 6 Turn on the receiver/amplifier. 7 Select the receiver/amplifier input that the Y adapter cables are plugged into. Connecting Speakers or Microphone 31
-
 1
1 -
2
-
3
-
4
-
5
-
6
-
7
-
8
-
9
-
10
-
11
-
12
-
13
-
14
-
15
-
16
-
17
-
18
-
19
-
20
-
21
-
22
-
23
-
24
-
25
-
26
-
27
-
28
-
29
-
30
-
31
-
 32
32 -
 33
33 -
 34
34 -
 35
35 -
 36
36 -
 37
37 -
 38
38 -
 39
39 -
 40
40 -
 41
41 -
 42
42 -
43
-
44
-
45
-
46
-
47
-
48
-
49
-
50
-
51
-
52
-
53
-
54
-
55
-
56
-
57
-
58
-
59
-
60
-
61
-
62
-
63
-
64
-
65
-
66
-
67
-
68
-
69
-
70
-
71
-
72
 |
 |
