HP Pavilion xt500 HP Pavilion & Compaq Presario Notebook PC - Service Manu - Page 57
Removing the Floppy Drive, Reassembly Notes, drive guide.
 |
View all HP Pavilion xt500 manuals
Add to My Manuals
Save this manual to your list of manuals |
Page 57 highlights
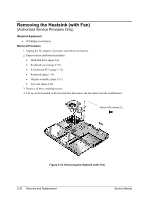
Screw, M2.5×4mm (2) Screw, M2.5×4mm (2) Reassembly Notes Figure 2-14. Removing the Floppy Drive Caution Do not excessively bend or fold the floppy drive cable. Excessive flexing can damage the floppy drive cable connections. • Connect the floppy drive cable to the motherboard prior to replacing the floppy drive and hard disk drive guide. • When replacing the hard disk drive guide, do not secure the left side to the motherboard. The left side of the guide gets secured during the top case replacement procedure. Service Manual Removal and Replacement 2-23
-
 1
1 -
2
-
3
-
4
-
5
-
6
-
7
-
8
-
9
-
10
-
11
-
12
-
13
-
14
-
15
-
16
-
17
-
18
-
19
-
20
-
21
-
22
-
23
-
24
-
25
-
26
-
27
-
28
-
29
-
30
-
31
-
32
-
33
-
34
-
35
-
36
-
37
-
38
-
39
-
40
-
41
-
42
-
43
-
44
-
45
-
46
-
47
-
48
-
49
-
50
-
51
-
 52
52 -
 53
53 -
 54
54 -
 55
55 -
 56
56 -
 57
57 -
 58
58 -
 59
59 -
 60
60 -
 61
61 -
 62
62 -
63
-
64
-
65
-
66
-
67
-
68
-
69
-
70
-
71
-
72
-
73
-
74
-
75
-
76
-
77
-
78
-
79
-
80
-
81
-
82
-
83
-
84
-
85
-
86
-
87
-
88
-
89
-
90
-
91
-
92
-
93
-
94
-
95
-
96
-
97
-
98
-
99
-
100
-
101
-
102
-
103
-
104
-
105
-
106
-
107
-
108
-
109
-
110
-
111
-
112
-
113
-
114
-
115
-
116
-
117
-
118
-
119
-
120
-
121
-
122
-
123
-
124
-
125
-
126
 |
 |

Screw,
M2.5±4mm (2)
Screw,
M2.5±4mm (2)
Figure 2-14. Removing the Floppy Drive
Reassembly Notes
Caution
Do not excessively bend or fold the floppy drive cable. Excessive flexing can damage the floppy
drive cable connections.
•
Connect the floppy drive cable to the motherboard prior to replacing the floppy drive and hard disk
drive guide.
•
When replacing the hard disk drive guide, do not secure the left side to the motherboard. The left
side of the guide gets secured during the top case replacement procedure.
Service Manual
Removal and Replacement
2-23