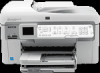
HP Photosmart Premium Fax All-in-One Printer - C309 Setup Guide - Page 2
HP All-in-One.
 |
View all HP Photosmart Premium Fax All-in-One Printer - C309 manuals
Add to My Manuals
Save this manual to your list of manuals |
Page 2 highlights
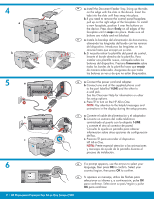
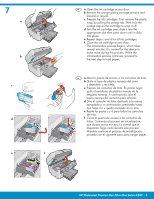
4 a b 5 a b c EN a. Install the Document Feeder Tray, lining up the tabs on the edge with the slots in the device. Insert the tabs into the slots until they snap into place. b. If you need to remove the control panel faceplate, pull up on the right edge of the faceplate. To install a new faceplate, position it over the buttons on the device. Press down firmly on all edges of the faceplate until it snaps into place. Make sure all buttons are visible and not blocked. ES a. Instale la bandeja del alimentador de documentos, alineando las lengüetas del borde con las ranuras del dispositivo. Introduzca las lengüetas en las ranuras hasta que encajen en su sitio. b. Si necesita retirar la plantilla del panel de control, levante el borde derecho de la plantilla. Para instalar una plantilla nueva, colóquela sobre los botones del dispositivo. Presione firmemente sobre todos los bordes de la plantilla hasta que encaje de manera adecuada. Asegúrese de que todos los botones se ven y de que no están bloqueados. EN a. Connect the power cord and adapter. b. Connect one end of the supplied phone cord to the port labelled 1-LINE and the other to a wall jack. See the Onscreen Help for information on other fax setup options. c. Press to turn on the HP All-in-One. NOTE: Pay attention to the helpful messages and animations in the display during the setup process. ES a. Conecte el cable de alimentación y el adaptador. b. Conecte un extremo del cable telefónico suministrado al puerto con la etiqueta 1-LINE y conecte el otro al conector de pared. Consulte la ayuda en pantalla para obtener información sobre otras opciones de configuración del fax. c. Presione para encender el dispositivo HP All-in-One. NOTA: Preste especial atención a las animaciones y mensajes de ayuda de la pantalla durante el proceso de instalación. 6 EN If a prompt appears, use the arrows to select your language, then press OK to confirm. Select your country/region, then press OK to confirm. ES Si aparece un mensaje, utilice las flechas para seleccionar su idioma y, a continuación, pulse OK para confirmar. Seleccione su país/región y pulse OK para confirmar. 2 • HP Photosmart Premium Fax All-in-One Series-C309
-
 1
1 -
 2
2 -
 3
3 -
 4
4 -
 5
5 -
 6
6 -
 7
7 -
 8
8 -
9
-
10
-
11
-
12
-
13
-
14
-
15
-
16
 |
 |
