HP ProLiant SL390s HP ProLiant SL390s G7 2U half width Server Maintenance and - Page 52
Personality board
 |
View all HP ProLiant SL390s manuals
Add to My Manuals
Save this manual to your list of manuals |
Page 52 highlights
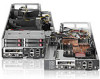
Figure 37 Removing the system board from the tray IMPORTANT: Do not discard the screws. If the system board is removed in the future, you must keep them for future use. To replace the system board: 1. Put the system board in the tray. The screw holes on the tray should align with the holes on the system board. 2. Fasten the screws to secure the system board to the tray. Figure 38 Fastening the system board to the tray Personality board To remove the Personality board: 1. Remove the five screws that secure the personality board to the tray. 2. Release the personality board from the tray. Removal and Replacement Procedures 52
-
 1
1 -
2
-
3
-
4
-
5
-
6
-
7
-
8
-
9
-
10
-
11
-
12
-
13
-
14
-
15
-
16
-
17
-
18
-
19
-
20
-
21
-
22
-
23
-
24
-
25
-
26
-
27
-
28
-
29
-
30
-
31
-
32
-
33
-
34
-
35
-
36
-
37
-
38
-
39
-
40
-
41
-
42
-
43
-
44
-
45
-
46
-
 47
47 -
 48
48 -
 49
49 -
 50
50 -
 51
51 -
 52
52 -
 53
53 -
 54
54 -
 55
55 -
 56
56 -
 57
57 -
58
-
59
-
60
-
61
-
62
-
63
-
64
-
65
-
66
-
67
-
68
-
69
-
70
-
71
-
72
-
73
-
74
-
75
-
76
-
77
-
78
-
79
-
80
-
81
-
82
-
83
-
84
 |
 |

Removal and Replacement Procedures 52
Figure 37
Removing the system board from the tray
IMPORTANT:
Do not discard the screws. If the system board is removed in the future, you must keep
them for future use.
To replace the system board:
1.
Put the system board in the tray. The screw holes on the tray should align with the holes on the
system board.
2.
Fasten the screws to secure the system board to the tray.
Figure 38
Fastening the system board to the tray
Personality board
To remove the Personality board:
1.
Remove the five screws that secure the personality board to the tray.
2.
Release the personality board from the tray.