HP ProLiant SL390s HP ProLiant SL390s G7 2U half width Server Maintenance and - Page 60
Insert a, b, c, d cables on the rear GPU assembly
 |
View all HP ProLiant SL390s manuals
Add to My Manuals
Save this manual to your list of manuals |
Page 60 highlights
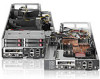
Figure 52 Installing the GPU on the rear GPU assembly 3. Insert a,b,c,d cables on the rear GPU assembly: Figure 53 Connecting the cables on the rear GPU assembly 4. Install the rear GPU assembly on the bottom of 2U tray and fasten the screws to secure it to the tray: Removal and Replacement Procedures 60
-
 1
1 -
2
-
3
-
4
-
5
-
6
-
7
-
8
-
9
-
10
-
11
-
12
-
13
-
14
-
15
-
16
-
17
-
18
-
19
-
20
-
21
-
22
-
23
-
24
-
25
-
26
-
27
-
28
-
29
-
30
-
31
-
32
-
33
-
34
-
35
-
36
-
37
-
38
-
39
-
40
-
41
-
42
-
43
-
44
-
45
-
46
-
47
-
48
-
49
-
50
-
51
-
52
-
53
-
54
-
 55
55 -
 56
56 -
 57
57 -
 58
58 -
 59
59 -
 60
60 -
 61
61 -
 62
62 -
 63
63 -
 64
64 -
 65
65 -
66
-
67
-
68
-
69
-
70
-
71
-
72
-
73
-
74
-
75
-
76
-
77
-
78
-
79
-
80
-
81
-
82
-
83
-
84
 |
 |

Removal and Replacement Procedures 60
Figure 52
Installing the GPU on the rear GPU assembly
3.
Insert a,b,c,d cables on the rear GPU assembly:
Figure 53
Connecting the cables on the rear GPU assembly
4.
Install the rear GPU assembly on the bottom of 2U tray and fasten the screws to secure it to the
tray: