HP ScanJet Enterprise 9000 Getting Started Guide - Page 7
Connect the power supply
 |
View all HP ScanJet Enterprise 9000 manuals
Add to My Manuals
Save this manual to your list of manuals |
Page 7 highlights
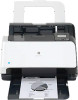
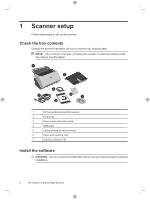
English 1. Decide what software to install. • If you will be using the scanner with document-management and scanning software that you already own, you only need to install the HP Scanjet Drivers and Tools. • If you do not already have document-management and scanning software, you can use the software that is shipped with the scanner. Read the onscreen descriptions of the software during the installation to decide what software to install. (The software and the number of CDs that are shipped with the scanner might vary by country/region.) 2. Insert the HP Scanning Software CD into the computer CD drive. Wait for the installation dialog box to appear. 3. Click Install Software, and then follow the instructions on the screen. Set up the hardware Complete the following tasks in order to set up the scanner hardware and prepare it for use. Connect the power supply The green LED on the power supply case is on when the power supply is functioning correctly. 1. Connect the power supply to the power supply cable, and then plug the power supply cable into a power outlet or a surge protector. 2. Check that the green LED on the power supply case is on. • If the green LED is not on, ensure that power is available to the power outlet or surge protector that the power supply cable is plugged into. • If power is available to the power outlet or surge protector but the green LED is still not on, the power supply might be defective. Contact HP Support for assistance. Set up the hardware 3
-
 1
1 -
 2
2 -
 3
3 -
 4
4 -
 5
5 -
 6
6 -
 7
7 -
 8
8 -
 9
9 -
 10
10 -
 11
11 -
 12
12 -
13
-
14
-
15
-
16
-
17
-
18
-
19
-
20
-
21
-
22
-
23
-
24
-
25
-
26
-
27
-
28
-
29
-
30
-
31
-
32
-
33
-
34
-
35
-
36
-
37
-
38
-
39
-
40
-
41
-
42
-
43
-
44
-
45
-
46
-
47
-
48
-
49
-
50
-
51
-
52
-
53
-
54
-
55
-
56
-
57
-
58
-
59
-
60
-
61
-
62
-
63
-
64
-
65
-
66
-
67
-
68
-
69
-
70
-
71
-
72
-
73
-
74
-
75
-
76
-
77
-
78
-
79
-
80
-
81
-
82
-
83
-
84
-
85
-
86
-
87
-
88
-
89
-
90
-
91
-
92
-
93
-
94
-
95
-
96
-
97
-
98
-
99
-
100
-
101
-
102
-
103
-
104
-
105
-
106
-
107
-
108
-
109
-
110
-
111
-
112
-
113
-
114
-
115
-
116
-
117
-
118
-
119
-
120
-
121
-
122
-
123
-
124
 |
 |
