HP ScanJet Enterprise 9000 Getting Started Guide - Page 9
Prepare the scanner for use
 |
View all HP ScanJet Enterprise 9000 manuals
Add to My Manuals
Save this manual to your list of manuals |
Page 9 highlights
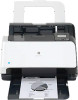
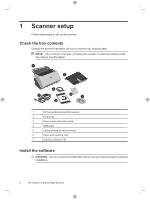
Prepare the scanner for use 1. Attach the output tray by sliding the back of the tray into the slot under the front of the scanner. Ensure that the output tray does not extend beyond the surface on which the scanner sits. 2 English 1 3 2. Extend the document feeder. 3. Extend the output tray by sliding out the paper guide and lifting the flap. Test the installation CAUTION: Before placing an item in the document feeder, make sure that the item does not contain wet glue, correction fluid, or other substances that can be transferred to the interior of the scanner. Make sure there are no curls, wrinkles, staples, paper clips, or any other attached material. Sheets should not be stuck together. To test a standard installation, follow these steps. 1. Place a single page face down in the document feeder. TIP: Place A3 (or Tabloid 11 x 17 in) pages with the short edge down, as shown. You can place A4 (or Letter 8.5 x 11 in) and smaller pages with either the long edge (landscape) or short edge (portrait) down. Test the installation 5
-
 1
1 -
2
-
3
-
 4
4 -
 5
5 -
 6
6 -
 7
7 -
 8
8 -
 9
9 -
 10
10 -
 11
11 -
 12
12 -
 13
13 -
 14
14 -
15
-
16
-
17
-
18
-
19
-
20
-
21
-
22
-
23
-
24
-
25
-
26
-
27
-
28
-
29
-
30
-
31
-
32
-
33
-
34
-
35
-
36
-
37
-
38
-
39
-
40
-
41
-
42
-
43
-
44
-
45
-
46
-
47
-
48
-
49
-
50
-
51
-
52
-
53
-
54
-
55
-
56
-
57
-
58
-
59
-
60
-
61
-
62
-
63
-
64
-
65
-
66
-
67
-
68
-
69
-
70
-
71
-
72
-
73
-
74
-
75
-
76
-
77
-
78
-
79
-
80
-
81
-
82
-
83
-
84
-
85
-
86
-
87
-
88
-
89
-
90
-
91
-
92
-
93
-
94
-
95
-
96
-
97
-
98
-
99
-
100
-
101
-
102
-
103
-
104
-
105
-
106
-
107
-
108
-
109
-
110
-
111
-
112
-
113
-
114
-
115
-
116
-
117
-
118
-
119
-
120
-
121
-
122
-
123
-
124
 |
 |
