HP Scanjet Enterprise 8500 HP Scanjet Enterprise 8500 fn1 - User Guide - Page 36
Additional configuration using the Embedded Web Server, Apply, Security, Protect Stored Data
 |
View all HP Scanjet Enterprise 8500 manuals
Add to My Manuals
Save this manual to your list of manuals |
Page 36 highlights
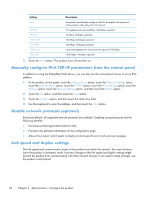
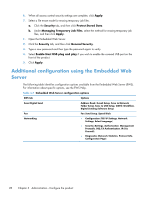
6. When all access control security settings are complete, click Apply. 7. Select a file erase mode for erasing temporary job files. a. Click the Security tab, and then click Protect Stored Data. b. Under Managing Temporary Job Files, select the method for erasing temporary job files, and then click Apply. 1. Open the Embedded Web Server. 2. Click the Security tab, and then click General Security. 3. Type a new password and then type the password again to verify. 4. Select Enable Host USB plug and play if you wish to enable the covered USB port on the front of the product. 5. Click Apply. Additional configuration using the Embedded Web Server The following table identifies configuration options available from the Embedded Web Server (EWS). For information about specific options, see the EWS Help. Table 3-7 Embedded Web Server configuration options EWS tab Options Scan/Digital Send Address Book, E-mail Setup, Save to Network Folder Setup, Save to USB Setup, OXPd: Workflow, Digital Sending Software Setup Fax Networking Fax Send Setup, Speed Dials ● Configuration (TCP/IP Settings, Network Settings, Select Language) ● Security (Settings, Authorization, Management Protocols, 802.1X Authentication, IP/Sec Firewall) ● Diagnostics (Network Statistics, Protocol Info, Configuration Page) 28 Chapter 3 Administration - Configure the product
-
 1
1 -
2
-
3
-
4
-
5
-
6
-
7
-
8
-
9
-
10
-
11
-
12
-
13
-
14
-
15
-
16
-
17
-
18
-
19
-
20
-
21
-
22
-
23
-
24
-
25
-
26
-
27
-
28
-
29
-
30
-
 31
31 -
 32
32 -
 33
33 -
 34
34 -
 35
35 -
 36
36 -
 37
37 -
 38
38 -
 39
39 -
 40
40 -
 41
41 -
42
-
43
-
44
-
45
-
46
-
47
-
48
-
49
-
50
-
51
-
52
-
53
-
54
-
55
-
56
-
57
-
58
-
59
-
60
-
61
-
62
-
63
-
64
-
65
-
66
-
67
-
68
-
69
-
70
-
71
-
72
-
73
-
74
-
75
-
76
-
77
-
78
-
79
-
80
-
81
-
82
-
83
-
84
-
85
-
86
-
87
-
88
-
89
-
90
-
91
-
92
-
93
-
94
-
95
-
96
-
97
-
98
-
99
-
100
-
101
-
102
-
103
 |
 |