HP Tc2100 HP Server Novell NetWare Installation Guide (including v 6.5) - Page 7
Save Directory Information and continue, Disk Partition Options
 |
View all HP Tc2100 manuals
Add to My Manuals
Save this manual to your list of manuals |
Page 7 highlights
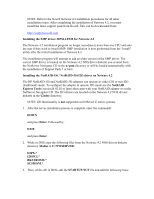
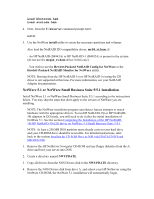
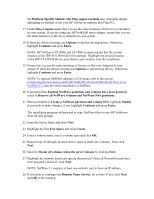
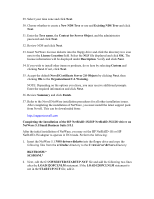
23. Once back at the Disk Partition Options, select Return to previous menu and repeat steps 18 through 26 until all devices are partitioned. 24. After all devices are partitioned press F10 and select continue with installation from the Disk Partition and Mirroring Options. NOTE: Press Enter through any messages you may receive. 25. If you wish to modify any NetWare Volumes do so on the Manage NetWare Volumes screen. If you do not wish to make any changes press F10 and select Yes to continue installation. 26. If you wish to modify any Protocols do so on the Protocol Selection screen. If you do not wish to make any changes select Continue with installation from the Protocol Options menu. NOTE: Press Enter through any messages you may receive. 27. If you wish to change the path where NetWare files will be installed, do so when prompted. If you do not want to make any changes press Enter to continue. NOTE: The installation program will proceed to copy NetWare files to your HP NetServer. Wait till next prompt. 28. Enter a name for the Directory tree and press Enter. 29. Select your time zone and press Enter then F10 to continue. 30. Enter your company or Organization and press Enter. 31. Use the arrow keys to highlight the password field. Enter a password and press F10 to continue. 32. Select Yes when prompted to Save Directory Information and continue. NOTE: Press Enter through any messages you may receive. 33. Insert NetWare License diskette into the floppy drive and press F3 and then Enter. 34. Edit the STARTUP file as necessary. If you do not wish to modify the STARTUP.NCF file press F10 and select Yes to save a new STARTUP.NCF. 35. Edit the AUTOEXEC file as necessary. If you do not wish to modify the AUTOEXEC.NCF file press F10 and select Yes to save a new AUTOEXEC.NCF. NOTE: The installation program will proceed to copy NetWare files to your HP NetServer. Wait till next prompt. 36. If you wish to install other items or products, do so on the Other Installation Options screen. If not, highlight Continue Installation and press Enter.
-
 1
1 -
 2
2 -
 3
3 -
 4
4 -
 5
5 -
 6
6 -
 7
7 -
 8
8 -
 9
9 -
 10
10 -
 11
11 -
 12
12 -
13
-
14
-
15
-
16
-
17
-
18
-
19
-
20
-
21
-
22
 |
 |
