HP Visualize J5000 hp workstations - hp-ux 10.20 graphics administration guide - Page 94
Option, Function, Default Action, Default, Button Chording
 |
View all HP Visualize J5000 manuals
Add to My Manuals
Save this manual to your list of manuals |
Page 94 highlights
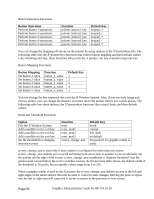
Button Chording Option Turn button chording off or on Function button_chording Default Action On for devices with two buttons, off for devices with more than two buttons Button chording refers to the generation of a button-press by pressing two other buttons. If you have a two-button mouse, you can generate Button 3 by pressing both buttons together. With a three-button mouse, you can generate button 4 by pressing the left and middle buttons together and button 5 by pressing the middle and right buttons together. See the button chording examples in the X*pointerkeys file. You can also use the X*pointerkeys file to configure pointer buttons so they are latched. When this feature is enabled, a button you press stays logically down until you press it again. See the example X*pointerkeys file in /usr/lib/X11 for information on configuring this functionality Note: The sample X*pointerkeys file is placed in /usr/lib/X11 at install time. If you subsequently update your system, the X*pointerkeys file in /usr/lib/X11 is not overwritten, and the sample file is placed in /usr/newconfig Specifying a Portion of a Tablet Option Use a subset of the tablet surface as the X pointer device Function tablet_subset_width tablet_subset_height tablet_subset_xorigin tablet_subset_yorigin Default disabled If a tablet is used as the X pointer device, it may be desirable to use only a portion of the tablet surface. A rectangular subset of the surface may be specified with these functions. The units are in millimeters from the upper left corner of the tablet surface. For example, if you want to use only an "A" size portion of a larger "B" size tablet, the following lines could be added to the X*pointerkeys file: tablet_subset_xorigin 68 tablet_subset_yorigin 40 tablet_subset_width 296 tablet_subset_height 216 Page 94 Graphics Administration Guide for HP-UX 10.20
-
 1
1 -
2
-
3
-
4
-
5
-
6
-
7
-
8
-
9
-
10
-
11
-
12
-
13
-
14
-
15
-
16
-
17
-
18
-
19
-
20
-
21
-
22
-
23
-
24
-
25
-
26
-
27
-
28
-
29
-
30
-
31
-
32
-
33
-
34
-
35
-
36
-
37
-
38
-
39
-
40
-
41
-
42
-
43
-
44
-
45
-
46
-
47
-
48
-
49
-
50
-
51
-
52
-
53
-
54
-
55
-
56
-
57
-
58
-
59
-
60
-
61
-
62
-
63
-
64
-
65
-
66
-
67
-
68
-
69
-
70
-
71
-
72
-
73
-
74
-
75
-
76
-
77
-
78
-
79
-
80
-
81
-
82
-
83
-
84
-
85
-
86
-
87
-
88
-
 89
89 -
 90
90 -
 91
91 -
 92
92 -
 93
93 -
 94
94 -
 95
95 -
 96
96 -
 97
97 -
 98
98 -
 99
99 -
100
-
101
-
102
-
103
-
104
-
105
-
106
-
107
-
108
-
109
-
110
-
111
-
112
-
113
-
114
-
115
-
116
-
117
-
118
-
119
-
120
-
121
-
122
-
123
-
124
-
125
-
126
-
127
-
128
-
129
-
130
-
131
-
132
-
133
-
134
-
135
-
136
-
137
-
138
-
139
-
140
-
141
-
142
-
143
-
144
-
145
-
146
-
147
-
148
-
149
-
150
-
151
-
152
-
153
-
154
-
155
-
156
-
157
-
158
-
159
-
160
-
161
-
162
-
163
-
164
-
165
-
166
-
167
-
168
-
169
-
170
-
171
 |
 |
