HP Visualize J5000 hp workstations - hp-ux 10.20 graphics administration guide - Page 96
mouse pointer. You could insert the following lines in your
 |
View all HP Visualize J5000 manuals
Add to My Manuals
Save this manual to your list of manuals |
Page 96 highlights
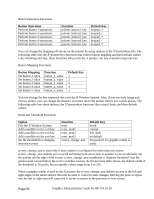
However, suppose you wanted to move only one pixel to the left. Although the default value of pointer_mod2_amt is one pixel, no key is assigned to the modifier for that amount. Thus, you would need to edit the X0pointerkeys file (or create an X*pointerkeys) to include a line assigning one of the modifier keys to pointer_amt_mod2. The following line in X0pointerkeys assigns the key to pointer_amt_mod2: ###pointerfunction key pointer_amt_mod2 left_shift Or suppose you wanted to set up your X0pointerkeys file so that you could move 1, 10, 25, and 100 pixels. The following lines show one way to specify this: ###pointer function key pointer_amt_mod1 left_extend pointer_amt_mod2 left_shift pointer_amt_mod3 control pointer_move 1_pixels pointer_mod1_amt 10_pixels pointer_mod2_amt 25_pixels pointer_mod3_amt 100_pixels With these lines in effect, one press of the key on the keypad moves the pointer 1 pixel to the left. Pressing the left and moves the pointer 10 pixels to the left. Pressing moves the pointer 25 pixels to the left. And pressing moves the pointer 100 pixels to the left. Or, take the case, previously mentioned, where you want to use the arrow keys for both text cursor and mouse pointer. You could insert the following lines in your X0pointerkeys file: ###pointer function key pointer_key_mod1 left_shift pointer_left_key cursor_left pointer_right_key cursor_right pointer_up_key cursor_up pointer_down_key cursor_down The above lines enable you to use the arrow keys for cursor movement, while using the shifted arrow keys for pointer movement. Note: Only the key (and not the ) modifies the press of an arrow key from cursor to pointer movement. Now, suppose you want to use the arrow keys to operate the pointer, and you also need the arrow keys to control the cursor in an hpterm window. Furthermore, another application uses the shift-arrow key sequence to control its cursor. Page 96 Graphics Administration Guide for HP-UX 10.20
-
 1
1 -
2
-
3
-
4
-
5
-
6
-
7
-
8
-
9
-
10
-
11
-
12
-
13
-
14
-
15
-
16
-
17
-
18
-
19
-
20
-
21
-
22
-
23
-
24
-
25
-
26
-
27
-
28
-
29
-
30
-
31
-
32
-
33
-
34
-
35
-
36
-
37
-
38
-
39
-
40
-
41
-
42
-
43
-
44
-
45
-
46
-
47
-
48
-
49
-
50
-
51
-
52
-
53
-
54
-
55
-
56
-
57
-
58
-
59
-
60
-
61
-
62
-
63
-
64
-
65
-
66
-
67
-
68
-
69
-
70
-
71
-
72
-
73
-
74
-
75
-
76
-
77
-
78
-
79
-
80
-
81
-
82
-
83
-
84
-
85
-
86
-
87
-
88
-
89
-
90
-
 91
91 -
 92
92 -
 93
93 -
 94
94 -
 95
95 -
 96
96 -
 97
97 -
 98
98 -
 99
99 -
 100
100 -
 101
101 -
102
-
103
-
104
-
105
-
106
-
107
-
108
-
109
-
110
-
111
-
112
-
113
-
114
-
115
-
116
-
117
-
118
-
119
-
120
-
121
-
122
-
123
-
124
-
125
-
126
-
127
-
128
-
129
-
130
-
131
-
132
-
133
-
134
-
135
-
136
-
137
-
138
-
139
-
140
-
141
-
142
-
143
-
144
-
145
-
146
-
147
-
148
-
149
-
150
-
151
-
152
-
153
-
154
-
155
-
156
-
157
-
158
-
159
-
160
-
161
-
162
-
163
-
164
-
165
-
166
-
167
-
168
-
169
-
170
-
171
 |
 |
