HP Xb3000 HP xb3000 Notebook Expansion Base - Maintenance and Service Guide
HP Xb3000 - Notebook Expansion Base Docking Station Manual
 |
UPC - 882780374928
View all HP Xb3000 manuals
Add to My Manuals
Save this manual to your list of manuals |
HP Xb3000 manual content summary:
- HP Xb3000 | HP xb3000 Notebook Expansion Base - Maintenance and Service Guide - Page 1
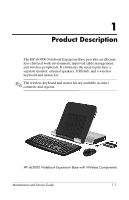
Base Document Part Number: 416285-002 July 2007 This guide is a troubleshooting reference used for maintaining a nd servicing the HP xb3000 Notebook Expansion Base. It provides comprehensive information on identifying expansion base features, components, and spare parts; troubleshooting problems - HP Xb3000 | HP xb3000 Notebook Expansion Base - Maintenance and Service Guide - Page 2
should be construed as constituting an additional warranty. HP shall not be liable for technical or editorial errors or omissions contained herein. Maintenance and Service Guide HP xb3000 Notebook Expansion Base Second Edition: July 2007 First Edition: July 2006 Document Part Number: 416285-002 - HP Xb3000 | HP xb3000 Notebook Expansion Base - Maintenance and Service Guide - Page 3
2.1 Before Replacing Parts 2-1 2.2 Problems and Solutions 2-2 3 Illustrated Parts Catalog 3.1 Serial Number Location 3-1 3.2 Expansion Base Major Components 3-2 3.3 Wireless Components 3-4 3.4 Hard Drive Components 3-5 3.5 Sequential Part Number Listing 3-6 Maintenance and Service Guide iii - HP Xb3000 | HP xb3000 Notebook Expansion Base - Maintenance and Service Guide - Page 4
5.1 Serial Number 5-2 5.2 Disassembly Sequence Chart 5-3 5.3 Preparing the Expansion Base for Disassembly . . . . 5-3 5.4 Installing an Optional Hard Drive 5-4 6 Specifications A Screw Listing B Connector Pin Assignments C Power Cord Set Requirements Index iv Maintenance and Service Guide - HP Xb3000 | HP xb3000 Notebook Expansion Base - Maintenance and Service Guide - Page 5
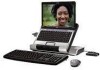
eliminates the need to purchase a separate monitor, external speakers, USB hub, and a wireless keyboard and mouse kit. ✎ The wireless keyboard and mouse kit are available in select countries and regions. HP xb3000 Notebook Expansion Base with Wireless Components Maintenance and Service Guide 1-1 - HP Xb3000 | HP xb3000 Notebook Expansion Base - Maintenance and Service Guide - Page 6
The HP xb3000 Notebook Expansion Base is compatible with the following platforms: ■ HP Pavilion dv9000 Notebook PC ■ HP Pavilion dv6000 Notebook PC ■ HP Pavilion dv2000 Notebook PC ■ HP Pavilion tx1000 Entertainment PC ■ Compaq Presario V6000 Notebook PC ■ Compaq Presario V3000 Notebook PC - HP Xb3000 | HP xb3000 Notebook Expansion Base - Maintenance and Service Guide - Page 7
❏ Universal Serial Bus (USB) 2.0 connectors (6) ❏ Power connector ❏ Component video jacks ❏ S-Video-out ❏ Composite video jack ❏ S/PDIF (Sony/Philips Digital Interface) audio connector ❏ External monitor port ❏ RJ-45/Ethernet port ❏ Hard drive power connector Maintenance and Service Guide 1-3 - HP Xb3000 | HP xb3000 Notebook Expansion Base - Maintenance and Service Guide - Page 8
components on the front panel of the expansion base are shown below and described in Table 1-1. Front Components Table 1-1 Front Components Item Component Function 1 Speakers (2) Produce stereo expansion base sound. 2 Power button Turns on the computer. 1-4 Maintenance and Service Guide - HP Xb3000 | HP xb3000 Notebook Expansion Base - Maintenance and Service Guide - Page 9
Table 1-1 Front Components (Continued) Component Function Power light On: The expansion base is connected to AC power. Mute button Mutes and restores expansion base sound. Volume down button Blinking: The volume over the right half of the scroll zone. Maintenance and Service Guide 1-5 - HP Xb3000 | HP xb3000 Notebook Expansion Base - Maintenance and Service Guide - Page 10
expansion base sound when connected to optional powered expansion base speakers are muted when a device is connected to the headphone jack. 3 USB ports (2)* Connect optional USB devices. *There are 4 additional USB ports on the rear panel of the expansion base. 1-6 Maintenance and Service Guide - HP Xb3000 | HP xb3000 Notebook Expansion Base - Maintenance and Service Guide - Page 11
Product Description The external component on the left side of the expansion base is shown below and described in Table 1-3. Left-Side Components Component Hard drive bay Table 1-3 Left-Side Component Function Holds an optional internal hard drive. Maintenance and Service Guide 1-7 - HP Xb3000 | HP xb3000 Notebook Expansion Base - Maintenance and Service Guide - Page 12
Table 1-4. Rear Panel Components Item 1 2 3 4 Table 1-4 Rear Panel Components Component Function Power connector Connects the expansion base to the computer AC adapter. USB ports (4)* Connect optional USB devices. Component video jacks Connect an optional component video device. S-Video - HP Xb3000 | HP xb3000 Notebook Expansion Base - Maintenance and Service Guide - Page 13
drive carrier for the optional internal hard drive. 12 Expansion cable Connects the expansion base to a computer. 13 Connection indicator On: The computer is connected correctly. light *There are 2 additional USB ports on the right side of the expansion base. Maintenance and Service Guide - HP Xb3000 | HP xb3000 Notebook Expansion Base - Maintenance and Service Guide - Page 14
described in Table 1-5 are included with the expansion base. Wireless Accessories Item 1 2 3 4 Table 1-5 Keyboard Components Component Function Receiver Connects to a USB port on the expansion base. Enables connection between the expansion base and the wireless keyboard and mouse. Wireless - HP Xb3000 | HP xb3000 Notebook Expansion Base - Maintenance and Service Guide - Page 15
out ■ RJ-11 (modem) connection (from wall to expansion base) ■ RJ-11 (modem) connection (from expansion base to computer) ■ RJ-45 (network) port ■ USB 2.0 connectors (3) ■ S-Video-out ■ Serial port Ä CAUTION: To properly ventilate the expansion base, allow at least a 7.6-cm (3-inch) clearance on the - HP Xb3000 | HP xb3000 Notebook Expansion Base - Maintenance and Service Guide - Page 16
1.5 Using the Expansion Base Adjusting the Expansion Base The expansion base must be upright before a computer is attached. To adjust the expansion base to an upright position: » Lift the upper panel to the appropriate height. Adjusting the Expansion Base 1-12 Maintenance and Service Guide - HP Xb3000 | HP xb3000 Notebook Expansion Base - Maintenance and Service Guide - Page 17
Product Description To lower the expansion base: 1. Pull out the handles on each side of the expansion base 1. 2. Grasp the handles and lower the upper panel of the expansion base 2. Lowering the Expansion Base Maintenance and Service Guide 1-13 - HP Xb3000 | HP xb3000 Notebook Expansion Base - Maintenance and Service Guide - Page 18
outlet. ■ If provided with a 3-pin attachment plug on your power cord, plug the cord into a grounded (earthed) 3-pin outlet. Do not disable the power cord grounding pin; for example, by using a 2-pin adapter. The grounding pin is an important safety feature. 1-14 Maintenance and Service Guide - HP Xb3000 | HP xb3000 Notebook Expansion Base - Maintenance and Service Guide - Page 19
the AC power cord to the AC adapter 2. 3. Connect the AC power cord to the AC outlet 3. Connecting the Expansion Base to AC Power ✎ Power cords and power outlets vary by region and country. ✎ The AC adapter is included with the computer or purchased separately. Maintenance and Service Guide 1-15 - HP Xb3000 | HP xb3000 Notebook Expansion Base - Maintenance and Service Guide - Page 20
V6000 Notebook PC ■ Compaq Presario V3000 Notebook PC Refer to Section 1.6, "Using the HP Expansion Accessory Adapter," if you are connecting a computer that requires the HP Expansion Accessory Adapter. 1. Turn the expansion base upright. 2. Open the computer. 1-16 Maintenance and Service Guide - HP Xb3000 | HP xb3000 Notebook Expansion Base - Maintenance and Service Guide - Page 21
3. Slide the computer into the expansion base with the keyboard facing you. Sliding the Computer into the Expansion Base ✎ The computer is held in place by a buffer pad, which prevents the computer from shifting out of its proper position in the expansion base. Maintenance and Service Guide 1-17 - HP Xb3000 | HP xb3000 Notebook Expansion Base - Maintenance and Service Guide - Page 22
. ✎ The location of the expansion port on your computer varies by computer series and model. Extracting the Expansion Cable ✎ It is important to position the cable correctly, so that the cable can move freely. A cable guide assists you in positioning the cable. 1-18 Maintenance and Service Guide - HP Xb3000 | HP xb3000 Notebook Expansion Base - Maintenance and Service Guide - Page 23
connection was made properly, the connection indicator light on the expansion base will light up solid blue. ✎ After the computer is connected to the expansion base, the internal computer speakers are disabled and the expansion base speakers are activated. Maintenance and Service Guide 1-19 - HP Xb3000 | HP xb3000 Notebook Expansion Base - Maintenance and Service Guide - Page 24
HP Expansion Accessory Adapter The following computers require use of the HP Expansion Accessory Adapter to connect the computer to the expansion base: ■ HP Pavilion dv8300 Notebook PC ■ HP Pavilion dv8000 Notebook PC ■ HP Pavilion dv5000 Notebook PC ■ HP Pavilion dv4000 Notebook PC ■ HP Pavilion - HP Xb3000 | HP xb3000 Notebook Expansion Base - Maintenance and Service Guide - Page 25
using the HP Expansion Accessory Adapter: 1. Connect the HP Expansion Accessory Adapter to the computer. Connecting the HP Expansion Accessory Adapter 2. Slide the computer into the expansion base and gently pull the expansion cable from its docked location. Maintenance and Service Guide 1-21 - HP Xb3000 | HP xb3000 Notebook Expansion Base - Maintenance and Service Guide - Page 26
Product Description 3. Connect the expansion cable to the HP Expansion Accessory Adapter. Connecting the Expansion Cable to the HP Expansion Accessory Adapter 1-22 Maintenance and Service Guide - HP Xb3000 | HP xb3000 Notebook Expansion Base - Maintenance and Service Guide - Page 27
button on the bottom of the keyboard 2. Synchronizing the Wireless Receiver and Wireless Keyboard 3. Turn the keyboard right-side up. 4. Wait 20 seconds. Maintenance and Service Guide 1-23 - HP Xb3000 | HP xb3000 Notebook Expansion Base - Maintenance and Service Guide - Page 28
2. Synchronizing the Wireless Receiver and Wireless Mouse 7. Turn the mouse right-side up. 8. Wait 20 seconds. Your wireless keyboard and mouse will now operate while a notebook is connected to the expansion base. 1-24 Maintenance and Service Guide - HP Xb3000 | HP xb3000 Notebook Expansion Base - Maintenance and Service Guide - Page 29
Parts When troubleshooting a problem, check the following list for possible solutions before replacing parts: ■ Be sure that cables are connected properly to the suspected defective part. ■ Be sure that all required device drivers are installed on the computer. Maintenance and Service Guide - HP Xb3000 | HP xb3000 Notebook Expansion Base - Maintenance and Service Guide - Page 30
Docking Problems and Solutions Problem Possible Cause The computer is turned on and properly docked, but the power light and docking light are not on. Power cord is not plugged into either the expansion base or the AC outlet. Some of the ports or connectors do not work, even though the docking - HP Xb3000 | HP xb3000 Notebook Expansion Base - Maintenance and Service Guide - Page 31
Troubleshooting Table 2-2 Undocking Problems and Solutions Problem The computer will not disconnect from the expansion base. Possible Cause The connectors may be jammed. Solution Press the eject button all the way in. If the computer does not disconnect, repeat this procedure - HP Xb3000 | HP xb3000 Notebook Expansion Base - Maintenance and Service Guide - Page 32
Solutions Problem The print driver was successfully installed, but I am unable to print. Possible Cause The wrong print processor may be selected. A new device is not recognized as part of the system. The computer may be properly aligned, but is not fully seated or docked in the expansion base - HP Xb3000 | HP xb3000 Notebook Expansion Base - Maintenance and Service Guide - Page 33
and Solutions (Continued) Problem A new device is not recognized as part of the system. (Continued) Possible Cause The device cable or power cord is loose. The device was connected while the system was on. Cabling is incorrect. You may need to install device drivers on the computer. Solution - HP Xb3000 | HP xb3000 Notebook Expansion Base - Maintenance and Service Guide - Page 34
media tray. and then manually eject the media tray. There is no power to the Turn on power to the expansion base. system, and then eject the disc. Table 2-5 MultiBay II Problems and Solutions Problem The MultiBay II drive is not recognized. Possible Cause The drive is not properly inserted - HP Xb3000 | HP xb3000 Notebook Expansion Base - Maintenance and Service Guide - Page 35
are using ■ The manufacturer and model of the printer or other accessories connected to the computer and expansion base ■ Configuration settings, including contents of the system files To access Customer Care, visit the HP Web site at http://www.hp.com/support. Maintenance and Service Guide 2-7 - HP Xb3000 | HP xb3000 Notebook Expansion Base - Maintenance and Service Guide - Page 36
Troubleshooting 2-8 Maintenance and Service Guide - HP Xb3000 | HP xb3000 Notebook Expansion Base - Maintenance and Service Guide - Page 37
and a reference for spare part numbers and option part numbers. 3.1 Serial Number Location When ordering parts or requesting information, provide the expansion base serial number and model number located on the bottom of the base plate. Serial Number Location Maintenance and Service Guide 3-1 - HP Xb3000 | HP xb3000 Notebook Expansion Base - Maintenance and Service Guide - Page 38
Illustrated Parts Catalog 3.2 Expansion Base Major Components HP Notebook Expansion Base Major Components 3-2 Maintenance and Service Guide - HP Xb3000 | HP xb3000 Notebook Expansion Base - Maintenance and Service Guide - Page 39
Catalog Table 3-1 Spare Parts: Expansion Base Major Components Item 1 2 3 Description HP xb3000 Notebook Expansion Base HP Expansion Accessory Adapter Hard drive power cords For use in: Australia The United States Hard drive AC adapters (not illustrated) 30W, California Energy Commission (CEC - HP Xb3000 | HP xb3000 Notebook Expansion Base - Maintenance and Service Guide - Page 40
Wireless receiver Wireless keyboard For use in: Asia Pacific Brazil Korea 417333-371 417333-201 417333-AD1 Wireless mouse Latin America The United States Spare Part Number 417335-001 417333-161 417333-001 417334-001 3-4 Maintenance and Service Guide - HP Xb3000 | HP xb3000 Notebook Expansion Base - Maintenance and Service Guide - Page 41
Illustrated Parts Catalog 3.4 Hard Drive Components HP Notebook Expansion Base Hard Drive Components Table 3-3 Spare Parts: Hard Drive Components Item Description Spare Part Number 1 Hard drive-300-GB,* Serial ATA 417703-001 2 Hard drive carrier 417700-001 3 Hard drive AC adapters (not - HP Xb3000 | HP xb3000 Notebook Expansion Base - Maintenance and Service Guide - Page 42
Power cord for use in the United States Power cord for use in Australia 30-watt, non-CEC compliant hard drive AC adapter Expansion base HP Expansion Accessory Adapter Hard drive carrier 300-GB, serial ATA hard drive 30-watt, CEC compliant hard drive AC adapter 3-6 Maintenance and Service Guide - HP Xb3000 | HP xb3000 Notebook Expansion Base - Maintenance and Service Guide - Page 43
4 Removal and Replacement Preliminaries This chapter provides essential information for proper and safe removal and replacement service. 4.1 Tools Required You will need the following tools to complete the removal and replacement procedures: ■ Magnetic screwdriver ■ Phillips P0 and P1 screwdrivers ■ - HP Xb3000 | HP xb3000 Notebook Expansion Base - Maintenance and Service Guide - Page 44
parts. Use care when handling the plastic parts. Apply pressure only at the points designated in the maintenance instructions. Cables and Connectors Ä CAUTION: When servicing the expansion base cannot be caught or snagged by parts being removed or replaced. Handle flex cables with extreme care; - HP Xb3000 | HP xb3000 Notebook Expansion Base - Maintenance and Service Guide - Page 45
care. To prevent damage to the expansion base, damage to a removable drive, or loss of information, observe the following precautions: ■ Before removing or inserting a hard drive, shut down the system (computer and expansion base). If you are unsure whether the system is off or in hibernation, turn - HP Xb3000 | HP xb3000 Notebook Expansion Base - Maintenance and Service Guide - Page 46
in many cases, the discharge contains enough power to alter device parameters or melt silicon junctions work perfectly throughout a normal cycle. Or the device might function normally for a while, then degrade in the internal layers, reducing its life expectancy. 4-4 Maintenance and Service Guide - HP Xb3000 | HP xb3000 Notebook Expansion Base - Maintenance and Service Guide - Page 47
grounded when touching a sensitive component or assembly. ■ Store reusable electrostatic-sensitive parts from assemblies in protective packaging or nonconductive foam. ■ Use transporters and conveyors not possible, use an ionizer to dissipate electric charges. Maintenance and Service Guide 4-5 - HP Xb3000 | HP xb3000 Notebook Expansion Base - Maintenance and Service Guide - Page 48
components, parts, and assemblies by the case or PCM laminate. Handle these items only at static-free workstations. ■ Avoid contact with pins, leads, or circuitry. ■ Turn off power and input signals before inserting or removing connectors or test equipment. 4-6 Maintenance and Service Guide - HP Xb3000 | HP xb3000 Notebook Expansion Base - Maintenance and Service Guide - Page 49
system. Wrist straps are flexible straps with a minimum of one megohm ±10% resistance in the ground cords at standing workstations and are compatible with most types of shoes cords of one megohm resistance. ■ Static-dissipative tables or floor mats with hard ties to the ground. ■ Field service kits - HP Xb3000 | HP xb3000 Notebook Expansion Base - Maintenance and Service Guide - Page 50
4-2 Static-Shielding Materials Material Use Voltage Protection Level Antistatic plastic Bags 1,500 V Carbon-loaded plastic Floor mats 7,500 V Metallized laminate Floor mats 5,000 V 4-8 Maintenance and Service Guide - HP Xb3000 | HP xb3000 Notebook Expansion Base - Maintenance and Service Guide - Page 51
and replacement procedures. There are as many as 7 screws, in 3 different sizes, that must be removed, replaced, or loosened when servicing the expansion base. Make special note of screw size and location during removal and replacement. Refer to Appendix A, "Screw Listing," for detailed information - HP Xb3000 | HP xb3000 Notebook Expansion Base - Maintenance and Service Guide - Page 52
Removal and Replacement Procedures 5.1 Serial Number Report the expansion base serial number to HP when requesting information or ordering spare parts. The serial number is located on the bottom of the expansion base. Serial Number Location 5-2 Maintenance and Service Guide - HP Xb3000 | HP xb3000 Notebook Expansion Base - Maintenance and Service Guide - Page 53
for Disassembly Installing an Optional Hard Drive Hard drive carrier 1 Hard drive rear panel 2 Hard drive 4 5.3 Preparing the Expansion Base for Disassembly Perform the following steps before disassembling the expansion base: 1. If the computer is in the expansion base, turn off the computer - HP Xb3000 | HP xb3000 Notebook Expansion Base - Maintenance and Service Guide - Page 54
optional internal storage. 2 Hard drive power cord Connects to an AC wall outlet. 3 Hard drive power adapter Connects to the hard drive power connector. 4 Screws (6) Secure the optional internal hard drive to the hard drive carrier. 5 Hard drive carrier Holds the optional internal hard drive - HP Xb3000 | HP xb3000 Notebook Expansion Base - Maintenance and Service Guide - Page 55
Removal and Replacement Procedures 1. Remove the Phillips PM2.5×7.0 screw 1 that secures the hard drive carrier to the expansion base. 2. Remove the hard drive carrier 2 from the expansion base. Removing the Hard Drive Carrier Maintenance and Service Guide 5-5 - HP Xb3000 | HP xb3000 Notebook Expansion Base - Maintenance and Service Guide - Page 56
and Replacement Procedures 3. Remove the two Phillips PM2.5×5.0 screws 1 that secure the hard drive carrier rear panel to the hard drive carrier. 4. Remove the hard drive carrier rear panel 2 from the hard drive carrier. Removing the Hard Drive Carrier Rear Panel 5-6 Maintenance and Service Guide - HP Xb3000 | HP xb3000 Notebook Expansion Base - Maintenance and Service Guide - Page 57
Procedures 5. With the hard drive connectors toward you, insert the hard drive 1 into the hard drive carrier. 6. Install the four Phillips PM3.0×4.0 screws 2 to secure the hard drive to the hard drive carrier. Inserting the Hard Drive into the Hard Drive Carrier Maintenance and Service Guide 5-7 - HP Xb3000 | HP xb3000 Notebook Expansion Base - Maintenance and Service Guide - Page 58
Removal and Replacement Procedures 7. Connect the hard drive data cable 1 and the hard drive power cable 2 to the appropriate connectors on the back of the hard drive. Connecting the Hard Drive Carrier Rear Panel 5-8 Maintenance and Service Guide - HP Xb3000 | HP xb3000 Notebook Expansion Base - Maintenance and Service Guide - Page 59
Removal and Replacement Procedures 8. Insert the hard drive carrier 1 into the expansion base hard drive bay. 9. Install the Phillips PM2.5×5.0 screw 2 to secure the hard drive carrier to the expansion base. Installing the Hard Drive Carrier Maintenance and Service Guide 5-9 - HP Xb3000 | HP xb3000 Notebook Expansion Base - Maintenance and Service Guide - Page 60
adapter 1 to the hard drive power connector on the expansion base rear panel. 11. Connect the power cord to the hard drive power adapter 2, and then connect the power cord to the wall outlet 3. Connecting the Hard Drive AC Adapter ✎ For more information on the hard drive, refer to the instructions - HP Xb3000 | HP xb3000 Notebook Expansion Base - Maintenance and Service Guide - Page 61
This chapter provides physical and performance specifications. Table 6-1 Expansion Base Dimensions Length Width Height 45.6 cm 32.8 cm 12.2 cm 17.9 in 12.9 in 4.8 in Weight With hard drive Without hard drive 5.25 kg 4.93 kg 11.5 lb 10.9 lb Temperature Operating* Nonoperating - HP Xb3000 | HP xb3000 Notebook Expansion Base - Maintenance and Service Guide - Page 62
to 131°F) ✎ Certain restrictions and exclusions apply. Consult Customer Care for details. *Total storage capacity is 300 billion bytes (for hard drives, 1GB = 1 billion bytes); actual accessible capacity is less. Actual drive specifications may differ slightly. 6-2 Maintenance and Service Guide - HP Xb3000 | HP xb3000 Notebook Expansion Base - Maintenance and Service Guide - Page 63
A Screw Listing This appendix provides specification and reference information for the screws used on the expansion base. Maintenance and Service Guide A-1 - HP Xb3000 | HP xb3000 Notebook Expansion Base - Maintenance and Service Guide - Page 64
Listing Table A-1 Phillips PM2.5×7.0 Screw Head mm Color Qty. Length Thread Width Black 1 7.0 mm 2.5 mm 5.0 mm Where used: One screw that secures the hard drive carrier to the expansion base (documented in Section 5.4) Phillips PM2.5×7.0 Screw Location A-2 Maintenance and Service Guide - HP Xb3000 | HP xb3000 Notebook Expansion Base - Maintenance and Service Guide - Page 65
A-2 Phillips PM2.5×5.0 Screw Head mm Color Qty. Length Thread Width Silver 2 5.0 mm 2.5 mm 5.0 mm Where used: 2 screws that secure the hard drive carrier rear panel to the hard drive carrier (documented in Section 5.4) Phillips PM2.5×5.0 Screw Locations Maintenance and Service Guide A-3 - HP Xb3000 | HP xb3000 Notebook Expansion Base - Maintenance and Service Guide - Page 66
Screw Listing Table A-3 Phillips PM3.0×4.0 Screw Head mm Color Qty. Length Thread Width Silver 4 4.0 mm 3.0 mm 5.0 mm Where used: 4 screws that secure the hard drive to the hard drive carrier (documented in Section 5.4) Phillips PM3.0×4.0 Screw Locations A-4 Maintenance and Service Guide - HP Xb3000 | HP xb3000 Notebook Expansion Base - Maintenance and Service Guide - Page 67
B Connector Pin Assignments Table B-1 Audio-In (Microphone) Jack Pin Signal 1 Audio signal in 2 Audio signal in Pin Signal 3 Ground Maintenance and Service Guide B-1 - HP Xb3000 | HP xb3000 Notebook Expansion Base - Maintenance and Service Guide - Page 68
Connector Pin Assignments Table B-2 Audio-Out (Headphone) Jack Pin Signal 1 Audio out, left channel 2 Audio out, right channel Pin Signal 3 Ground B-2 Maintenance and Service Guide - HP Xb3000 | HP xb3000 Notebook Expansion Base - Maintenance and Service Guide - Page 69
analog Pin Signal 9 +5 VDC 10 Ground 11 Monitor detect 12 DDC 2B data 13 Horizontal sync 14 Vertical sync 15 DDC 2B clock Maintenance and Service Guide B-3 - HP Xb3000 | HP xb3000 Notebook Expansion Base - Maintenance and Service Guide - Page 70
Connector Pin Assignments Table B-4 RJ-45 (Network) Jack Pin Signal 1 Transmit + 2 Transmit - 3 Receive + 4 Unused Pin Signal 5 Unused 6 Receive - 7 Unused 8 Unused B-4 Maintenance and Service Guide - HP Xb3000 | HP xb3000 Notebook Expansion Base - Maintenance and Service Guide - Page 71
Connector Pin Assignments Table B-5 S-Video-Out Jack Pin Signal 1 TV-Ground 2 TV-CVBS 3 TV-Ground 4 TV-Ground Pin Signal 5 TV-CD 6 TV-Ground 7 TV-YD Maintenance and Service Guide B-5 - HP Xb3000 | HP xb3000 Notebook Expansion Base - Maintenance and Service Guide - Page 72
Connector Pin Assignments Table B-6 Universal Serial Bus Pin Signal 1 +5 VDC 2 Data - Pin Signal 3 Data + 4 Ground B-6 Maintenance and Service Guide - HP Xb3000 | HP xb3000 Notebook Expansion Base - Maintenance and Service Guide - Page 73
240 volts AC. The power cord set included with the expansion base meets the requirements for use in the country where the equipment is purchased. Power cord sets for use in other countries must meet the requirements of the country where the expansion base is used. Maintenance and Service Guide C-1 - HP Xb3000 | HP xb3000 Notebook Expansion Base - Maintenance and Service Guide - Page 74
rating of 125 or 250 V AC, as required by each country's power system. ■ The appliance coupler must meet the mechanical configuration of an EN 60 320/IEC 320 Standard Sheet C13 connector for mating with the appliance inlet on the back of the expansion base. C-2 Maintenance and Service Guide - HP Xb3000 | HP xb3000 Notebook Expansion Base - Maintenance and Service Guide - Page 75
Power Cord Set Requirements Country-Specific Requirements 3-Conductor Power Cord cord must be Type HO5VV-F, 3-conductor, 1.0 mm² conductor size. Power cord configuration. 3. The appliance coupler, flexible cord, and wall plug must bear a "T" Dentori Law. The flexible cord must be Type VCT - HP Xb3000 | HP xb3000 Notebook Expansion Base - Maintenance and Service Guide - Page 76
it will be used. 5. The flexible cord must be Type VCTF, 3-conductor, 0.75 mm² conductor size. Power cord set fittings (appliance coupler and wall plug) must bear the certification mark of the agency responsible for evaluation in the country where it will be used. C-4 Maintenance and Service Guide - HP Xb3000 | HP xb3000 Notebook Expansion Base - Maintenance and Service Guide - Page 77
4-3 E electrostatic discharge 4-4, 4-8 expansion accessory adapter connecting 1-20 spare part number 3-3, 3-6 expansion base components 3-2 spare part number 3-3, 3-6 specifications 6-1 expansion cable 1-9 external monitor port location 1-9 pin assignments B-3 Maintenance and Service Guide Index-1 - HP Xb3000 | HP xb3000 Notebook Expansion Base - Maintenance and Service Guide - Page 78
hard drive bay 1-7 hard drive carrier removal 5-5 spare part number 3-5, 3-6 hard drive carrier screw 1-9 hard drive components 3-5 hard drive power connector 1-9 hard drive power cord, spare part numbers 3-3 headphone jack location 1-6 pin assignments B-2 HP Expansion Accessory Adapter connecting - HP Xb3000 | HP xb3000 Notebook Expansion Base - Maintenance and Service Guide - Page 79
number 3-1, 5-2 service considerations 4-2 speakers 1-4 specifications expansion base 6-1 hard drive 6-2 static shielding materials 4-8 S-Video-out jack location 1-8 pin assignments B-5 T tools required 4-1 transporting precautions 4-5 troubleshooting 2-1 U Universal Serial Bus (USB) port location
-
 1
1 -
 2
2 -
 3
3 -
 4
4 -
 5
5 -
 6
6 -
 7
7 -
8
-
9
-
10
-
11
-
12
-
13
-
14
-
15
-
16
-
17
-
18
-
19
-
20
-
21
-
22
-
23
-
24
-
25
-
26
-
27
-
28
-
29
-
30
-
31
-
32
-
33
-
34
-
35
-
36
-
37
-
38
-
39
-
40
-
41
-
42
-
43
-
44
-
45
-
46
-
47
-
48
-
49
-
50
-
51
-
52
-
53
-
54
-
55
-
56
-
57
-
58
-
59
-
60
-
61
-
62
-
63
-
64
-
65
-
66
-
67
-
68
-
69
-
70
-
71
-
72
-
73
-
74
-
75
-
76
-
77
-
78
-
79
 |
 |

Maintenance and Service
Guide
HP xb3000 Notebook Expansion Base
Document Part Number:
416285-002
July 2007
This guide is a troubleshooting reference used for maintaining a
nd servicing the HP xb3000 Notebook Expansion Base. It
provides comprehensive information on identifying expansion
base features, components, and spare parts; troubleshooting
problems; and performing disassembly procedures.