HP mp3320 User Guide
HP mp3320 - Digital Projector Manual
 |
View all HP mp3320 manuals
Add to My Manuals
Save this manual to your list of manuals |
HP mp3320 manual content summary:
- HP mp3320 | User Guide - Page 1
hp mp3320 series digital projector user's guide 1 - HP mp3320 | User Guide - Page 2
warranties for HP products and services are set forth in the express warranty statements accompanying such products and services. Nothing herein should be construed as constituting an additional warranty. HP the copyright laws. The programs that control this product are copyrighted and all rights - HP mp3320 | User Guide - Page 3
's in the Box 8 Identifying Common Features 9 Projector at a glance 10 Projector buttons and lights 11 Back panel 12 Remote control 13 Accessories 14 Setting Up the Projector 15 To position the projector 16 To set up on a table 17 To connect power 18 To connect a computer 19 To connect - HP mp3320 | User Guide - Page 4
Routine Maintenance 43 To get the projector status 43 To clean the projector lens 44 To replace the lamp module 44 To replace the battery in the remote control 46 Upgrading the Projector 47 To update the firmware 47 5 Installing Permanently Installing the Projector 49 To install on a table - HP mp3320 | User Guide - Page 5
Contents 6 Fixing Problems Troubleshooting Suggestions 55 Start-up problems 56 Picture problems 57 Sound problems 61 Interruption problems 61 Remote control problems 62 Testing the Projector 63 To run the projector diagnostics 63 7 Reference Specifications 65 Safety Information 70 Safety - HP mp3320 | User Guide - Page 6
Contents 6 User's Guide - HP mp3320 | User Guide - Page 7
1 Setting Up The chapter explains how to install and set up the HP digital projector. ■ "What's in the Box?" on page 8 ■ "Identifying Common Features" on page 9 ■ "Setting Up the Projector" on page 15 ■ "Turning On and Off" on page 24 ■ "Making Basic Adjustments" on page 26 User's Guide 7 - HP mp3320 | User Guide - Page 8
output. 5 Remote control Control projector. 6 Quick Setup Guide, warranty, Provide documentation to help get started support, and port activation and find support. documentation 7 Documentation CD Contains user's guide and other documentation. 8 Power cord Connects projector to power source - HP mp3320 | User Guide - Page 9
Setting Up Identifying Common Features This section identifies common features and functions of the projector. ■ "Projector at a glance" on page 10 ■ "Projector buttons and lights" on page 11 ■ "Back panel" on page 12 ■ "Remote control" on page 13 ■ "Accessories" on page 14 User's Guide 9 - HP mp3320 | User Guide - Page 10
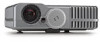
for remote control 7 Lens cover Function Connects power cord to projector. Contains buttons and lights. Enlarges picture size 100-120%. Focuses at distances of 1.2 to 12 m (4 to 40 ft). Adjusts the height of the picture. Receives signals from the remote control. Protects lens. 10 User's Guide - HP mp3320 | User Guide - Page 11
lights 1 2 34 5 6 Setting Up auto sync back 8 7 9 Identifying buttons and lights on the projector Symbol Item 1 Power button Function Turns the projector on or off. 2 Enter button, back button, Change projector settings using the on-screen and directional arrows menu. 3 Auto sync button - HP mp3320 | User Guide - Page 12
the back panel Symbol Item 1 Security slot Function Secures the projector using a cable lock. 2 Receiver for remote control Receives signals from the remote control. 3 USB output Connects to computer to control the mouse. 4 Audio input Connects audio source. 5 Composite-video input - HP mp3320 | User Guide - Page 13
remote control. 6 7 5 5 4 2 3 2 8 1 9 Identifying the remote control buttons Symbol Item Function 1 Enter button, back button, and Change projector display. 7 Power button Turns the projector on or off. 8 Auto sync button 9 Picture mode button Resynchronizes the projector to the - HP mp3320 | User Guide - Page 14
them. ■ HP premium remote control allows you to control every aspect of your presentation. ■ HP power cables allow you to connect in any region. ■ HP cables allow you to connect all audio-video equipment. ■ HP replacement lamp brings your projector up to factory-fresh brightness. 14 User's Guide - HP mp3320 | User Guide - Page 15
This section describes how to set up, plan, and connect the projector. ■ "To position the projector" on page 16 ■ "To set up on a table" on page 17 ■ "To connect power" on page 18 ■ "To connect a computer" on page 19 ■ "To connect a handheld organizer" on page 20 ■ "To connect video sources - HP mp3320 | User Guide - Page 16
The following tables show you where to position the projector in relation to the screen. Identifying image size relative to distance from screen Image size (diagonal) Image 6.9 m 216 in. 5.5 m 432-480 in. 11.0-12.0 m 290 in. 7.4 m 232 in. 5.9 m 464-480 in. 11.8-12.0 m 16 User's Guide - HP mp3320 | User Guide - Page 17
install the projector relative to = 0.8 × diagonal of screen (for 4:3 screen) projector lens below bottom of screen = C × width of power cord to the side of the projector and the other end to an electrical outlet. 3. When you first turn on the projector Projector position. Then choose - HP mp3320 | User Guide - Page 18
Setting Up To connect power ■ Connect one end of the power cord to the side of the projector 1 and the other end to an electrical outlet 2. 2 1 18 User's Guide - HP mp3320 | User Guide - Page 19
1. Connect the VGA cable between the VGA port on the projector 1 and the VGA port on the computer 2. 2. (Optional) To allow the remote control to function as the computer mouse, connect the USB cable between the USB port on the projector 3 and the USB port on the computer 4. 3. (Optional) To get - HP mp3320 | User Guide - Page 20
. For example, the iPAQ Pocket PC requires a VGA-out PC Card with 15-pin connector. 2. Connect the VGA cable between the VGA port on the projector 1 and the VGA-out PC Card 2 on the organizer. 2 1 VGA in 20 User - HP mp3320 | User Guide - Page 21
device, you will need an adapter (available from HP) to connect the device to the projector. S-video connection Many DVD players and VCRs have projector 3 and the video device 4. If the video device has RCA audio connectors, use a mini-phone to RCA adapter or cable. 1 3 S in in 4 2 User's Guide - HP mp3320 | User Guide - Page 22
RCA connector) (not provided) between the composite video port on the projector 1 and the RCA video port on the video device 2. 2. , connect a mini-phone audio cable (not provided) between the audio port on the projector 3 and the video device 4. If the video device has RCA audio connectors, use - HP mp3320 | User Guide - Page 23
a VGA-to-component video cable (available from HP) between the VGA port on the projector 1 and the three RCA component-video connectors on connect a mini-phone audio cable (not provided) between the audio port on the projector 3 and the video device 4. If the video device has RCA audio connectors, - HP mp3320 | User Guide - Page 24
off" on page 25 To turn the projector on 1. Be sure the power cord is connected. 2. Open the lens cover 1 by rotating it. 3. Press the power button 2 on top of the projector, or press the power button on the remote control. 2 1 4. Connect and power on the source, such as computer, handheld organizer - HP mp3320 | User Guide - Page 25
1. Press the power button on the projector or remote control to turn off the projector. The power button blinks during the cool-down period, then the projector turns off. 2. You can disconnect video and audio equipment from the projector during the cool-down period, but not the power cord. 3. If you - HP mp3320 | User Guide - Page 26
Setting Up Making Basic Adjustments This section provides instructions on making basic adjustments to the projector. ■ "To aim the projector" on page 26 ■ "To adjust the focus and zoom" on page 27 To aim the projector ■ To raise the projected picture on the screen, press the height adjustment button - HP mp3320 | User Guide - Page 27
Setting Up To adjust the focus and zoom 1. Rotate the focus ring until the image becomes clear. The projector can be focused at distances of 1.2 to 12 m (4 to 40 ft). 2. Rotate the zoom ring to adjust the picture size from 100 to 120%. If - HP mp3320 | User Guide - Page 28
Setting Up 28 User's Guide - HP mp3320 | User Guide - Page 29
" on page 31 Using the Remote Control 6 7 5 5 4 2 3 2 8 1 9 ■ To turn the projector on or off, press the power button 7. ■ To hide or unhide the projected picture, press the hide button 6. ■ To switch to the next connected input source, press the source button 3. User's Guide 29 - HP mp3320 | User Guide - Page 30
or right-click 5 button. This feature requires a USB connection between the projector and computer. ■ To control page-up and page-down on a computer, press the page-up and a distance of 9 m (30 ft), aim the remote control at the screen or at the front or back of the projector. 30 User's Guide - HP mp3320 | User Guide - Page 31
you want the pointer to move. ✎ For the mouse and page-up or page-down operations, aim the remote control at the screen or at the front or back of the projector from within a distance of 9 m (30 ft). These operations require a USB connection from the projector to the computer. User's Guide 31 - HP mp3320 | User Guide - Page 32
Press the source button on the projector or remote control. ■ Open the on-screen temporarily. ■ Press the hide button on the remote control. (If you press the hide button again hide button again or any other button on the projector or remote control. ✎ If you are using Microsoft PowerPoint, you can - HP mp3320 | User Guide - Page 33
projector. ■ "Adjusting the Picture and Sound" on page 33 ■ "Using the On-Screen Menu" on page 36 Adjusting the Picture and Sound This section provides the following instructions keystone setting as needed using the menu buttons on the projector or remote control: ❏ If the top of the picture is too - HP mp3320 | User Guide - Page 34
picture Use the picture mode buttons on the projector or the remote control to optimize the image. ■ To optimize the picture for data presentations, press the graphics projector. The graphics button turns on. button on From the Quick choice menu, you can adjust mute and volume. 34 User's Guide - HP mp3320 | User Guide - Page 35
the on-screen menu and select Setup. 2. Set the setup adjustments as needed. From the Setup menu, you can select settings such as menu language, projector position, and lamp saver mode. To get descriptions for all available setup adjustments, see "Setup menu" on page 42. User - HP mp3320 | User Guide - Page 36
Projector Using the On-Screen Menu This section explains how to navigate the on-screen menu and provides function definitions. The tables in this section describe all the functions available in the on-screen menu for the firmware version at publication. If your firmware back button. 36 User's Guide - HP mp3320 | User Guide - Page 37
the on-screen menu settings with either the buttons on the projector or on the remote control. SCREENSHOT auto sync back 1. Press enter on the projector or the remote control to open the on-screen menu. 2. Press up or down or down to quickly move to another setting and adjust it. User's Guide 37 - HP mp3320 | User Guide - Page 38
Adjusting the Projector Quick choice menu Quick choice Keystone Reset keystone Next input of picture. You can optimize the picture for computer presentations or video output. The remote control and projector have buttons to change the picture mode. Brightens or darkens the image. Sets difference - HP mp3320 | User Guide - Page 39
Adjusting the Projector Select input menu For a visual aid, see "Back panel" on page 12. Select , or DVD player. This connection is normally considered a video input. Auto-scan sources Sets whether the projector automatically searches for input signals and displays the next one found. User - HP mp3320 | User Guide - Page 40
type of picture. You can optimize the picture for computer presentations or video output. The remote control and projector have buttons to change the picture mode. Changes settings that define the current picture mode . Sharpens or softens the image. Adjusts the intensity of colors. 40 User's Guide - HP mp3320 | User Guide - Page 41
Synchronizes the projector to a computer graphics card. Vertical offset Shifts the image up or down within the projection area. Horizontal offset Shifts the image left or right within the projection area. Reset video settings Resets all video settings to default settings. User's Guide 41 - HP mp3320 | User Guide - Page 42
searches for input signals and displays the next one found. For a new lamp, resets hours of use. Resets all menu settings to default settings. Displays information and status for the projector. Show tests for checking the operation of the projector and the remote control. 42 User's Guide - HP mp3320 | User Guide - Page 43
Performing Routine Maintenance This section provides instructions on performing routing maintenance. ■ "To get the projector status" on page 43 ■ "To clean the projector lens" on page 44 ■ "To replace the lamp module" on page 44 ■ "To replace the battery in the remote control" on page 46 To get the - HP mp3320 | User Guide - Page 44
the Projector To clean the projector lamp module Å WARNING: Replacing the lamp module requires special consideration: ■ To reduce the risk of injury, be careful when removing the lamp module as broken glass might be present in the unlikely event the lamp is broken. If the lamp is broken, contact HP - HP mp3320 | User Guide - Page 45
. 4. Insert the lamp module and tighten the two screws. 5. Install the cover and tighten the two screws. 6. Turn on the projector. If the lamp does not turn on after the warm-up period, try reinstalling the lamp again. 7. Open the on-screen menu and select Setup > Reset lamp hours. User's Guide 45 - HP mp3320 | User Guide - Page 46
Maintaining the Projector To replace the battery in the remote control 1. Pull out the battery holder. 2. Insert the new battery in the holder. 3. Push the holder into the remote control. 1 2 3 When discarding old batteries, contact your local waste-disposal provider regarding local restrictions - HP mp3320 | User Guide - Page 47
updated versions of the projector firmware to enhance the projector performance. The projector firmware version is shown in the on-screen menu at Help. Also, additional language support is available by firmware download. Check for different versions at http://www.hp.com/support. USB method 1. On - HP mp3320 | User Guide - Page 48
Maintaining the Projector 48 User's Guide - HP mp3320 | User Guide - Page 49
5 Installing Permanently This chapter explains how to permanently install the digital projector. Installing the Projector This section provides instructions on how to permanently install the projector. ■ "To install on a table" on page 49 ■ "To install on the ceiling" on page 50 ■ "To install for - HP mp3320 | User Guide - Page 50
To install the projector on a ceiling, you will need a ceiling mount (available from HP). Å WARNING: to the bottom of the projector. The pointed part of the hole in the bracket faces the back of the projector. See the instructions that came with the Up the Projector" on page 15. 50 User's Guide - HP mp3320 | User Guide - Page 51
lens aiming away from the screen, insert the mounting plate onto the bracket so the tabs engage, then pivot the projector so it aims forward. Tighten the rear thumbscrew fully, then tighten the two other thumbscrews. 4. Adjust the on-screen menu to match your settings. Open - HP mp3320 | User Guide - Page 52
HP ceiling mount, mount the projector according to the following dimensions: ■ X = 82 mm (3.23 in.) ■ Y = 55 mm (2.17 in.) ■ Z = 110 mm (4.33 in.) ■ Thread size = M3 To install for rear projection 1. Place the projector instructions. 2. Open the on-screen menu and select Setup > Projector position. Then - HP mp3320 | User Guide - Page 53
projector. This allows the projector to be mounted on tripods readily available at camera and other electronic stores. Ä CAUTION: ■ The tripod should be capable of supporting a weight of at least 5 lb. Refer to the owner's manual the lock 1 into the hole and twist the key 2. User's Guide 1 2 53 - HP mp3320 | User Guide - Page 54
Installing Permanently 54 User's Guide - HP mp3320 | User Guide - Page 55
is fixed. If the suggestions do not solve your problem, contact HP. See the Support Guide included with the projector. ■ "Start-up problems" on page 56 ■ "Picture problems" on page 57 ■ "Sound problems" on page 61 ■ "Interruption problems" on page 61 ■ "Remote control problems" on page 62 User - HP mp3320 | User Guide - Page 56
cool before turning it on again. ❏ If the lamp indicator is on or blinking, unplug the projector after it cools down. Remove and reinstall the lamp module. If this does not fix the problem, install a new lamp. ❏ The projector lamp has reached the end of its life. Replace the lamp. 56 User's Guide - HP mp3320 | User Guide - Page 57
Fixing Problems Picture problems If the image is not displayed on the screen, but the HP startup screen is displayed: ❏ Press the source button on the projector or remote control. ❏ Turn off or disable the notebook or desktop computer screen saver function. ❏ For a computer connection, ensure your - HP mp3320 | User Guide - Page 58
Problems projector. ❏ For a computer connection, set the display resolution on projector has been set to the wrong position setting. Open the on-screen menu, select Setup > Projector on top of the projector. ❏ Be sure the projector is 1.2 to 12 as possible, reposition the projector so that it is - HP mp3320 | User Guide - Page 59
button on the projector or remote control. ❏ For a computer connection, turn everything off, then power on the projector first and power on the notebook or desktop computer second. ❏ For a computer connection, if the above steps do not correct the display image, adjust the resolution of the notebook - HP mp3320 | User Guide - Page 60
select Setup > Reset all settings, or hold down the down + up + right buttons on the projector for 5 seconds. If the projector stops responding to all controls: ❏ If possible, turn off the projector, then unplug the power cord and wait at least 15 seconds before reconnecting power. 60 User's Guide - HP mp3320 | User Guide - Page 61
lamp module. If this does not fix the problem, install a new lamp. ❏ If the temperature indicator turns on or blinks, the projector is too hot. See the following problem. If the projector occurs after restarting the projector, contact HP to have the projector serviced or repaired. User's Guide 61 - HP mp3320 | User Guide - Page 62
a popping sound, the projector will not turn back on until the lamp module has been replaced. ❏ If the lamp breaks, contact HP about repairs that might be required. Remote control problems If the remote control does not operate: ❏ Be sure nothing is blocking the remote control receiver on the front - HP mp3320 | User Guide - Page 63
Fixing Problems Testing the Projector The on-screen menu contains diagnostic tests you can use to verify the proper operation of the projector and the remote control. To run the projector diagnostics 1. Open the on-screen menu and select Help > Diagnostics. 2. Select a test to perform. User's Guide - HP mp3320 | User Guide - Page 64
Fixing Problems 64 User's Guide - HP mp3320 | User Guide - Page 65
specifications, visit the HP website at http://www.hp.com. Identifying the projector specifications Size 251 mm × 210 mm × 69 mm (9.9 in. × 8.3 in. × 2.7 in.) Weight 1.8 kg (3.9 lb) Resolution XGA Technology DLP /p, 720p, 1080i IR receivers On front and back of projector User's Guide 65 - HP mp3320 | User Guide - Page 66
, 1.0-mm arc 2000 hours (half life) Lamp-saver mode reduces lamp power to 160 W, extends lamp life Replacement lamp: L2152A Light engine 0.7-in. 12° DDR DMD XGA Color system Two preset color modes are available: Graphics Video Remote control USB mouse Mounting options Ceiling and tabletop - HP mp3320 | User Guide - Page 67
Reference Identifying the projector specifications (continued) Noise level 38±2 dBA Environment Operating: Temperature: 10 to 35°C (50 to 95°F) Humidity: 80% RH max, non- 20 to 55°C (-4 to 131°F) Humidity: 80% RH max, non-condensing Altitude: up to 12,000 m (40,000 ft) User's Guide 67 - HP mp3320 | User Guide - Page 68
Reference Analog Video Mode Compatibility Compatibility Resolution VGA 640 x 350 640 x 350 640 x 400 640 x 480 640 x 480 640 x 480 640 x 480 720 x 400 720 x 400 SVGA 800 x 600 800 x 31.5 37.9 35.2 37.9 48.1 46.9 53.7 48.4 56.5 60.0 68.7 63.98 79.98 65.22 63.98 34.98 68 User's Guide - HP mp3320 | User Guide - Page 69
Analog Video Mode Compatibility (continued) Compatibility Resolution V-Sync (Hz) MAC II 13 640 x 480 66.68 MAC 16 832 x 624 74.55 MAC 19 1024 x 768 75 MAC 1152 x 870 75.06 75 Reference H-Sync (kHz) 35 49.725 60.24 68.68 31.35 68.03 97.09 60 60 60 68.49 75 90.9 User's Guide 69 - HP mp3320 | User Guide - Page 70
, as instructed by the manual. ■ Keep paper and other combustible material away from the projector lens to prevent the possibility of fire. ■ Use only an approved power cord rated for the voltage and current marked on the product label. Do not overload any outlet or extension cord. 70 User's Guide - HP mp3320 | User Guide - Page 71
on the digital projector and remote control are classified as Class 1 LED devices according to International Standard IEC 825-1 (EN60825-1). This device is not considered harmful, but the following precautions are recommended: ■ If the unit requires service, contact an authorized HP service center - HP mp3320 | User Guide - Page 72
the unit), try the following: ■ Reorienting or relocating the receiving antenna. ■ Relocating the digital projector with respect to the receiver. ■ Connecting the digital projector's power cord to another power outlet. Connections to peripheral devices To maintain compliance with FCC Rules and - HP mp3320 | User Guide - Page 73
Japan Korea Reference User's Guide 73 - HP mp3320 | User Guide - Page 74
: Digital Projector Model Number(s): mp3320, mp3322 series Regulatory Model: CRVSB-04VU Conforms to the following product specifications: Safety configuration with Hewlett Packard Personal Computer peripherals. This device complies with Part 15 of the FCC Rules. Operation is subject to the - HP mp3320 | User Guide - Page 75
Reference User's Guide 75 - HP mp3320 | User Guide - Page 76
Reference 76 User's Guide - HP mp3320 | User Guide - Page 77
panel identifying 12 buttons projector 11 remote control 13 C ceiling computer with VGA port 19 handheld organizer 20 User's Guide Index with S-video 21 contents in the box room 16 distance setting up in relation to image 15 F firmware updating 47 focus adjusting 27 range of 27 G graphics mode - HP mp3320 | User Guide - Page 78
34 power turning off 25 turning on 24 presentations changing source 32 from a computer 31 projector adjusting 33 identifying parts 10 maintaining 43 setting up 15 troubleshooting 55 upgrading 47 R rear panel see back panel rear projection installation setting up 52 remote control battery replacement - HP mp3320 | User Guide - Page 79
32 specifications of the projector 65 status of projector 43 S-video connection connecting video source 21 T table installation setting up 17 Index testing diagnostics 63 tripod mounting on 53 troubleshooting interruption problems 61 picture problems 57 remote control problems 62 sound problems 61 - HP mp3320 | User Guide - Page 80
Index Index 78 User's Guide
-
 1
1 -
 2
2 -
 3
3 -
 4
4 -
 5
5 -
 6
6 -
 7
7 -
8
-
9
-
10
-
11
-
12
-
13
-
14
-
15
-
16
-
17
-
18
-
19
-
20
-
21
-
22
-
23
-
24
-
25
-
26
-
27
-
28
-
29
-
30
-
31
-
32
-
33
-
34
-
35
-
36
-
37
-
38
-
39
-
40
-
41
-
42
-
43
-
44
-
45
-
46
-
47
-
48
-
49
-
50
-
51
-
52
-
53
-
54
-
55
-
56
-
57
-
58
-
59
-
60
-
61
-
62
-
63
-
64
-
65
-
66
-
67
-
68
-
69
-
70
-
71
-
72
-
73
-
74
-
75
-
76
-
77
-
78
-
79
-
80
 |
 |

hp
mp3320 series
digital projector
user’s guide