HP p550 HP p550 Digital Camera - User Manual - Page 43
Simple Mode Control Panel, In the Simple mode, press [SET].
 |
View all HP p550 manuals
Add to My Manuals
Save this manual to your list of manuals |
Page 43 highlights
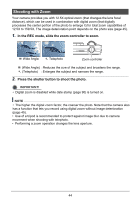
4. Point the camera at the subject. If the camera detects a human face, it continually focuses on the face (page 40). If the camera does not detect a face, it continually focuses on the center of the screen. • The camera will focus and focus frame will turn green. 5. When you are ready to shoot, press the shutter button. This captures the photo. IMPORTANT! • Vibration and noise will occur due to lens operation. This does not indicate malfunction. • Simple Mode Control Panel In the Simple mode, the Control Panel provides you with access to four setting items: image size, flash, self-timer, and Simple Mode. There is also a "MENU" option, which you can select to display a menu screen for configuring image quality (page 61) and Setup tab (page 87) settings. • In the Simple mode, the Quality tab can be used to configure the "Video Quality" and "D-Lighting" settings only. • The settings of menu options that appear on the normal REC menu but not on the Simple mode REC menu are automatically fixed at their optimum settings. These fixed settings do not affect normal REC menu settings. 1. In the Simple mode, press [SET]. In the Simple mode, the characters that appear on the setting screen are larger than they are in 1 2 other modes. 3 4 2. Use [ ] and [ ] to select the setting you 5 want to change. 1 Photo size (page 34) 2 Flash (page 37) 3 Self-timer (page 39) 4 Simple Mode (page 41) 5 REC menu display (page 52) 42
-
 1
1 -
2
-
3
-
4
-
5
-
6
-
7
-
8
-
9
-
10
-
11
-
12
-
13
-
14
-
15
-
16
-
17
-
18
-
19
-
20
-
21
-
22
-
23
-
24
-
25
-
26
-
27
-
28
-
29
-
30
-
31
-
32
-
33
-
34
-
35
-
36
-
37
-
 38
38 -
 39
39 -
 40
40 -
 41
41 -
 42
42 -
 43
43 -
 44
44 -
 45
45 -
 46
46 -
 47
47 -
 48
48 -
49
-
50
-
51
-
52
-
53
-
54
-
55
-
56
-
57
-
58
-
59
-
60
-
61
-
62
-
63
-
64
-
65
-
66
-
67
-
68
-
69
-
70
-
71
-
72
-
73
-
74
-
75
-
76
-
77
-
78
-
79
-
80
-
81
-
82
-
83
-
84
-
85
-
86
-
87
-
88
-
89
-
90
-
91
-
92
-
93
-
94
-
95
-
96
-
97
-
98
-
99
-
100
-
101
-
102
-
103
-
104
-
105
-
106
-
107
-
108
-
109
-
110
-
111
-
112
-
113
-
114
 |
 |
