Hitachi C12LSH Instruction Manual - Page 30
&caution, Caution
 |
UPC - 717709010338
View all Hitachi C12LSH manuals
Add to My Manuals
Save this manual to your list of manuals |
Page 30 highlights
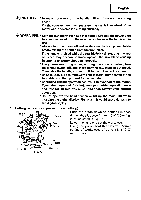
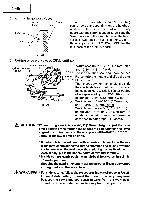
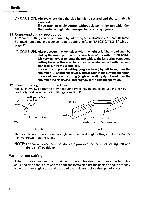
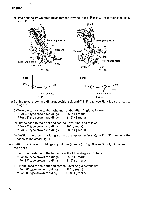
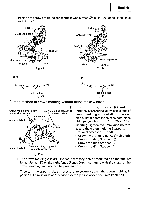
English 8. Bevel angle fine adjustment Handle Loosen Tighten Clamp lever Clamp lever Knob (B) I Knob (B) 8 mm bolt (B) Fig. 31 H Fig. 32 (1) Grip the handle on the motor head and position it at the bevel angle you need. Temporarily tighten the clamp lever. &CAUTION: If not tightened firmly enough the motor head might suddenly move or slip, causing injuries. Be sure to tighten the motor head section enough so it will not move. (2) When making fine adjustments of the bevel angle, turn the knob (B) while supporting the handle with your hand. NOTE: Turning knob (B) clockwise, allows fine adjustment of the main unit to the left (as seen from front). Turning knob (B) counterclockwise, allows fine adjustment of the main unit to the right (as seen from front). (3) After adjusting to the desired angle, tighten the clamp lever and clamp the motor head. & CAUTION: Always check that the clamp lever is secured and the motor head is clamped. If you attempt angle cutting without clamping the motor head, then the motor head might shift unexpectedly causing injuries. 30
-
 1
1 -
2
-
3
-
4
-
5
-
6
-
7
-
8
-
9
-
10
-
11
-
12
-
13
-
14
-
15
-
16
-
17
-
18
-
19
-
20
-
21
-
22
-
23
-
24
-
 25
25 -
 26
26 -
 27
27 -
 28
28 -
 29
29 -
 30
30 -
 31
31 -
 32
32 -
 33
33 -
 34
34 -
 35
35 -
36
-
37
-
38
-
39
-
40
-
41
-
42
 |
 |
