Hitachi C12LSH Instruction Manual - Page 41
components
 |
UPC - 717709010338
View all Hitachi C12LSH manuals
Add to My Manuals
Save this manual to your list of manuals |
Page 41 highlights
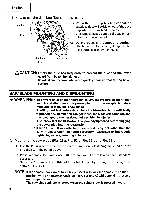
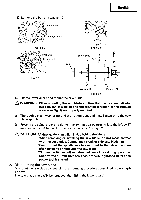
English 4. Inspecting the screws Regularly inspect each component of the power tool for looseness. Re-tighten screws on any loose part. & WARNING: To prevent personal injury, never operate the power tool if any components are loose. 5. Inspecting the lower guard for proper operation Before each use of the tool, test the lower guard (see Fig. 7) to assure that it is in good condition and that it moves smoothly. Never use the tool unless the lower guard operates properly and it is in good mechanical condition. 6. Storage After operation of the tool has been completed, check that the following has been performed: (1) Trigger switch is in OFF position, (2) Power plug has been removed from the receptacle, When the tool is not in use, keep it stored in a dry place out of the reach of children. 7. Replacement of Poly-V-Belt Poly-V-belt Pulley (A) 0 O Pulley (B) Fig. 55 The power of the motor is transmitted to the saw blade by a Poly-V-Belt. When the Poly-VBelt is broken or damaged, remove the belt cover by loosening the four 5 mm screws (see Fig. 2) and replace the damaged one with the new one. When connecting the belt on pulleys, first connect 2 or 3 teeth of Poly-V-Belt to the grooves of the pulley (A) and pulley (B). Then turning the pulley (A) and pulley (B), connect all teeth of the belt to the pulleys. 8. Lubrication Lubricate the following sliding surfaces once a month to keep the power tool in good operating condition for a long time (see Fig. 1 and Fig. 2). Use of machine oil is recommended. Oil supply points: * Rotary portion of hinge * Rotary portion of vise assembly * Rotary portion of holder (A) 41
-
 1
1 -
2
-
3
-
4
-
5
-
6
-
7
-
8
-
9
-
10
-
11
-
12
-
13
-
14
-
15
-
16
-
17
-
18
-
19
-
20
-
21
-
22
-
23
-
24
-
25
-
26
-
27
-
28
-
29
-
30
-
31
-
32
-
33
-
34
-
35
-
 36
36 -
 37
37 -
 38
38 -
 39
39 -
 40
40 -
 41
41 -
 42
42
 |
 |
