Hitachi C18DLP4 Instruction Manual - Page 12
Before Use
 |
UPC - 717709011823
View all Hitachi C18DLP4 manuals
Add to My Manuals
Save this manual to your list of manuals |
Page 12 highlights
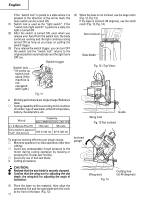
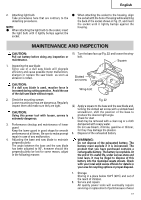
English CAUTION: For further details, refer to the item of [MOUNTING Do not pull the plug out of the receptacle by pulling AND DISMOUNTING THE SAW BLADE] on Page on the cord. 15. Make sure to grasp the plug when removing from 3. Check if wing nut is tightened receptacle to avoid damaging cord. If the wing nut to adjust cutting depth (Fig. 8) is loose, injury can result. Make sure that it is 5. Remove the battery from the battery charger. tightened securely. Supporting the battery charger with hand, pull out 4. Check performance of lower guard the battery from the battery charger. How to make the batteries perform longer. WARNING: Make absolutely sure that the lower guard is not ⅜ Recharge the batteries before they become completely exhausted. fixed. Also, check and see if it can move smoothly. If the saw blade is kept exposed, injury can result. When you feel that the power of the tool becomes weaker, stop using the tool and recharge its The lower guard (refer to Fig. 3) serves to protect battery. If you continue to use the tool and exhaust your body from coming into contact with the saw the electric current, the battery may be damaged blade. Make absolutely certain that the cover and its life will become shorter. smoothly performs to cover the saw blade. If the ⅜ Avoid recharging at high temperatures. lower guard should not move smoothly, never use A rechargeable battery will be hot immediately it without repairing it. after use. If such a battery is recharged immediately In such a case, get in touch with the store where after use, its internal chemical substance will you bought the circular saw or the HITACHI deteriorate, and the battery life will be shortened. AUTHORIZED SERVICE CENTER for necessary Leave the battery and recharge it after it has cooled repair. for a while. 5. Check battery insertion CAUTION: ⅷ When the battery charger has been continuously used, the battery charger will heated, thus constituting the cause of the failures. Once the WARNING: If the battery is inserted while the power switch is in the ON position, the power tool will start operating immediately, inviting serious accident. charging has been completed, give 15 minutes rest until the next charging. CAUTION: ⅷ If the battery is recharged when it is warm due to Until the battery locks in place with a little click, if battery use or exposure to sunlight, the pilot lamp not, it may accidentally fall out of the tool causing may light in green. injury to you or someone around you. The battery will not be recharged. In such a case, let the battery cool before charging. 6. Check for proper operation of the brake ⅷ When the pilot lamp flickers in red (at 0.2 second This circular saw features an electric brake that intervals), check for and take out any foreign functions when the switch is released. Before using objects in the charger's battery installation hole. the circular saw, ensure that the electric brake If there are no foreign objects, it is probable that functions properly. If it does not, bring the tool to the battery or charger is malfunctioning. Take it a HITACHI AUTHORIZED SERVICE CENTER. to your authorized Service Center. 7. Prepare a wooden work bench (Fig. 7) Since the saw blade will extend beyond the lower BEFORE USE surface of the lumber, place the lumber on a work bench when cutting. If a square block is utilized as 1. Check the work area environment a work bench, select level ground to ensure it is Check the work area to make sure that it is clear of properly stabilized. An unstable work bench will debris and clutter. result in hazardous operation. Clear the area of unnecessary personnel. Ensure that lighting and ventilation is adequate. Lumber Base 2. Check if saw blade is tightened While the saw blade is tightened securely for immediate use when it is assembled at the factory, be sure to check it out again for caution's sake. A bolt can be tightened when it is turned clockwise. Work bench Saw blade Use the provided box wrench to check it out. 12 Fig. 7
-
 1
1 -
2
-
3
-
4
-
5
-
6
-
 7
7 -
 8
8 -
 9
9 -
 10
10 -
 11
11 -
 12
12 -
 13
13 -
 14
14 -
 15
15 -
 16
16 -
 17
17 -
18
-
19
-
20
-
21
-
22
-
23
-
24
-
25
-
26
-
27
-
28
-
29
-
30
-
31
-
32
-
33
-
34
-
35
-
36
-
37
-
38
-
39
-
40
-
41
-
42
-
43
-
44
-
45
-
46
-
47
-
48
-
49
-
50
-
51
-
52
-
53
-
54
-
55
-
56
-
57
-
58
-
59
-
60
 |
 |
