Hitachi C18DLP4 Instruction Manual - Page 15
Mounting And Dismounting
 |
UPC - 717709011823
View all Hitachi C18DLP4 manuals
Add to My Manuals
Save this manual to your list of manuals |
Page 15 highlights
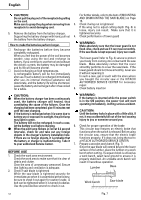
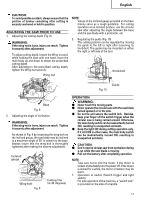
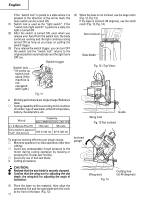
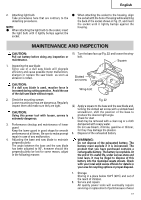
English NOTE: When using the saw at the inclination of 45 degrees, use both the marks of on the bevel plate and [45] on the inclined gauge of the base (Fig. 15). What's more, if it is absolutely essential to use the saw at a precise angle, make adjustment using a protractor, etc. Bevel plate 1. Dismounting the saw blade (1) Set the cutting volume at maximum, and place the Circular Saw as shown in Fig. 16. Box wrench Lock lever Tighten Loosen Wing-bolt 0 1 5 30 4 5 Inclined gauge Fig. 16 Fig. 15 (3) Ensure that the switch is turned to the ON position before the saw blade comes in contact with the lumber. The switch is turned ON when the trigger is squeezed; and OFF when the trigger is released. Moving the saw straight at a constant speed will produce optimum cutting. (2) Depress the lock lever, lock the spindle, and remove the left-hand bolt and washer (B2) with the box wrench. (3) While holding the lower guard lever to keep the lower guard fully retracted into the saw cover, remove the saw blade (Fig. 17). CAUTION: ⅷ Before starting to saw, ensure that the saw blade has reached full speed revolution. ⅷ Should the saw blade be stopped or made an abnormal noise during operation, turn off the switch immediately. ⅷ When finished with a job, pull out the battery from the main body. ⅷ Twisting and forcibly pressing the saw during cutting can result in unreasonable pressure on the motor, so try to go straight quietly. ⅷ In the situation where the circular saw is continuously operated while replacing the battery with stocked spare batteries one after another, the motor tends to overheat. Therefore, whenever the housing becomes hot, give the saw a break for a while. ⅷ Avoid cutting operation in a state where the base bottom is afloat from the material being cut. Otherwise, the motor can get locked. Lower guard lever Fig. 17 Saw cover 2. Mounting the Saw Blade (Fig. 18) WARNING: If the left-hand bolt is worked using other tools than the provided box wrench, excessive tightening and insufficient tightening may take place, resulting in injury. ⅜ Take procedures here that are contrary to the detaching procedures. MOUNTING AND DISMOUNTING THE SAW BLADE CAUTION: To avoid serious accident, ensure the switch is in the OFF position, and pull out the battery. 15
-
 1
1 -
2
-
3
-
4
-
5
-
6
-
7
-
8
-
9
-
 10
10 -
 11
11 -
 12
12 -
 13
13 -
 14
14 -
 15
15 -
 16
16 -
 17
17 -
 18
18 -
 19
19 -
 20
20 -
21
-
22
-
23
-
24
-
25
-
26
-
27
-
28
-
29
-
30
-
31
-
32
-
33
-
34
-
35
-
36
-
37
-
38
-
39
-
40
-
41
-
42
-
43
-
44
-
45
-
46
-
47
-
48
-
49
-
50
-
51
-
52
-
53
-
54
-
55
-
56
-
57
-
58
-
59
-
60
 |
 |
