Hitachi C18DLP4 Instruction Manual - Page 14
Fig. 12 <Top View>
 |
UPC - 717709011823
View all Hitachi C18DLP4 manuals
Add to My Manuals
Save this manual to your list of manuals |
Page 14 highlights
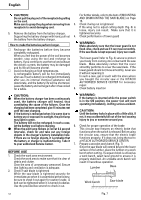
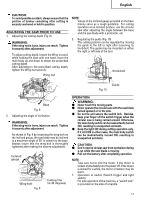
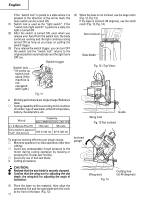
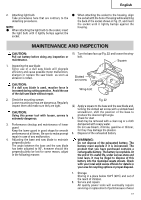
English If the "switch lock" is pulled in a state where it is pressed in the direction of the arrow mark, the main switch can be turned ON. (1) Switch lock is used as the "light switch". If the "switch lock (light switch)" is pulled in a state, the light is turned ON. (2) After the switch is turned ON, even when you release your hand from the switch lock, the body continues running and the light continues being turned ON as long as you keep on pulling the switch trigger. (3) If you release the switch trigger, you can turn OFF the switch and the "switch lock" returns to the original position automatically and the light turns OFF too. Switch trigger Switch lock * (It works as switch lock alone if the machine is not equipped with light.) Fig. 11 (2) When the base is not inclined, use the large notch (Fig. 12, Fig. 13). If the base is inclined (45 degrees), use the small notch (Fig. 12, Fig. 14). Not inclined Saw blade Fig. 12 2. Working performance per single charge (Reference data) ⅜ Cutting capability differs according to the condition of lumber, type of saw blade, ambient temperature, battery characteristics, etc. Wood Capacity Battery (EBM1830) Battery (BCL1815) 2 × 8 (Spruce-Pine-Fir) 110 cuts 55 cuts Concreteform plywood (1/2" (12 mm) t) 133 ft (40 m) 67 ft (20 m) To improve working efficiency per single charge, ⅜ Minimize operation (no-load operation) other than cutting; ⅜ Avoid any unreasonably forced pressure to the motor during cutting operation by twisting or pressing the circular saw forcibly; ⅜ Avoid any use of dull saw blade. 3. Cutting procedures Inclined gauge Guide Wing-bolt Fig. 13 Not inclined CAUTION: ⅷ Recheck that the saw blade is securely clamped. ⅷ Confirm that the wing-nut for adjusting the slot depth, the wing-bolt for adjusting the angle of inclination. Wing-bolt Fig. 14 Cutting line (at 45 degrees) (1) Place the base on the material, then align the premarked line and the saw blade with the notch at the front of the base (Fig. 12). 14
-
 1
1 -
2
-
3
-
4
-
5
-
6
-
7
-
8
-
 9
9 -
 10
10 -
 11
11 -
 12
12 -
 13
13 -
 14
14 -
 15
15 -
 16
16 -
 17
17 -
 18
18 -
 19
19 -
20
-
21
-
22
-
23
-
24
-
25
-
26
-
27
-
28
-
29
-
30
-
31
-
32
-
33
-
34
-
35
-
36
-
37
-
38
-
39
-
40
-
41
-
42
-
43
-
44
-
45
-
46
-
47
-
48
-
49
-
50
-
51
-
52
-
53
-
54
-
55
-
56
-
57
-
58
-
59
-
60
 |
 |
