Hitachi C18DLP4 Instruction Manual - Page 13
Adjusting The Saw Prior To Use
 |
UPC - 717709011823
View all Hitachi C18DLP4 manuals
Add to My Manuals
Save this manual to your list of manuals |
Page 13 highlights
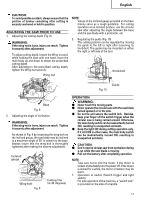
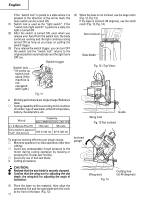
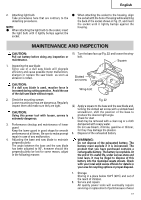
English CAUTION: To avoid possible accident, always ensure that the portion of lumber remaining after cutting is securely anchored or held in position. ADJUSTING THE SAW PRIOR TO USE 1. Adjusting the cutting depth (Fig. 8) WARNING: If the wing-nut is loose, injury can result. Tighten it securely after adjustment. To adjust cutting depth, loosen the Wing-nut and, while holding the base with one hand, move the main body up and down to obtain the prescribed cutting depth. After adjusting to the prescribed cutting depth, tighten the Wing-nut securely. Wing-nut NOTE: Values of the inclined gauge provided on the base merely serve as a rough guideline. For cutting operation at an inclined posture, use the circular saw after adjusting the angle between the base and the saw blade with a protractor, etc. 3. Regulating the guide (Fig. 10) The cutting position can be regulated by moving the guide to the left or right after loosening its knob-bolt. The guide may be mounted on either the right or left side of the tool. Knob-bolt Guide Fig. 10 Base Fig. 8 2. Adjusting the angle of inclination WARNING: If the wing-nut is loose, injury can result. Tighten it securely after adjustment. As shown in Fig. 9 by loosening the wing-bolt on the inclined gauge, the saw blade may be inclined to a maximum angle of 50° in relation to the base. Always insure that the wing-bolt is thoroughly tightened after making the desired adjustment. Inclined gauge Wing-bolt Fig. 9 Cutting line (at 45 degrees) OPERATION WARNING: ⅷ Never touch the moving parts. ⅷ Never operate the circular saw with the saw blade turned upward or to the side. ⅷ Do not fix and secure the switch lock. Besides, keep your finger off the switch trigger when the circular saw is being carried around. Otherwise, the main body switch can be inadvertently turned ON, resulting in unexpected accidents. ⅷ Keep the light ON during cutting operation only. If it is lit ON in other cases, the main body switch can be inadvertently turned ON, resulting in unexpected accidents. CAUTION: ⅷ Don't remove circular saw from workpiece during a cut while the saw blade is moving. ⅷ Pull out the battery after completing operation. NOTE: Take care not to lock the motor. If the motor is locked, immediately turn the power off. If the motor is locked for a while, the motor or battery may be burnt. 1. Operation of switch (Switch trigger and light switch) For safe operation of the machine, a "switch lock" is provided on the side of a handle. 13
-
 1
1 -
2
-
3
-
4
-
5
-
6
-
7
-
 8
8 -
 9
9 -
 10
10 -
 11
11 -
 12
12 -
 13
13 -
 14
14 -
 15
15 -
 16
16 -
 17
17 -
 18
18 -
19
-
20
-
21
-
22
-
23
-
24
-
25
-
26
-
27
-
28
-
29
-
30
-
31
-
32
-
33
-
34
-
35
-
36
-
37
-
38
-
39
-
40
-
41
-
42
-
43
-
44
-
45
-
46
-
47
-
48
-
49
-
50
-
51
-
52
-
53
-
54
-
55
-
56
-
57
-
58
-
59
-
60
 |
 |
