Hoover UH40125 Manual
Hoover UH40125 - WindTunnel Bagless Upright Vacuum Manual
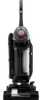 |
UPC - 073502030387
View all Hoover UH40125 manuals
Add to My Manuals
Save this manual to your list of manuals |
Hoover UH40125 manual content summary:
- Hoover UH40125 | Manual - Page 1
and Servicing Instructions www.hoover.com Please review this manual before operating your Hoover® product. ©2008 Healthy Gain Investments, Ltd. All rights reserved. #56511C67. 3/08 Guide d'utilisation Instructions d'utilisation et d'entretien www.hoover.com Lire attentivement ce guide avant - Hoover UH40125 | Manual - Page 2
provided. Model Serial Number Hint: Attach your sales receipt to this owner's manual. Verification of date of purchase may be required for warranty service of your HOOVER product. Serial Number Be sure to fill out and return the product registration card included with your cleaner. Contents - Hoover UH40125 | Manual - Page 3
cord from electrical outlet before servicing the cleaner. • Always unplug cleaner when not in use. vacuum cleaner only for its intended use as described in the instructions. Use only attachments recommended by Hoover le présent guide. N'utiliser que les accessoires recommandés par Hoover; d'autres - Hoover UH40125 | Manual - Page 4
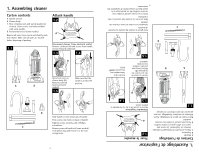
Make sure that the B 1.3 1.4 1. Assembling cleaner Carton contents A. Handle section B. Cleaner body C. Hose, cleaning tools and wands (packed on cleaner). Short crevice tool only available with some models. D. Powered hand tool (some models) Remove all parts from carton and identify each item - Hoover UH40125 | Manual - Page 5
Not intended for commercial use in any This cleaner is intended for household use. 25 *some models only. 23 26. Crevice wand*: stores in FINDERMC 2.1 intégrée * 20. Brosses latérales 21. Tuyau 22. Support à tuyau 23. Crochets pour le cordon : enrouler le cordon sur les crochets - Hoover UH40125 | Manual - Page 6
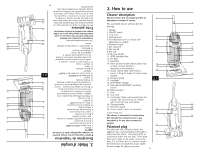
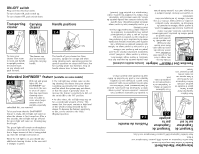
With red and green lights (A), the Embedded DirtFINDER™ feature (available on some models) To move your cleaner from room to room, put handle in upright position, tilt cleaner back on rear wheels and push forward. The cleaner can also be moved by using the carrying handle. The handle of your - Hoover UH40125 | Manual - Page 7
cleaner from falling, always place it at bot- When using cleaning tools, the agitator will continue to rotate. Use the hose and powered hand tool (some models abaissé à la position de fonctionnement (F). nozzle parallel to Guide either side of Special edge groomers are provided on both sides - Hoover UH40125 | Manual - Page 8
to your hose. Use them with any of the above tools. *some models 8 Fixation du couvercle des accessoires Le couvercle des accessoires est doté d'un CAUTION: Agitator continues to rotate while cleaner handle is in upright position. Avoid tipping cleaner or setting it on furniture, fringed area - Hoover UH40125 | Manual - Page 9
Close the bottom door firmly to The dirt cup assembly consists of the following parts: Lid (A) Dirt Cup (B) Pre-filter (C) HEPA Cartridge Filter (D) Dirt Inlet Opening (E) Bottom Door Release Button (F) While the cleaner is in operation, the pre- filter screen will stop larger debris from entering - Hoover UH40125 | Manual - Page 10
remove dust and fine particles from the HEPA cartridge filter and pre-filter. The filter assembly can also be removed for additional cleaning. bottom of cleaner behind grooves at 3.4 FF tom of cup will rest into cavity. Bot- Slide cup straight 10 - Hoover UH40125 | Manual - Page 11
without any of the filters in place. Should you want to replace this filter, ask for HOOVER part No. 40110006. Let filter air dry and reposition it on the side of cleaner. Make sure the white side of the filter faces outward. Close door. water with mild detergent. Press door back into place - Hoover UH40125 | Manual - Page 12
Replace belt if it is stretched, cut or broken. What to buy To assure effective operation, use only genuine HOOVER belts with your cleaner. When purchasing a new belt, ask for Hoover part No. 38528033. Quoi acheter Cet aspirateur est doté d'une lumière à ampoule à culot poussoir 912 de 12 V (pièce - Hoover UH40125 | Manual - Page 13
for Hoover part No. 48414132. How to replace Disconnect cleaner from la courroie et placer la courroie dans le guide de courroie (C) du rouleau brosse agitateur. Si instructions de la section « Courroie », à partir de la figure 3-13. Jeter l'ancien agitateur. 3.19 Continuer à suivre les instructions - Hoover UH40125 | Manual - Page 14
replaced. Ask for HOOVER part No. 48414150. Agitator brush roll replacement Powered hand tool (some models only) Accessoire portatif to buy When purchasing edge groomers, ask for HOOVER part No. 39511018. How to replace Disconnect cleaner from electrical outlet. Remove bottom plate as described - Hoover UH40125 | Manual - Page 15
housing and snap into place. Replacing belt When replacing belt, ask for HOOVER part No. 38528037. 3.28 F 5. Replace brush roll, belt guard, tre lubrifiés périodiquement à un centre de service Hoover ou à un atelier de service garanti Hoover autorisé (dépôt). 5. Remettre en place le rouleaubrosse - Hoover UH40125 | Manual - Page 16
final filters for dirt accumulation. Service To obtain approved HOOVER service and genuine HOOVER parts, locate the nea est Hoover Sales and Service Center or Authorized Hoover Warranty Service Dealer (Depot) by: • checking the Yellow Pages under "Vacuum Cleaners - Household" OR - • calling 1-800 - Hoover UH40125 | Manual - Page 17
or tripped Replace fuse or reset breaker No voltage in wall plug Check fuse or breaker Cleaner won't run Not firmly plugged in Plug unit in firmly PROBLEM POSSIBLE CAUSE POSSIBLE SOLUTION If a minor problem occurs, it usually can be solved quite easily when the cause is found by using the - Hoover UH40125 | Manual - Page 18
filters if needed. 4.1 B A B Check dirt duct 2. Remove screws on lower back of cleaner handle (A) and remove lower dirt duct (B). 3. Clear blockage from dirt duct sections. PROBLEM Powered hand tool (some models) brush roll won't turn Smoky/burning smell detected POSSIBLE CAUSE Too much pressure - Hoover UH40125 | Manual - Page 19
parts and accessory items may be purchased from your Authorized Hoover Dealer, Leading Retailers, Hoover Sales & Service Centers, on-line at www.hoover.com, or by completing this order form. Mail orders limited to U.S. residents only. In Canada, please call 1-800-263-6376 OR on-line at hoover - Hoover UH40125 | Manual - Page 20
Suceur plat court Rouleau brosse agitateur Suceur plat long Brosse à épousseter Tuyau Extra ReachMC Brosse latérale Accessoire portatif à turbine Part No. Qty/ Pk. Prix/paq. Qté. 40140201 1 $ 24.99 40201160 2 $ 3.99 38762008 40110006 1 $ 1.99 2 $ 9.99 27313101 1 $ 2.49 38634078 1 $ 6.49 - Hoover UH40125 | Manual - Page 21
envíela por correo a: Hoover, Inc. 7005 Cochran Road • Glenwillow, Ohio • 44139 Attn: Sales & Service Center Descripción del artí Recibida Manual del usuario Instrucciones de funcionamiento y mantenimiento www.hoover.com Por favor, lea este manual antes de hacer funcionar su producto Hoover®. - Hoover UH40125 | Manual - Page 22
compra a este manual del usuario. Para obtener el servicio de garantía de compra de su producto HOOVER, es posible placa de datos, que se encuentra en la parte posterior de la aspiradora. Enchufe la aspiradora Hoover, Inc. 7005 Cochran Road • Glenwillow, Ohio • 44139 Attn: Sales & Service Center - Hoover UH40125 | Manual - Page 23
la ropa holgada, los dedos de las manos, los pies y todas las partes del cuerpo fuera de las aberturas, el agitador giratorio y otras piezas en movimiento se describe en las instrucciones. Use solo los accesorios recomendados por Hoover; el uso de otros accesorios puede ser peligroso. • Sujete el - Hoover UH40125 | Manual - Page 24
el accesorio de mano turboaccionado (algunos modelos). 1.5 D Deslice la sección del mango sobre la parte posterior del mango. Empuje los tornillos para introducirlos en los C agujeros de la parte posterior del mango. Apriete bien los tornillos con un destornillador Phillips. Retire el - Hoover UH40125 | Manual - Page 25
consultando la sección Service (Mantenimiento) de Hoover Inc., en Internet en www.hoover.com 1-800-263- 6376. Siempre identifique su aspiradora por el número de modelo completo al solicitar información o realizar pedidos de piezas. (El número de modelo se encuentra en la parte - Hoover UH40125 | Manual - Page 26
deberá reemplazar. 3.27 La correa se puede ver a través de la parte superior de la boquilla o retirando la placa inferior y el protector de Reemplazo de la correa Para reemplazar la correa, solicite la pieza n° 38528037 de HOOVER. 3.28 F 1. Retire la placa inferior, el protector de la correa y - Hoover UH40125 | Manual - Page 27
desgastadas, debe reemplazarse el rodillo de escobillas. Solicite la pieza n° 48414150 de HOOVER. 3.21 A Cómo reemplazarlo 3.22 1. Retire el accesorio de B la manguera y voltéelo de manera que la parte inferior mire hacia arriba. Presione las trabas a ambos lados del accesorio y retire - Hoover UH40125 | Manual - Page 28
eficaz, reemplace el agitador si las escobillas no tocan la tarjeta. Qué comprar Al comprar un nuevo agitador, solicite la pieza n° 48414132 de HOOVER. Cómo reemplazarlo Desconecte la aspiradora de la toma de corriente eléctrica. Retire la placa inferior, la correa y el agitador siguiendo las - Hoover UH40125 | Manual - Page 29
una nueva correa, solicite la pieza n° 38528033 de Hoover. Cómo reemplazarla Desconecte la aspiradora de la toma de corriente 3.13 eléctrica. 3.14 3.15 B Coloque el mango en la posición baja y voltee la aspiradora para que la parte inferior quede hacia arriba. Con un destornillador Phillips - Hoover UH40125 | Manual - Page 30
puerta. Si desea reemplazar el filtro, solicite la pieza n° 40110006 de HOOVER. No haga funcionar la aspiradora sin ninguno de los filtros en su lugar en el fondo de la cavidad de la aspiradora, protege el motor de las partículas de suciedad. Si el filtro se ensucia, retire el depósito para polvo
-
 1
1 -
 2
2 -
 3
3 -
 4
4 -
 5
5 -
 6
6 -
 7
7 -
8
-
9
-
10
-
11
-
12
-
13
-
14
-
15
-
16
-
17
-
18
-
19
-
20
-
21
-
22
-
23
-
24
-
25
-
26
-
27
-
28
-
29
-
30
 |
 |
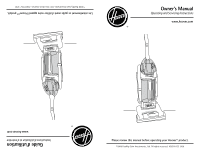
Please review this manual before operating your Hoover® product.
www.hoover.com
Owner’s Manual
Operating and Servicing Instructions
©2008 Healthy Gain Investments, Ltd. All rights reserved. #56511
C
67. 3/08
Lire attentivement ce guide avant d’utiliser votre appareil Hoover
MD
produit.
www.hoover.com
Guide d’utilisation
Instructions d’utilisation et d’entretien
©2008 Healthy Gain Investments, Ltd. Tous droits réservés. #56511
C
67. 3/08