Husqvarna ST 230 Owner Manual - Page 11
Operation, Before you start the product, To fill the engine with oil, To fill fuel
 |
View all Husqvarna ST 230 manuals
Add to My Manuals
Save this manual to your list of manuals |
Page 11 highlights
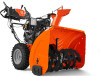
N O Operation Before you start the product • Keep persons and animals away from the work area. • Do daily maintenance. See Maintenance schedule on page 15. • Make sure the ignition lead fits correctly on the spark plug. • Add oil or gasoline, if necessary. See Technical data on page 24. To fill the engine with oil CAUTION: Do not rotate the dipstick when you check the oil. Do not fill above the mark. 1. Remove the oil cap and clean the dipstick. See Product overview on page 3 for the location of the dipstick. 2. Add oil to the top mark on the dipstick. Use the dipstick to do a check of the oil level at regular intervals. 3. Put the oil cap back. To fill fuel If available, use low-emission/alkylate gasoline. If low-emission/alkylate gasoline is not available, use good quality unleaded gasoline or leaded gasoline. Use gasoline with an octane number of 90 RON out of North America (87 AKI in North America) or higher, and with a maximum of 10% ethanol (E10). 2. Fill slowly with a fuel can. If you spill fuel, remove it with a cloth and let remaining fuel dry off. 3. Clean the area around the fuel tank cap. 4. Tighten the fuel tank cap fully. If the fuel tank cap is not tightened, there is a risk of fire. 5. Move the product a minimum of 3 m (10 ft) from the position where you filled the tank, before a start. To adjust the discharge chute and the chute deflector 1. To adjust the discharge chute position, move the discharge chute control lever (A) back and to the left or right direction. 2. To adjust the snow throwing distance of the chute deflector, move the deflector remote control lever (B) down to decrease the distance and up to increase the distance. B A CAUTION: Do not use gasoline with an octane number less than 90 RON out of North America (87 AKI in North America). This can cause damage to the product. To start the engine, manual start 1. Insert the ON/OFF key (A) into the ignition slot until it clicks. Do not turn the key. 1. Open the fuel tank cap slowly to release the pressure. 694 - 003 - 07.11.2019 11
-
 1
1 -
2
-
3
-
4
-
5
-
 6
6 -
 7
7 -
 8
8 -
 9
9 -
 10
10 -
 11
11 -
 12
12 -
 13
13 -
 14
14 -
 15
15 -
 16
16 -
17
-
18
-
19
-
20
-
21
-
22
-
23
-
24
-
25
-
26
-
27
-
28
-
29
-
30
-
31
-
32
-
33
-
34
-
35
-
36
-
37
-
38
-
39
-
40
-
41
-
42
-
43
-
44
-
45
-
46
-
47
-
48
-
49
-
50
-
51
-
52
-
53
-
54
-
55
-
56
-
57
-
58
-
59
-
60
-
61
-
62
-
63
-
64
-
65
-
66
-
67
-
68
-
69
-
70
-
71
-
72
-
73
-
74
-
75
 |
 |
