IBM 2367 Hardware Maintenance Manual - Page 95
Make sure that the claw on the bottom side of the, are firmly attached.
 |
View all IBM 2367 manuals
Add to My Manuals
Save this manual to your list of manuals |
Page 95 highlights
Removing and replacing a FRU When installing the keyboard bezel, do the following: 1. Attach the keyboard bezel to the computer, aligning the three dents of the bezel with the hinges and the projection. 2. Make sure that all of the claws on the front side of the computer ( b in removal step 6 ) are firmly attached. 3. Make sure that the claw on the bottom side of the bezel is firmly attached. 4. Attach the connector firmly if the ThinkPad computer features the touch pad, and then secure the screws. ThinkPad T30 91
-
 1
1 -
2
-
3
-
4
-
5
-
6
-
7
-
8
-
9
-
10
-
11
-
12
-
13
-
14
-
15
-
16
-
17
-
18
-
19
-
20
-
21
-
22
-
23
-
24
-
25
-
26
-
27
-
28
-
29
-
30
-
31
-
32
-
33
-
34
-
35
-
36
-
37
-
38
-
39
-
40
-
41
-
42
-
43
-
44
-
45
-
46
-
47
-
48
-
49
-
50
-
51
-
52
-
53
-
54
-
55
-
56
-
57
-
58
-
59
-
60
-
61
-
62
-
63
-
64
-
65
-
66
-
67
-
68
-
69
-
70
-
71
-
72
-
73
-
74
-
75
-
76
-
77
-
78
-
79
-
80
-
81
-
82
-
83
-
84
-
85
-
86
-
87
-
88
-
89
-
 90
90 -
 91
91 -
 92
92 -
 93
93 -
 94
94 -
 95
95 -
 96
96 -
 97
97 -
 98
98 -
 99
99 -
 100
100 -
101
-
102
-
103
-
104
-
105
-
106
-
107
-
108
-
109
-
110
-
111
-
112
-
113
-
114
-
115
-
116
-
117
-
118
-
119
-
120
-
121
-
122
-
123
-
124
-
125
-
126
-
127
-
128
-
129
-
130
-
131
-
132
-
133
-
134
-
135
-
136
-
137
-
138
-
139
-
140
-
141
-
142
-
143
-
144
-
145
-
146
-
147
-
148
-
149
-
150
-
151
-
152
-
153
-
154
-
155
-
156
-
157
-
158
-
159
-
160
-
161
-
162
-
163
-
164
-
165
-
166
-
167
-
168
 |
 |

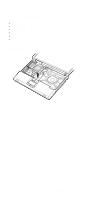
When installing the keyboard bezel, do the following:
1.
Attach the keyboard bezel to the computer, aligning the
three dents of the bezel with the hinges and the
projection.
2.
Make sure that all of the claws on the front side of the
computer (
±b²
in removal step
±6²
) are firmly attached.
3.
Make sure that the claw on the bottom side of the
bezel is firmly attached.
4.
Attach the connector firmly if the ThinkPad computer
features the touch pad, and then secure the screws.
Removing and replacing a FRU
ThinkPad T30
91