IBM 84903bu User Guide - Page 54
adapter-retention
 |
UPC - 000435882073
View all IBM 84903bu manuals
Add to My Manuals
Save this manual to your list of manuals |
Page 54 highlights
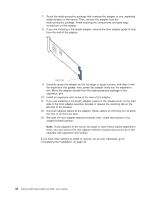
7. Touch the static-protective package that contains the adapter to any unpainted metal surface on the server. Then, remove the adapter from the static-protective package. Avoid touching the components and gold-edge connectors on the adapter. 8. If you are installing a full-length adapter, remove the blue adapter guide (if any) from the end of the adapter. Adapter guide 9. Carefully grasp the adapter by the top edge or upper corners, and align it with the expansion slot guides; then, press the adapter firmly into the expansion slot. Move the adapter directly from the static-protective package to the expansion slot. 10. Install an expansion-slot screw at the rear of the adapter. 11. If you are installing a full-length adapter, press on the release lever on the right side of the front adapter-retention bracket to release the retaining tab on the left side of the bracket. 12. Connect required cables to the adapter. Route cables so that they do not block the flow of air from the fans. 13. Reinstall the rear adapter-retention bracket; then, rotate the bracket to the closed (locked) position. Note: If any adapters in the server are large or have heavy cables attached to them, you can remove the rear adapter-retention bracket and secure all of the adapters with expansion-slot screws. If you have other options to install or remove, do so now; otherwise, go to "Completing the installation" on page 44. 40 xSeries 206m Types 8485 and 8490: User's Guide
-
 1
1 -
2
-
3
-
4
-
5
-
6
-
7
-
8
-
9
-
10
-
11
-
12
-
13
-
14
-
15
-
16
-
17
-
18
-
19
-
20
-
21
-
22
-
23
-
24
-
25
-
26
-
27
-
28
-
29
-
30
-
31
-
32
-
33
-
34
-
35
-
36
-
37
-
38
-
39
-
40
-
41
-
42
-
43
-
44
-
45
-
46
-
47
-
48
-
 49
49 -
 50
50 -
 51
51 -
 52
52 -
 53
53 -
 54
54 -
 55
55 -
 56
56 -
 57
57 -
 58
58 -
 59
59 -
60
-
61
-
62
-
63
-
64
-
65
-
66
-
67
-
68
-
69
-
70
-
71
-
72
-
73
-
74
-
75
-
76
-
77
-
78
-
79
-
80
-
81
-
82
-
83
-
84
-
85
-
86
-
87
-
88
-
89
-
90
-
91
-
92
 |
 |
