IBM 84903bu User Guide - Page 56
correctly.
 |
UPC - 000435882073
View all IBM 84903bu manuals
Add to My Manuals
Save this manual to your list of manuals |
Page 56 highlights
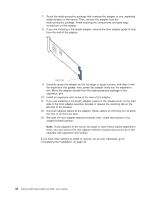
1. Review the safety information that begins on page v and "Installation guidelines" on page 19. 2. Turn off the server and attached devices; then, disconnect all power cords and external cables. 3. Remove the side cover (see "Removing the side cover" on page 22). 4. Disconnect the power cord from the power supply that is to be removed. 5. Press down on the orange release lever and pull the power supply out of the bay, using the handle. 6. If you are instructed to return the hot-swap power supply, follow all packaging instructions, and use any packaging materials for shipping that are supplied to you. 7. Touch the static-protective package that contains the hot-swap power supply to any unpainted metal surface on the server; then, remove the power supply from the package and place it on a static-protective surface. 8. Place the power supply into the bay guides. 9. Press down on the orange release lever and push the power supply toward the front of the chassis until it locks into place. 10. Connect one end of the power cord into the connector on the back of the power supply and connect the other end of the power cord into a properly grounded electrical outlet. 11. Make sure that both the ac and dc power LEDs on the rear of the power supply are lit, indicating that the power supply is operating correctly. 12. Install the side cover (see "Reinstalling the side cover" on page 46). 13. Connect the external cables and power cords. If you have other options to install or remove, do so now; otherwise go to "Completing the installation" on page 44. 42 xSeries 206m Types 8485 and 8490: User's Guide
-
 1
1 -
2
-
3
-
4
-
5
-
6
-
7
-
8
-
9
-
10
-
11
-
12
-
13
-
14
-
15
-
16
-
17
-
18
-
19
-
20
-
21
-
22
-
23
-
24
-
25
-
26
-
27
-
28
-
29
-
30
-
31
-
32
-
33
-
34
-
35
-
36
-
37
-
38
-
39
-
40
-
41
-
42
-
43
-
44
-
45
-
46
-
47
-
48
-
49
-
50
-
 51
51 -
 52
52 -
 53
53 -
 54
54 -
 55
55 -
 56
56 -
 57
57 -
 58
58 -
 59
59 -
 60
60 -
 61
61 -
62
-
63
-
64
-
65
-
66
-
67
-
68
-
69
-
70
-
71
-
72
-
73
-
74
-
75
-
76
-
77
-
78
-
79
-
80
-
81
-
82
-
83
-
84
-
85
-
86
-
87
-
88
-
89
-
90
-
91
-
92
 |
 |
