Insignia NS-37L550A11 User Manual (English) - Page 42
Labeling an input source, Using INlink
 |
View all Insignia NS-37L550A11 manuals
Add to My Manuals
Save this manual to your list of manuals |
Page 42 highlights
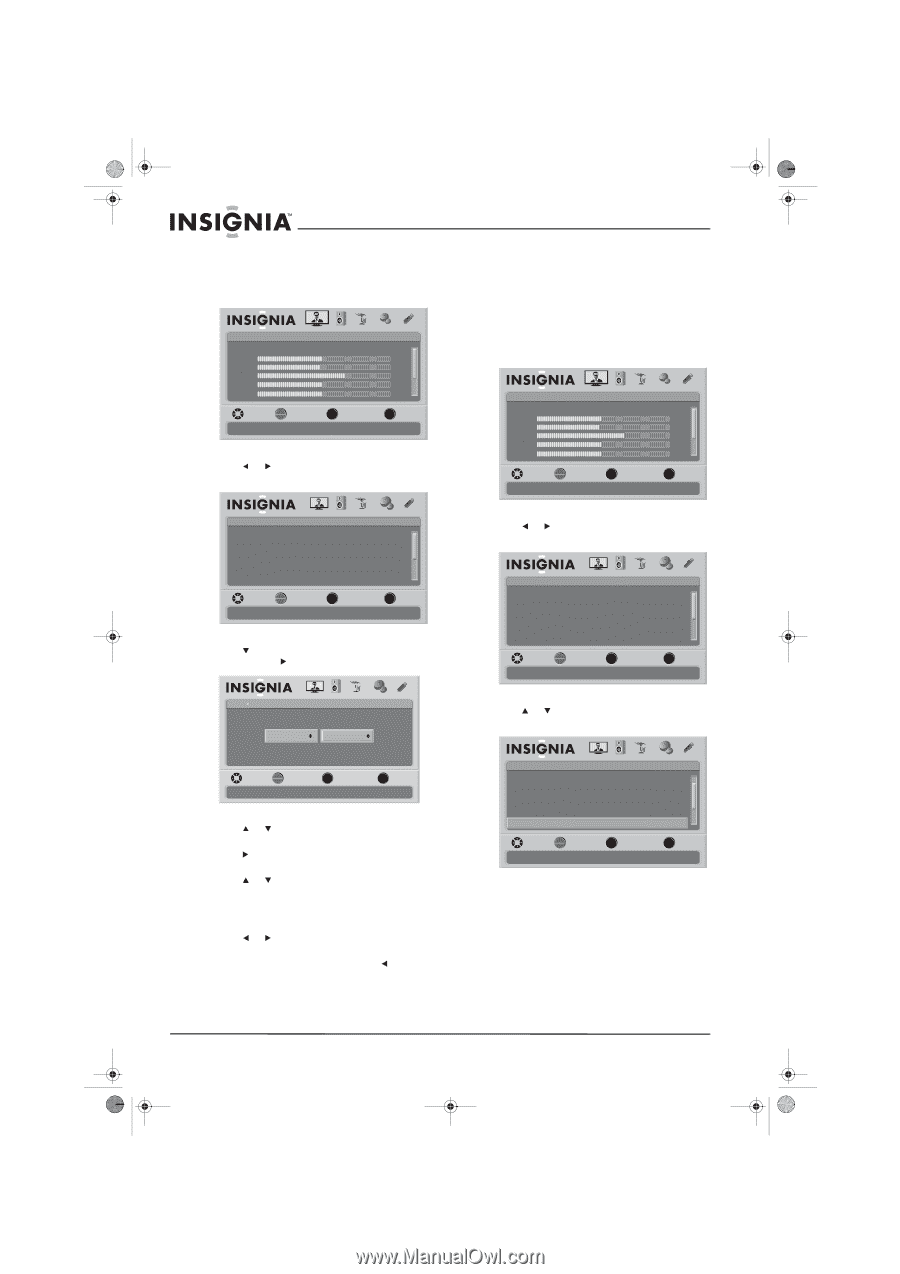
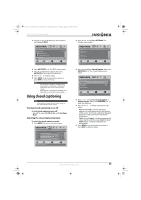
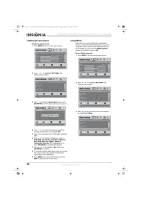
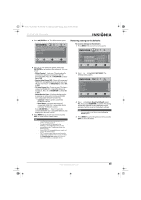
NS-32L_37L_42L550A11_09-1120_MAN_V2_English.book Page 38 Thursday, January 21, 2010 10:20 AM NS-32L550A11/NS-37L550A11/NS-42L550A11 32"/37"/42" LCD, 120 Hz 1080p Labeling an input source To label an input source: 1 Press MENU. The on-screen menu opens. Picture Mode Brightness Contrast Color Tint Sharpness PICTURE AUDIO CHANNELS SETTINGS USB Energy Savings 50 48 70 0 0 MOVE OK ENTER SELECT Adjust settings to affect picture quality MENU PREVIOUS EXIT EXIT 2 Press or to highlight SETTINGS. The Settings menu opens. Using INlink INlink lets you control HDMI CEC-compatible devices connected to the HDMI jacks on your TV using the remote control that came with your TV. To use INlink, you must set the INlink Control option on the INlink menu to On. To turn INlink on or off: 1 Press MENU. The on-screen menu opens. Picture Mode Brightness Contrast Color Tint Sharpness PICTURE AUDIO CHANNELS SETTINGS USB Energy Savings 50 48 70 0 0 MOVE OK ENTER SELECT Adjust settings to affect picture quality MENU PREVIOUS EXIT EXIT Settings Parental Controls Closed Caption Time Menu Settings Auto Input Sensing Input Labels PICTURE AUDIO CHANNELS SETTINGS USB On MOVE OK ENTER SELECT Set various TV options MENU PREVIOUS EXIT EXIT 3 Press to highlight Input Labels, then press OK/ENTER or . The Input Labels screen opens. Settings Input Labels PICTURE AUDIO CHANNELS SETTINGS USB AV DVD MOVE OK ENTER SELECT MENU PREVIOUS Create labels for the devices connected to your TV EXIT EXIT 4 Press or to select the input you want to change the label for (for example, AV). 5 Press to move the cursor to the label selection field. 6 Press or to select the label you want (-, VCR, DVD, Set Top Box, Satellite, Cable Box, DVD/PVR, Blue-ray, Game 1, Game 2, Camcorder, Receiver, PC, or Custom), then press OK/ENTER to confirm the change. 7 Press or to check Yes or No, then press OK/ENTER to confirm. 8 To change another input label, press to move the cursor to the input selection field, then repeat Step 4 through Step 7. 9 Press MENU to go to previous menu or press EXIT to close the on-screen menu. 2 Press or to highlight SETTINGS. The Settings menu opens. Settings Parental Controls Closed Caption Time Menu Settings Auto Input Sensing Input Labels PICTURE AUDIO CHANNELS SETTINGS USB On MOVE OK ENTER SELECT Set various TV options MENU PREVIOUS EXIT EXIT 3 Press or to scroll down the list of options and highlight INlink. Settings Closed Caption Time Menu Settings Auto Input Sensing Input Labels INlink PICTURE AUDIO CHANNELS SETTINGS USB On MOVE OK ENTER SELECT MENU PREVIOUS Allow the TV to automatically control CEC devices connected to the TV via HDMI EXIT EXIT 38 www.insigniaproducts.com
-
 1
1 -
2
-
3
-
4
-
5
-
6
-
7
-
8
-
9
-
10
-
11
-
12
-
13
-
14
-
15
-
16
-
17
-
18
-
19
-
20
-
21
-
22
-
23
-
24
-
25
-
26
-
27
-
28
-
29
-
30
-
31
-
32
-
33
-
34
-
35
-
36
-
 37
37 -
 38
38 -
 39
39 -
 40
40 -
 41
41 -
 42
42 -
 43
43 -
 44
44 -
 45
45 -
 46
46 -
 47
47 -
48
-
49
-
50
-
51
-
52
-
53
-
54
-
55
-
56
-
57
-
58
-
59
-
60
-
61
-
62
-
63
-
64
-
65
-
66
-
67
-
68
 |
 |