Insignia NS-37L550A11 User Manual (English) - Page 9
Install the stand or, wall-mount bracket - wall mount
 |
View all Insignia NS-37L550A11 manuals
Add to My Manuals
Save this manual to your list of manuals |
Page 9 highlights
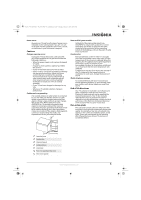
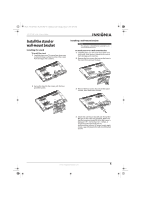
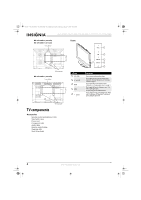
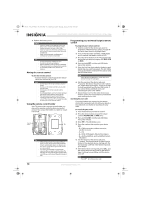
NS-32L_37L_42L550A11_09-1120_MAN_V2_English.book Page 5 Thursday, January 21, 2010 10:20 AM 32"/37"/42" LCD, 120 Hz 1080p Install the stand or wall-mount bracket Installing the stand To install the stand: 1 Carefully place your TV screen face-down on a cushioned, clean surface to protect the screen from damages and scratches. Installing a wall-mount bracket Warning This apparatus is intended to be supported by a UL Listed wall mount bracket. To attach your TV to a wall-mount bracket: 1 Carefully place your TV screen face-down on a cushioned, clean surface to protect the screen from damages and scratches. 2 Remove the four screws that secure the base to the stand, then remove the base. 2 Secure the stand to the screen with the four provided screws. 3 Remove the four screws that secure the stand column, then remove the column. 4 Attach the wall-mount bracket with thread ISO M6 type screws only (not included). Make sure that the insertion length (B) of the M6 screws is between 0.39 ~ 0.47 inches (10 ~ 12mm). A shorter length might make the TV wall-mounting insecure. A longer length might create a space between the wall-mount bracket and TV. www.insigniaproducts.com 5
-
 1
1 -
2
-
3
-
 4
4 -
 5
5 -
 6
6 -
 7
7 -
 8
8 -
 9
9 -
 10
10 -
 11
11 -
 12
12 -
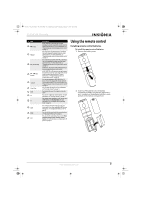 13
13 -
 14
14 -
15
-
16
-
17
-
18
-
19
-
20
-
21
-
22
-
23
-
24
-
25
-
26
-
27
-
28
-
29
-
30
-
31
-
32
-
33
-
34
-
35
-
36
-
37
-
38
-
39
-
40
-
41
-
42
-
43
-
44
-
45
-
46
-
47
-
48
-
49
-
50
-
51
-
52
-
53
-
54
-
55
-
56
-
57
-
58
-
59
-
60
-
61
-
62
-
63
-
64
-
65
-
66
-
67
-
68
 |
 |
