Intel SE7210TP1-E User Guide - Page 30
Changing the BIOS Language, Recovering the BIOS, Manually Recovering the BIOS - bios update
 |
UPC - 810884006803
View all Intel SE7210TP1-E manuals
Add to My Manuals
Save this manual to your list of manuals |
Page 30 highlights
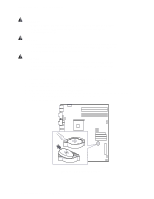
Server Utilities 10. If you do not set the CMOS values back to defaults using the F9 key, the system may function erratically. ✏ NOTE You may encounter a CMOS Checksum error or other problem after reboot. If this happens, shut down the system and boot it again. CMOS checksum errors require that you enter Setup, check your settings, save your settings, and exit Setup. Changing the BIOS Language You can use the BIOS upgrade utility to change the language the BIOS uses for messages and the Setup program. Use a bootable diskette containing the Intel flash utility and language files. 1. Boot the computer with the bootable diskette in drive A. The BIOS upgrade utility screen appears. 2. Select Update Flash Memory From a File. 3. Select Update Language Set. Press . 4. Select drive A and use the arrow keys to select the correct .lng file. Press . 5. When the utility asks for confirmation that you want to flash the new language into memory, select Continue with Programming. Press . 6. When the utility displays the message upgrade is complete, remove the diskette. Press . 7. The computer will reboot and the changes will take effect. Recovering the BIOS In the rare event that the BIOS becomes damaged, a recovery process needs to be followed to return the system to service. Two methods are available to recover the BIOS: automatically with the crisis recovery diskette, and manually by moving a jumper on the system board. These methods are described below. ✏ NOTE BIOS recovery is the mode of last resort, used only when the main system BIOS will not come up. Manually Recovering the BIOS A BIOS recovery can be manually initiated. This option would be used only when the BIOS is corrupt, but the ROM checksum error does not occur during POST. To manually initiate a BIOS recovery, use the following steps: 1. Power down and uplug the system from the AC power source. 2. Move the recovery jumper at J1D1 from pins 13 and 14 to cover pins 14 and 15. 3. Insert a bootable diskette containing the file AMIBOOT.ROM into the A: diskette drive. 4. Plug the system into the AC power source and power it on. 30 Intel Server Board SE7210TP1-E User Guide
-
 1
1 -
2
-
3
-
4
-
5
-
6
-
7
-
8
-
9
-
10
-
11
-
12
-
13
-
14
-
15
-
16
-
17
-
18
-
19
-
20
-
21
-
22
-
23
-
24
-
 25
25 -
 26
26 -
 27
27 -
 28
28 -
 29
29 -
 30
30 -
 31
31 -
 32
32 -
 33
33 -
 34
34 -
 35
35 -
36
-
37
-
38
-
39
-
40
-
41
-
42
-
43
-
44
-
45
-
46
-
47
-
48
-
49
-
50
-
51
 |
 |
