Invacare TDXSR-CG-HD Owners Manual - Page 58
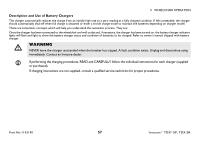
Quantity, Comments
 |
View all Invacare TDXSR-CG-HD manuals
Add to My Manuals
Save this manual to your list of manuals |
Page 58 highlights
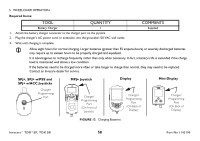
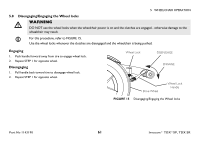
5 WHEELCHAIR OPERATION Required Items: TOOL QUANTITY COMMENTS Battery Charger 1 1. Attach the battery charger connector to the charger port on the joystick. 2. Plug the charger's AC power cord, or extension, into the grounded 120 VAC wall outlet. Supplied 3. Wait until charging is complete. Allow eight hours for normal charging. Larger batteries (greater than 55 ampere-hours) or severely discharged batteries may require up to sixteen hours to be properly charged and equalized. It is advantageous to recharge frequently rather than only when necessary. In fact, a battery's life is extended if the charge level is maintained well above a low condition. If the batteries need to be charged more often or take longer to charge than normal, they may need to be replaced. Contact an Invacare dealer for service. SPJ+, SPJ+ w/PSS and SPJ+ w/ACC Joysticks Charger/ Programming Port MPJ+ Joystick Charger/ Programming Port (On Front of Joystick) Display Charger/ Programming Port (On Back of Display) Mini-Display Charger/ Programming Port (On Back of Display) FIGURE 12 Charging Batteries Invacare® TDX®SP, TDX SR 58 Part No 1143190
-
 1
1 -
2
-
3
-
4
-
5
-
6
-
7
-
8
-
9
-
10
-
11
-
12
-
13
-
14
-
15
-
16
-
17
-
18
-
19
-
20
-
21
-
22
-
23
-
24
-
25
-
26
-
27
-
28
-
29
-
30
-
31
-
32
-
33
-
34
-
35
-
36
-
37
-
38
-
39
-
40
-
41
-
42
-
43
-
44
-
45
-
46
-
47
-
48
-
49
-
50
-
51
-
52
-
 53
53 -
 54
54 -
 55
55 -
 56
56 -
 57
57 -
 58
58 -
 59
59 -
 60
60 -
 61
61 -
 62
62 -
 63
63 -
64
-
65
-
66
-
67
-
68
-
69
-
70
-
71
-
72
-
73
-
74
-
75
-
76
-
77
-
78
-
79
-
80
-
81
-
82
-
83
-
84
-
85
-
86
-
87
-
88
-
89
-
90
-
91
-
92
-
93
-
94
-
95
-
96
-
97
-
98
-
99
-
100
-
101
-
102
-
103
-
104
-
105
-
106
-
107
-
108
 |
 |
