Invacare TDXSR-CG-HD Owners Manual - Page 89
Replacing Batteries and/or Battery Cables
 |
View all Invacare TDXSR-CG-HD manuals
Add to My Manuals
Save this manual to your list of manuals |
Page 89 highlights
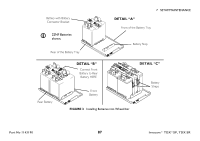
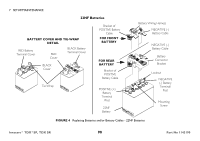
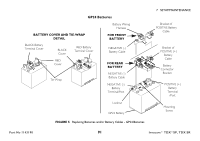
7 SETUP/MAINTENANCE 7.7 Replacing Batteries and/or Battery Cables For this procedure, refer to FIGURE 4 on page 90 for NF22 batteries or and FIGURE 5 on page 91. GP24 batteries. Have the following tools available. TOOL QTY COMMENTS 7/16-INCH (6PT) BOX WRENCH 1 Not Supplied DIAGONAL CUTTERS 1 Not Supplied 1. Remove the batteries from the wheelchair. Refer to Removing/Installing the Batteries From/Into the Wheelchair on page 82. 2. Cut the tie-wraps that secure the battery terminal covers to the battery terminals. 3. Slide the RED battery terminal cover back on the RED battery cable to expose the POSITIVE battery terminal. 4. Slide the BLACK battery terminal cover back on the BLACK battery cable to expose NEGATIVE battery terminal. ƽ WARNING NEVER allow any of your tools and/or battery cable(s) to contact BOTH battery post(s) at the same time. An electrical short may occur and serious personal injury or damage may occur. 5. Remove the locknut that secures the bracket of the POSITIVE battery cable to the POSITIVE (+) battery post of the battery. 6. Remove the locknut that secures the NEGATIVE battery cable to the NEGATIVE(-) battery post of the battery 7. Discard the existing battery. 8. Position battery connector bracket or wiring harness onto the new 22NF battery (FIGURE 4) or GP24 battery (FIGURE 5) as shown. 9. Secure the NEGATIVE battery cable to the NEGATIVE (-) battery post with existing mounting screw and locknut. 10. Secure the bracket of the POSITIVE battery cable to the POSITIVE (+) battery post with existing mounting screw and locknut. 11. Position each battery terminal cover over top of each battery terminal. 12. Secure battery terminal covers in place with one tie-wrap. 13. Install batteries into wheelchair. Refer to Removing/Installing the Batteries From/Into the Wheelchair on page 82. Part No 1143190 89 Invacare® TDX®SP, TDX SR
-
 1
1 -
2
-
3
-
4
-
5
-
6
-
7
-
8
-
9
-
10
-
11
-
12
-
13
-
14
-
15
-
16
-
17
-
18
-
19
-
20
-
21
-
22
-
23
-
24
-
25
-
26
-
27
-
28
-
29
-
30
-
31
-
32
-
33
-
34
-
35
-
36
-
37
-
38
-
39
-
40
-
41
-
42
-
43
-
44
-
45
-
46
-
47
-
48
-
49
-
50
-
51
-
52
-
53
-
54
-
55
-
56
-
57
-
58
-
59
-
60
-
61
-
62
-
63
-
64
-
65
-
66
-
67
-
68
-
69
-
70
-
71
-
72
-
73
-
74
-
75
-
76
-
77
-
78
-
79
-
80
-
81
-
82
-
83
-
 84
84 -
 85
85 -
 86
86 -
 87
87 -
 88
88 -
 89
89 -
 90
90 -
 91
91 -
 92
92 -
 93
93 -
 94
94 -
95
-
96
-
97
-
98
-
99
-
100
-
101
-
102
-
103
-
104
-
105
-
106
-
107
-
108
 |
 |