JVC GZ-MG20 Instruction Manual - Page 28
STILL IMAGE RECORDING & PLAYBACK, Still Image Recording, Zooming, Continuous Shooting, Deleting Files
 |
View all JVC GZ-MG20 manuals
Add to My Manuals
Save this manual to your list of manuals |
Page 28 highlights
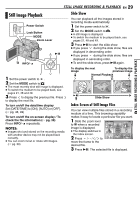
28 EN STILL IMAGE RECORDING & PLAYBACK Still Image Recording Power Switch Zooming Use the zoom function for close-up or wideangle shooting. For details, see page 23. Continuous Shooting Lock Button Zoom Lever MODE Recording Start/Stop Button 1 Set the power switch to . 2 Set the MODE switch to . ● The camera is programmed to record still images on the built-in hard disk by the factory-preset. To switch the recording medium, see pages 21, 48 and 49. ● To change the picture quality, see pages 48 and 51. ● To use the light, see page 31. 3 Press the recording start/stop button. PHOTO indicator appears during shooting. The still image is recorded. ● To check how the image looks before recording, press the recording start/stop button halfway and hold. The indicator appears and stops blinking when the captured image is focused. To cancel the recording, release the recording start/stop button. To record it on the recording medium, press the recording start/stop button fully. If the continuous shooting mode is set to on, keeping the recording start/stop button pressed in step 3 in "Still Image Recording" (੬ pg. 28) provides an effect similar to serial photography. (Interval between still images: approx. 0.5 seconds) To use this function, set the [CONTINUOUS SHOOTING] to [ON]. (੬ pg. 51) The indicator appears on the display. ● To turn off this function, set [CONTINUOUS SHOOTING] to [OFF]. ● Continuous shooting may not work well depending on the recording medium. ● The continuous shooting speed will drop when repeatedly making continuous shots. Deleting Files If you press during recording mode, the file recorded most recently will be deleted. (੬ pg. 39) ● However, if the recording mode (video or still image) is switched or the power is turned off and on again after recording, you cannot delete the file. NOTES: ● There may be differences in the brightness between the recorded video and still image, even if the same subject is shot. ● To turn the shutter sound off, see page 48. ● For approximate number of storable images, see page 63.
-
 1
1 -
2
-
3
-
4
-
5
-
6
-
7
-
8
-
9
-
10
-
11
-
12
-
13
-
14
-
15
-
16
-
17
-
18
-
19
-
20
-
21
-
22
-
 23
23 -
 24
24 -
 25
25 -
 26
26 -
 27
27 -
 28
28 -
 29
29 -
 30
30 -
 31
31 -
 32
32 -
 33
33 -
34
-
35
-
36
-
37
-
38
-
39
-
40
-
41
-
42
-
43
-
44
-
45
-
46
-
47
-
48
-
49
-
50
-
51
-
52
-
53
-
54
-
55
-
56
-
57
-
58
-
59
-
60
-
61
-
62
-
63
-
64
-
65
-
66
-
67
-
68
-
69
-
70
-
71
-
72
-
73
-
74
-
75
-
76
-
77
-
78
-
79
-
80
-
81
-
82
-
83
-
84
-
85
-
86
-
87
-
88
-
89
-
90
-
91
-
92
-
93
-
94
-
95
-
96
-
97
-
98
-
99
-
100
-
101
 |
 |
