JVC GZ-MG20 Instruction Manual - Page 98
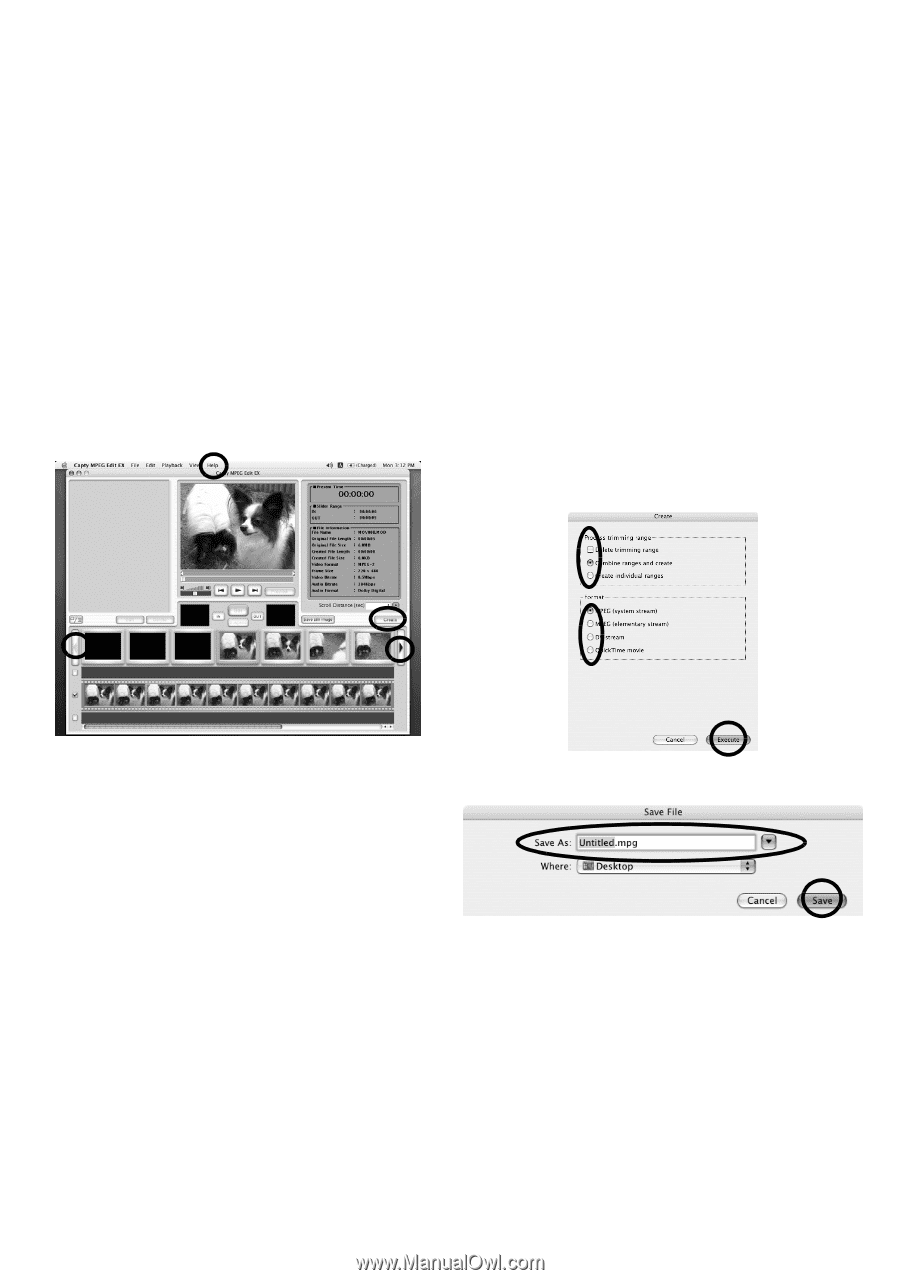
Step7, Delete trimming range, Combine range and create, Create individual ranges
 |
View all JVC GZ-MG20 manuals
Add to My Manuals
Save this manual to your list of manuals |
Page 98 highlights
Step7 Editing 1 The point selected first in the trimming range is displayed in the GOP list or frame list. To edit in frame units, insert a check mark to display the frame in the frame list. ● Note that the scroll function will become slower. 2 Drag and drop the IN point in the trimming range (point selected first) from the displayed thumbnail to the IN Point preview box. 3 Drag and drop the OUT point (point selected last) in the trimming range from the displayed thumbnail to the OUT Point preview box. 4 When the selections in the range are completed, click [Set]. ● If necessary, repeat operations to set the trimming range. 5 After editing is completed, click [Create]. Step8 Saving 1 Select the trimming range processing method. Delete trimming range Deletes the trimming range and creates a new file. Combine range and create Combines the multiple trimming ranges that were set in the trimming list at the currently selected locations. A single file is created. Create individual ranges Individual files are created for each currently selected range. 2 Select the file format. ● When creating DVD video using PIXELA's "CaptyDVD/VCD Ver. 2", be sure to select MPEG (system stream) format. 3 Click [Execute] to create the file. ● Click arrows on the screen while pressing down the shift key to set the Scroll Distance. ● For further details about the operations on the screen, refer to Help. 4 Name the file and click [Save]. - 34 -
-
 1
1 -
2
-
3
-
4
-
5
-
6
-
7
-
8
-
9
-
10
-
11
-
12
-
13
-
14
-
15
-
16
-
17
-
18
-
19
-
20
-
21
-
22
-
23
-
24
-
25
-
26
-
27
-
28
-
29
-
30
-
31
-
32
-
33
-
34
-
35
-
36
-
37
-
38
-
39
-
40
-
41
-
42
-
43
-
44
-
45
-
46
-
47
-
48
-
49
-
50
-
51
-
52
-
53
-
54
-
55
-
56
-
57
-
58
-
59
-
60
-
61
-
62
-
63
-
64
-
65
-
66
-
67
-
68
-
69
-
70
-
71
-
72
-
73
-
74
-
75
-
76
-
77
-
78
-
79
-
80
-
81
-
82
-
83
-
84
-
85
-
86
-
87
-
88
-
89
-
90
-
91
-
92
-
 93
93 -
 94
94 -
 95
95 -
 96
96 -
 97
97 -
 98
98 -
 99
99 -
 100
100 -
 101
101
 |
 |