JVC KW-V25BT Instruction Manual America
JVC KW-V25BT Manual
 |
View all JVC KW-V25BT manuals
Add to My Manuals
Save this manual to your list of manuals |
JVC KW-V25BT manual content summary:
- JVC KW-V25BT | Instruction Manual America - Page 1
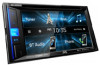
MONITOR WITH DVD RECEIVER INSTRUCTION MANUAL KW-V250BT (Region 1 - DVD Region Code 1 Area) KW-V25BT (Region 1 - DVD Region Code 1 Area) KW-V350BT (Region 1 - DVD Region Code 1 Area) KW-V350BT (Region 4 - DVD Region Code 4 Area) ENGLISH This instruction manual is used to describe the models listed - JVC KW-V25BT | Instruction Manual America - Page 2
manual. Please keep the manual in a safe and accessible place for future reference. WARNINGS To prevent accidents and damages • DO NOT install any unit or wire is no danger of hazardous radiation outside the unit. For KW-V250BT/KW-V25BT/KW-V350BT Region 1: CAUTION Use of controls or adjustments or - JVC KW-V25BT | Instruction Manual America - Page 3
of the device. For KW-V250BT/KW-V25BT/KW-V350BT Region 1: FCC WARNING This equipment may generate or use radio frequency energy. Changes or modifications to this equipment may cause harmful interference unless the modifications are expressly approved in the instruction manual. The user could lose - JVC KW-V25BT | Instruction Manual America - Page 4
for an item directly 51 JVC Remote App 52 Installation and Connection 52 Before installation 52 Installing the unit 54 Connecting external components 54 Wiring connection 55 References 56 Maintenance 56 More information 56 Troubleshooting 59 Specifications 63 Trademarks and licenses - JVC KW-V25BT | Instruction Manual America - Page 5
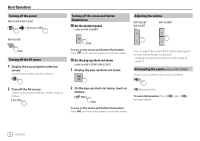
Basic Operations How to reset your unit If the unit fails to operate properly, press the reset button. KW-V250BT/KW-V25BT KW-V350BT 1 Reset button 2 Loading slot 3 Screen (touch panel) 4 Monitor panel 5 Illumination bar The brightness of the illumination changes according to the music level. (Page - JVC KW-V25BT | Instruction Manual America - Page 6
illumination On the monitor panel (only for KW-V350BT) Adjusting the volume KW-V250BT KW-V25BT KW-V350BT (Hold) To turn on the screen and button illumination: Press on the monitor panel or touch the screen. On the pop-up short-cut menu (only for KW-V250BT/KW-V25BT) 1 Display the pop-up short-cut - JVC KW-V25BT | Instruction Manual America - Page 7
. Clock settings 1 Display the Home screen. KW-V250BT KW-V25BT KW-V350BT AM10 : 28 Reset E.g. Clock settings screen for KW-V250BT/ KW-V25BT • Radio Data System (Initial): Synchronizes the clock time with FM RBDS. • Off: Sets the clock manually. Touch [J]/[K] to adjust the hour - JVC KW-V25BT | Instruction Manual America - Page 8
the phone control screen. 7 Only for KW-V350BT: Ejects the disc. 8 Only for KW-V350BT: Displays the screen. Available playback sources and options Touch 2 to display the source/option selection screen. E.g. Source/option selection screen for KW-V250BT/ KW-V25BT [Android™] [AV-IN - JVC KW-V25BT | Instruction Manual America - Page 9
screen. Tuner Disc USB iPod Android™ AV-IN Phone Spotify Pandora iHeart Radio SiriusXM Maestro AV Off E.g. Item selection screen for KW-V350BT Region 1 Source control screen the screen, touch the screen to show them. E.g. Common audio playback source screen: KW-V250BT/KW-V25BT KW-V350BT - JVC KW-V25BT | Instruction Manual America - Page 10
finger on the touch panel as follows (for some sources, the gesture control is not available). 7 [ ] [FNC J ] [ ] For KW-V250BT/KW-V25BT: Displays the screen. (Page 40) For KW-V350BT: Displays the pop-up short-cut menu. • To close the menu, touch [ K ]. Displays the folder list/track - JVC KW-V25BT | Instruction Manual America - Page 11
-up menu Displays the phone control screen. Displays the screen. (Page 40) Displays the screen. (Page 42) Displays the screen. (Page 46) Displays the screen. (Page 40) To close the pop-up menu • KW-V250BT/KW-V25BT: Press FNC on the monitor - JVC KW-V25BT | Instruction Manual America - Page 12
encoded disc, the multi-channel signals are downmixed. Inserting a disc Ejecting a disc For KW-V250BT/KW-V25BT: Display the pop-up short-cut menu, then eject the disc. For KW-V350BT: On the Home screen or source control screen, touch as follows: Label side up Selecting a folder/track on the list - JVC KW-V25BT | Instruction Manual America - Page 13
these settings only while playback is stopped. Playback operations Video playback information on the source control screen E.g. Video playback source control screen for KW-V250BT/KW-V25BT 1 Media type 2 Playback status 3 Current playback item information (title no./chapter no./folder no./file - JVC KW-V25BT | Instruction Manual America - Page 14
except VCD Menu Control E.g. Video menu control screen for KW-V250BT/ KW-V25BT Touching the operation keys performs the following actions type. Selects the view angle. *1 When [ ] is set to or , the picture is zoomed with the aspect ratio of the setting. This feature may - JVC KW-V25BT | Instruction Manual America - Page 15
[J] [K] [H] [I]: Selects an item. • [Enter]: Confirms the selection. • [Return]: Returns to the previous screen. Video playback for VCD Menu Control E.g. Video menu control screen for KW-V250BT/ KW-V25BT Touching the operation keys performs the following actions: 1 [ ] [ ] [ ] Refer to "Video - JVC KW-V25BT | Instruction Manual America - Page 16
Folder Name 3 Folder Name 4 Folder Name 5 File Name 1 File Name 2 File Name 3 File Name 4 File Name 5 File type Audio E.g. USB source control screen for KW-V250BT/ KW-V25BT Select the file type as follows: [Audio] [Video] [Photo] Plays back audio files. Plays back video files. Plays back still - JVC KW-V25BT | Instruction Manual America - Page 17
other information, see page 58. • You cannot watch video. Wired connection iPod/iPhone iPod/iPhone 30-pin Lightning model connector model (commercially available) (commercially available) E.g. Android source control screen for KW-V250BT/ KW-V25BT Touching the operation keys performs the following - JVC KW-V25BT | Instruction Manual America - Page 18
an alarm signal from FM broadcast. Playback information on the source control screen KW-V250BT/KW-V25BT Playback operations Playback information and key operation • For playback information, see "Source control screen" on page 7. • For key operations on the touch panel, see "Common operation - JVC KW-V25BT | Instruction Manual America - Page 19
source control screen". Operation keys on source control screen • The following explanations state the operation keys for KW-V250BT/KW-V25BT, mode for [S]/[T]. • AUTO1 (Initial): Auto search • AUTO2: Tunes in preset stations one after another • MANU: Manual search [S]/[T] Searches for a station. - JVC KW-V25BT | Instruction Manual America - Page 20
Manual presetting 1 Tune in to a station you want to preset. 2 Select a preset number to store into. Tuner AM FM1 P1 FM1 P2 FM1 P3 FM1 P4 FM1 P5 FM1 (Hold) E.g. Tuner source control screen for KW-V250BT/ KW Connect Vehicle Tuner Perform this installation when you install the unit for the - JVC KW-V25BT | Instruction Manual America - Page 21
. A confirmation message appears. Touch [Return]. Listening to the SiriusXM® Satellite Radio Playback information on the source control screen KW-V250BT/KW-V25BT SiriusXM KW-V350BT SiriusXM 1 Displays/hides other available operation keys* 2 Selects the band (SXM1/SXM2/SXM3/SXM4) 3 Channel number - JVC KW-V25BT | Instruction Manual America - Page 22
band. 1 Tune in to a channel you want to preset. 2 Select a preset number to store into. SiriusXM P1 P2 P3 P4 P5 (Hold) E.g. SiriusXM source control screen for KW-V250BT/ KW-V25BT The channel selected in step 1 is stored into the preset number [P1] to [P5] you have selected. 20 ENGLISH - JVC KW-V25BT | Instruction Manual America - Page 23
channel window. On the source control screen, touch as follows: 2 Select a preset channel. SiriusXM P1 Channel Name 100Ch P2 Channel Name 105Ch P3 Channel Name 110Ch P4 Channel Name 115Ch P5 Channel Name 120Ch E.g. Preset station window for KW-V250BT/ KW-V25BT • You can also select a preset - JVC KW-V25BT | Instruction Manual America - Page 24
artists, songs or teams. Up to 50 contents can be registered. For artists/songs While listening to your favorite artist/song: On the source control screen, touch as follows: TuneScan™ You can get a short preview of the songs you have missed on each of your SmartFavorites music channels and the - JVC KW-V25BT | Instruction Manual America - Page 25
items on the list to inform you once the unit receives the information. For artists/songs/teams 1 Display the screen. On the source control screen, touch as follows: To delete the registered items: Touch and hold the item you want to delete in step 2. The [ ] icon and - JVC KW-V25BT | Instruction Manual America - Page 26
selection. Parental Lock channel selection This option allows you to manually select the channels to be locked by the parental control feature screen. On the source control screen, touch as follows: Then, on the screen, touch as follows: - JVC KW-V25BT | Instruction Manual America - Page 27
as follows: 2 Reset the setting. On the screen, touch and hold as follows: : [Reset ] Pandora® (Only for KW-V250BT/KW-V25BT/KW-V350BT Region 1) You can stream Pandora from iPhone/iPod touch or Android devices. • Pandora is only available in certain countries. For - JVC KW-V25BT | Instruction Manual America - Page 28
for "Pandora" in the Apple iTunes App Store to find and install the most recent version. Playback operations Playback information and key operation KW-V250BT/KW-V25BT Pandora Connecting the device For Android devices Pair the Android device with this unit via Bluetooth. (Page 34) For iPhone/iPod - JVC KW-V25BT | Instruction Manual America - Page 29
1 Display the list selection screen. On the source control screen, touch as follows: 2 KW-V250BT/KW-V25BT/KW-V350BT Region 1) iHeartRadio is a free, all-in-one digital radio service Installing the application Your smartphone must has built in Bluetooth and the following profiles must be supported - JVC KW-V25BT | Instruction Manual America - Page 30
iHeartRadio for Auto" in the Apple iTunes App Store to find and install the most recent version. Connecting the device For Android devices Pair the Android device control screen". Operation keys on source control screen • The following explanations state the operation keys for KW-V250BT/KW-V25BT, - JVC KW-V25BT | Instruction Manual America - Page 31
return to the upper layer, touch [ ]. Editing the list 1 Display the screen. On the source control screen, touch as follows: Then, on the screen, touch as follows: 2 Select stations (1), then delete the selected stations (2). • A check mark appears beside - JVC KW-V25BT | Instruction Manual America - Page 32
/iPod touch or Android devices. • Because Spotify is a third-party service, the specifications are find and install the most recent version. Connecting the device For Android devices Pair the Android device with KW-V250BT/KW-V25BT Spotify KW-V350BT Spotify You can also operate Spotify with a remote - JVC KW-V25BT | Instruction Manual America - Page 33
time/playback status 6 Progress bar 7 Only for KW-V350BT: Playback source items shown on the Home screen. • Touching the playback source item changes the playback source. *1 For KW-V250BT/KW-V25BT/KW-V350BT Region 1: Purchase optional remote controller, RM-RK258. *2 See the following "Operation - JVC KW-V25BT | Instruction Manual America - Page 34
set to [ON]. (Page 46) • A caution message appears on the screen. To remove the caution message, touch the screen. You can also display the picture from the rear view camera manually without shifting the gear to the reverse (R) position. For KW-V250BT/KW-V25BT: On the pop-up short-cut menu, touch as - JVC KW-V25BT | Instruction Manual America - Page 35
video menu control, touch the same area again. To display parking guide line Set to [ON] (page 46) or touch the area shown below. • To close the parking guidelines, touch the same area again. To exit the camera screen Press or HOME on the monitor panel or touch the area - JVC KW-V25BT | Instruction Manual America - Page 36
off. • If your mobile phone supports PBAP (Phone Book Access Profile), total) Preparation Connect and install the microphone beforehand. Bluetooth function of the device. Auto pairing When is set to [ device. 1 Search for the unit ("JVC KW-V") from your Bluetooth device. 2 Confirm - JVC KW-V25BT | Instruction Manual America - Page 37
your Bluetooth device. 4 Select the unit ("JVC KW-V") on your Bluetooth device. • If a PIN code is required, enter "0000" (initial) or new PIN code you have entered in step 2. • When pairing is completed, the device is registered on the screen. Note • The PIN code is initially - JVC KW-V25BT | Instruction Manual America - Page 38
the volume of the call or earpiece. Making a call 1 Display the phone control screen. On the Home screen, touch as follows: For KW-V250BT/KW-V25BT: For KW-V350BT: 2 Select a method to make a call. 1 Device Name 1 2 Device Name 2 1234XXXXXX X 1 2 3 4 5 6 7 8 9 * 0/+ # 1 From the - JVC KW-V25BT | Instruction Manual America - Page 39
1 2 Device Name 2 1234XXXXXX X 1 2 3 4 5 6 7 8 9 * 0/+ # The active device is highlighted. Presetting phone numbers You can preset up to five phone numbers. 1 Display the phone control screen. On the Home screen, touch as follows: For KW-V250BT/KW-V25BT: For KW-V350BT: ENGLISH 37 - JVC KW-V25BT | Instruction Manual America - Page 40
JVC Streaming DJ When "BT Audio" is selected as the source, you can connect up to five Bluetooth audio devices at the same time. You can easily switch between these five devices by playing music from the device. KW-V250BT/KW-V25BT BT Audio KW information, see "Source control screen" on page 7. • For - JVC KW-V25BT | Instruction Manual America - Page 41
, touch as follows: Then, on the screen, touch as follows: [System] : [Enter] 2 Make the settings. Bluetooth Setup Paired Device List Enter PIN Code 0000 Device Name JVC KW-V Device Address 01:20:03:40:05:60:07 Auto Connect ON OFF Bluetooth HF/Audio Front - JVC KW-V25BT | Instruction Manual America - Page 42
Effect Input Fader / Balance System Speaker / X'over Key Time Alignment Enter Enter Enter Enter Enter E.g. Audio settings screen for KW-V250BT/ KW-V25BT You cannot change the screen in the following situations: • When the AV source is turned off. • When the Bluetooth phone is used (making - JVC KW-V25BT | Instruction Manual America - Page 43
function works only when "DISC"/ "USB"/ "iPod"/ "Android™" is selected as the source. Touch screen, touch as follows: 2 Display the - JVC KW-V25BT | Instruction Manual America - Page 44
screen (3). Speaker Select 3 Adjust the crossover frequency of the selected speaker. • Adjustable items vary depending on the selected speaker type/speaker size - JVC KW-V25BT | Instruction Manual America - Page 45
different from that of the actual scene. Then, on the screen, touch [Display]. Settings Audio Dimmer Display User Customize Input OSD Clock System Demonstration Key Scroll Auto Enter ON OFF ON OFF ON Once OFF +0 ft E.g. Display settings screen for KW-V250BT/ KW-V25BT ENGLISH 43 - JVC KW-V25BT | Instruction Manual America - Page 46
Settings For KW-V250BT/KW-V25BT 1 Change the background design Display the background design selection screen (1), select the dimmer setting (2) ([ ]: dimmer on or [ ]: dimmer off), then select the background design (3). • You can also adjust the color yourself. Touch [Adjust] to display - JVC KW-V25BT | Instruction Manual America - Page 47
information once. • OFF: Cancels. Touching [ H ] scrolls the text regardless of this setting. (Only for KW-V250BT/KW-V25BT) Selects the playback source to display on the Home screen. Select an item to replace (1), then select an item (2) you want to display in the selected position - JVC KW-V25BT | Instruction Manual America - Page 48
, touch [Input]. Settings Audio Rear Camera Display Parking Assist Input System Key Enter Enter E.g. Input settings screen for KW-V250BT/ KW-V25BT Configure the rear view camera settings. • ON (Initial): Displays the picture from the rear view camera when - JVC KW-V25BT | Instruction Manual America - Page 49
Input Smartphone Setup System Bluetooth Setup Key Beep English Enter Enter Enter ON OFF E.g. System settings screen for KW-V250BT/ KW-V25BT Select the text language used for on-screen information. For details, see "Initial settings" on page 5. "Please Power Off" appears when the setting - JVC KW-V25BT | Instruction Manual America - Page 50
the screen. Touch the center of the marks at the upper left (1), the lower center (2), then the upper right (3) as instructed. Touch Panel Adjust • To reset the touch position, touch [Reset]. • To cancel the current operation, touch [Cancel]. (Only for KW-V350BT - JVC KW-V25BT | Instruction Manual America - Page 51
has failed, perform the following, then retry the update: KW-V250BT/KW-V25BT: Turn the ignition switch off then on KW-V350BT: Turn the power off then on Shows the Open Source Licenses. Then, on the screen, touch [Key]. Settings Audio Equalizer Display Sound Effect - JVC KW-V25BT | Instruction Manual America - Page 52
controller RM-RK258 is supplied for KW-V350BT Region 4. • For KW-V250BT/KW-V25BT/KW-V350BT Region 1: To use the remote controller, purchase optional remote controller, RM-RK258. Refer to the instruction manual supplied with the remote controller. • For KW-V350BT Region 4: The unit is equipped with - JVC KW-V25BT | Instruction Manual America - Page 53
result. • Do not set the remote controller in hot places such as on - Displays the current source control screen. • Selects the band. • automatically. (Press)*1 - Searches for stations manually. (Hold)*1 • SiriusXM Satellite Radio*2 : *2 Only for KW-V250BT/KW-V25BT/KW-V350BT Region 1. Searching - JVC KW-V25BT | Instruction Manual America - Page 54
Remote Controller Installation and Connection JVC Remote APP JVC Remote is an application that connects and controls compatible JVC car receivers via Bluetooth® like a wireless remote control. You can also operate this unit from a Smartphone using JVC Remote APP. This application can display the - JVC KW-V25BT | Instruction Manual America - Page 55
1) Only for KW-V350BT Region 4 ] Trim plate (× 1) ' Steering remote cable (× 1) Installation procedure 1 Remove the key from the ignition and disconnect the · battery. 2 Make the proper input and output wire connections for each unit. 3 Connect the speaker wires of the wiring harness. 4 Connect the - JVC KW-V25BT | Instruction Manual America - Page 56
preouts FRONT: Mid range speaker preouts SW: Woofer preouts *1 Only for KW-V250BT/KW-V25BT/KW-V350BT Region 1. *2 Only for KW-V350BT Region 1. *3 Only for KW-V350BT Region 4. *4 When connecting an external amplifier, connect its ground wire to the chassis of the car; otherwise the unit may be - JVC KW-V25BT | Instruction Manual America - Page 57
Installation and Connection Wiring connection 10 A fuse " *1 Only for KW-V250BT/KW-V25BT/KW-V350BT Region 1. *2 Only for KW-V350BT Region 1. *3 Only for KW-V350BT Region 4. *4 Only for KW-V350BT Region 1/KW REMOTE INPUT REMOTE CONT ANT.CONT P.CONT To the car light control switch To the OE remote - JVC KW-V25BT | Instruction Manual America - Page 58
)/ MP@LL (Main Profile at Low Level) • This unit cannot play back the following files: - DivX files encoded in the interlaced scanning mode. * Only for KW-V350BT Region 4. 56 ENGLISH - JVC KW-V25BT | Instruction Manual America - Page 59
. • Some recordable/rewritable discs or files may not be played back due to their characteristics or recording conditions. * Only for KW-V250BT/KW-V25BT/KW-V350BT Region 1. Language codes (for DVD language selection) AA Afar GD Scots Gaelic AB Abkhazian GL Galician AF Afrikaans GN Guarani - JVC KW-V25BT | Instruction Manual America - Page 60
- Folder names: 50 characters - File names: 50 characters * Only for KW-V350BT Region 4. Notes on using a USB device • Avoid using the USB out and connect the USB device repeatedly while "Reading" is shown on the screen. • Operation and power supply may not work as intended for some USB devices - JVC KW-V25BT | Instruction Manual America - Page 61
trouble is not always serious. Check the following points before calling a service center. • For operations with external components, refer also to the instructions chassis. Wire or insulate KW-V250BT/KW-V25BT/KW-V350BT Region 1: Purchase optional remote controller, RM-RK258. *2 Only for KW supported - JVC KW-V25BT | Instruction Manual America - Page 62
Android device and start playback. Sound output only from the Android device. Use another media player application. Restart the Android device. If this does not solve the problem, the connected Android not work. Check the connection. Update the firmware version. Charge the battery. - JVC KW-V25BT | Instruction Manual America - Page 63
Troubleshooting AV-IN No picture appears on the screen. Turn on the video component if it is not on. Connect the video component correctly. Pandora*/iHeartRadio*/Spotify The application does not work. The application on your iPod touch/iPhone/ Android is not the latest version. Update the - JVC KW-V25BT | Instruction Manual America - Page 64
Troubleshooting the correct lock code. * Only for KW-V250BT/KW-V25BT/KW-V350BT Region 1. Bluetooth Phone sound quality is the connected audio player supports AVRCP (Audio/Video Remote Control Profile). The PIN code of the device is not indicated in its instructions, try "0000" or "1234." Turn off, - JVC KW-V25BT | Instruction Manual America - Page 65
for KW-V350BT Region 4. Bluetooth section Technology Frequency RF Output Power (E.I.R.P.) Maximum Communication Range Audio Codec Multi Profile Support Profile (Audio/Video Remote Control Profile) 1.5 GAP (Generic Access Profile) PBAP (PhoneBook Access Profile) 1.2 SDP (Service Discovery Profile - JVC KW-V25BT | Instruction Manual America - Page 66
Level Preout Impedance Speaker Impedance 50 W × 4 22 W × 4 (at less than 1% THD) KW-V250BT/KW-V25BT: 2.5 V/10 kΩ KW-V350BT Region 1/ KW-V350BT Region 4: 4 V/10 kΩ ≤ 600 Ω 4 Ω to 8 Ω General Operating Voltage Installation Dimensions (W × H × D) Weight (Main Unit) 12 V DC car battery 178 mm × 100 - JVC KW-V25BT | Instruction Manual America - Page 67
for this product is designed by Ricoh. • Android is a trademark of Google LLC. • The SIG, Inc. and any use of such marks by JVC KENWOOD Corporation is under license. Other trademarks and trade names NOT LIMITED TO, PROCUREMENT OF SUBSTITUTE GOODS OR SERVICES; LOSS OF USE, DATA, OR PROFITS; OR - JVC KW-V25BT | Instruction Manual America - Page 68
For updated information (the latest Instruction Manual, system updates, new functions, etc.), please visit the following website: © 2018 JVC KENWOOD Corporation 0618DTSMDTJEIN
-
 1
1 -
 2
2 -
 3
3 -
 4
4 -
 5
5 -
 6
6 -
 7
7 -
8
-
9
-
10
-
11
-
12
-
13
-
14
-
15
-
16
-
17
-
18
-
19
-
20
-
21
-
22
-
23
-
24
-
25
-
26
-
27
-
28
-
29
-
30
-
31
-
32
-
33
-
34
-
35
-
36
-
37
-
38
-
39
-
40
-
41
-
42
-
43
-
44
-
45
-
46
-
47
-
48
-
49
-
50
-
51
-
52
-
53
-
54
-
55
-
56
-
57
-
58
-
59
-
60
-
61
-
62
-
63
-
64
-
65
-
66
-
67
-
68
 |
 |

KW-V250BT
(Region 1 – DVD Region Code 1 Area)
KW-V25BT
(Region 1 – DVD Region Code 1 Area)
KW-V350BT
(Region 1 – DVD Region Code 1 Area)
KW-V350BT
(Region 4 – DVD Region Code 4 Area)
MONITOR WITH DVD RECEIVER
INSTRUCTION MANUAL
This instruction manual is used to describe the models listed above. Model availability and features (functions)
may differ depending on the country and sales area.
B5A-2613-10 (K/R)
ENGLISH