Kenmore 5814 Use and Care Guide - Page 10
Refrigerator Use
 |
UPC - 883049122533
View all Kenmore 5814 manuals
Add to My Manuals
Save this manual to your list of manuals |
Page 10 highlights
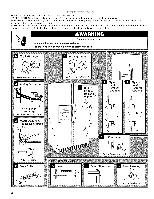
Rattlinngoisesmaycomefromtheflowof refrigerantht,e watelrineo, ritemsstoredontopoftherefrigerator. Watedrrippinognthedefroshteatedruringadefrosctycle maycauseasizzlinsgound. Aseachcycleendsy, oumayheaar gurglinsgoundueto therefrigerafnlot winginyourrefrigerator. Contractioanndexpansioonftheinsidewallsmaycausea poppinngoise. Youmayheaar irbeingforcedoverthecondensbeyrthe condensfearn. Youmayheawr aterunninigntothedrainpanduringthe defrosctycle. REFRIGERATOR USE In order to ensure proper temperatures, you need to permit air to flow between the two sections. Cold air enters the bottom of the freezer section and moves up. It then enters the refrigerator section through the top vent. Air then returns to the freezer as shown. Settings to the left of the mid-setting make the temperature less cold. Settings to the right of the mid-setting make the temperature colder. Wait 24 hours before you put food into the refrigerator. If you add food before the refrigerator has cooled completely, your food may spoil. NOTE: Adjusting the Refrigerator and Freezer Controls to a higher (colder) than recommended setting will not cool the compartments any faster. Adjusting Controls NOTE: Give the refrigerator time to cool down completely before adding food. It is best to wait 24 hours before you put food into the refrigerator. The settings indicated in the previous section should be correct for normal household refrigerator usage. The controls are set correctly when milk or juice is as cold as you like and when ice cream is firm. • Slide the control one setting to the right to make the compartment colder. • Slide the control one setting to the left to make it less cold. If you need to adjust temperatures in the refrigerator or freezer, use the settings listed in the chart below as a guide. Wait at least 24 hours between adjustments. CONDITION/REASON: ADJUSTMENT: REFRIGERATOR too warm FREEZER too warm/ too little ice REFRIGERATOR too cold FREEZER too cold REFRIGERATOR Control one setting higher FREEZER Control one setting higher REFRIGERATOR Control one setting lower FREEZER Control one setting lower Do not block any airflow vents. If the vents are blocked, airflow will be obstructed and temperature and moisture problems may occur. IMPORTANT: Because air circulates between both sections, any odors formed in one section will transfer to the other. You must thoroughly clean both sections to eliminate odors. To avoid odor transfer and drying out of food, wrap or cover foods tightly. Disabling Sounds • To turn off all dispenser and control sounds, press and hold ICE and FILTER at the same time for 3 seconds. • To turn all sounds back on, press and hold ICE and FILTER at the same time for 3 seconds again. J For your convenience, your refrigerator controls are preset at the factory. When you first install your refrigerator, make sure that the controls are still preset. The Refrigerator Control and the Freezer Control should both be set to the "mid-settings." Freezer cold 1 2 ,_ 3 4 colder Refrigerator C off 1 2 ,= 3 4 colder IMPORTANT: • Your product will not cool when the REFRIGERATOR Control is set to OFF. • The Refrigerator Control adjusts the refrigerator compartment temperature. The Freezer Control adjusts the freezer compartment temperature. 10 Depending on your model, you may have one or more of the following options: the ability to select either crushed or cubed ice, a special light that turns on when you use the dispenser, or a lock option to avoid unintentional dispensing. The Water Dispenser If you did not flush the water system when the refrigerator was first installed, do so now. Use a sturdy container to depress and hold the water dispenser lever for 5 seconds, then release it for 5 seconds. Repeat until water begins to flow. Once water begins to flow, continue depressing and releasing the dispenser lever (5 seconds on, 5 seconds off) for an additional 2 minutes. This will flush air from the filter and water dispensing system. Additional flushing may be required in some households. NOTE: As air is cleared from the system, water may spurt out of the dispenser. Allow 24 hours for the refrigerator to cool down and chill water.
-
 1
1 -
2
-
3
-
4
-
 5
5 -
 6
6 -
 7
7 -
 8
8 -
 9
9 -
 10
10 -
 11
11 -
 12
12 -
 13
13 -
 14
14 -
 15
15 -
16
-
17
-
18
-
19
-
20
-
21
-
22
-
23
-
24
-
25
-
26
-
27
-
28
-
29
-
30
-
31
-
32
-
33
-
34
-
35
-
36
-
37
-
38
-
39
-
40
-
41
-
42
-
43
-
44
-
45
-
46
-
47
-
48
-
49
-
50
-
51
-
52
-
53
-
54
-
55
-
56
-
57
-
58
-
59
-
60
-
61
-
62
-
63
-
64
-
65
-
66
-
67
-
68
-
69
-
70
-
71
-
72
 |
 |
