Kenmore 5814 Use and Care Guide - Page 6
adjustable
 |
UPC - 883049122533
View all Kenmore 5814 manuals
Add to My Manuals
Save this manual to your list of manuals |
Page 6 highlights
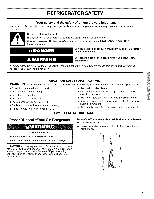
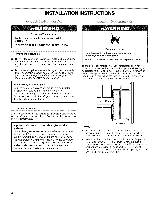
Gathethr erequiretdoolsandpartsbeforestartinginstallation. TOOLSNEEDED1/:4h"ex-heasdockewt rench%, 6"hex-heasdockewt rencahndaflat-bladsecrewdriver. IMPORTANBTe:foryeoubegintu, rntherefrigeratcoorntroOl FRUnplurgefrigeratordisconnepcot werR. emovfeoodandany adjustabdleoororutilitybinsfromdoors. NOTET:ogetyourproductht rougthhedoorwaoyfyourhomem, easutrheedoorwatyoseeifyouneedtoremovtehedoorhandleosr thewholedoorsS. eetheinstructionbselowtoremoveeithetrhedoorhandleosrthewholedoors. Electrical Shock Hazard Disconnect power before removing doors. Failure to do so can result in death or electrical shock. Top Left Hinge Top Right Hinge A Do Not Remove Screw A Wiring Connection Jm A B A. Wiring plugs B, Wiring clip Do Not Cut Wiring Clip B Water Dispenser Tubing Connection Do Not Remove Screw A Handle Removal (Optional) ooooo Style 2 Handle Removal (Optional) Style 3 Handle Removal (Optional) Bottom Hinge A A. Face of fitting Level Door Alignment !b Front Leveling A. Leveling Screw
-
 1
1 -
 2
2 -
 3
3 -
 4
4 -
 5
5 -
 6
6 -
 7
7 -
 8
8 -
 9
9 -
 10
10 -
 11
11 -
 12
12 -
13
-
14
-
15
-
16
-
17
-
18
-
19
-
20
-
21
-
22
-
23
-
24
-
25
-
26
-
27
-
28
-
29
-
30
-
31
-
32
-
33
-
34
-
35
-
36
-
37
-
38
-
39
-
40
-
41
-
42
-
43
-
44
-
45
-
46
-
47
-
48
-
49
-
50
-
51
-
52
-
53
-
54
-
55
-
56
-
57
-
58
-
59
-
60
-
61
-
62
-
63
-
64
-
65
-
66
-
67
-
68
-
69
-
70
-
71
-
72
 |
 |
