Kenwood KDC-BT838U Instruction Manual - Page 9
Display Settings - kca
 |
UPC - 019048179128
View all Kenwood KDC-BT838U manuals
Add to My Manuals
Save this manual to your list of manuals |
Page 9 highlights
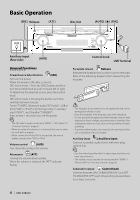
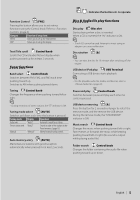
Display Settings Station/Disc Naming (SNPS/DNPS) Attaching a title to a Station or CD. 1 Receive/play the station/disc you want to attach a title to 2 Select Name set mode item during Menu mode Select the "Name Set" display. For how to select Function Control items, refer to (page 6). 3 Enter Name set mode Press the Control knob for at least 1 second. 4 Enter the name Operation type Move the cursor to the enter character position Select the character type* Select the characters Operation Push the Control knob towards right or left. Press the Control knob. Turn the Control knob or push it towards up or down. * Each time you press the knob, the character type alternates between the types shown in the table below. Character type Alphabet upper case Alphabet lower case Numbers and symbols Special characters (Accent characters) ⁄ • Enter characters by using a remote control with numbers buttons. Example: If you are entering "DANCE". Character Button Times pressed "D" "A" "N" "C" "E" [3] [¢] [2] [¢] [6] [¢] [2] [¢] [3] 1 1 2 3 2 5 Exit Menu mode Press the [FNC] button. ⁄ • A title cannot be attached to Audio file media. • When operation stops for 10 seconds the name at that time is registered, and Name Set mode closes. • Memory numbers - FM/AM: 30 stations - Internal CD player: 10 discs - External CD changer/ player: Varies according to the CD changer/ player. Refer to the CD changer/ player manual. • Change the title of station/CD by the same operation used to name it. Auxiliary Input Display Setting Selects the display below when changing to Auxiliary input source. 1 Select Auxiliary input display setting item during Menu mode (In AUX mode) Select the "Name Set" display. For how to select Function Control items, refer to (page 6). 2 Enter Auxiliary input display setting mode Press the Control knob for at least 1 second. The presently selected Auxiliary input display is displayed. 3 Select the Auxiliary input display Turn the Control knob or push it towards up or down. "AUX"/ "DVD"/ "PORTABLE"/ "GAME"/ "VIDEO"/ "TV" 4 Exit Auxiliary input display setting mode Press the [FNC] button. ⁄ • When operation stops for 10 seconds, the name at that time is registered, and the Auxiliary input display setting mode closes. • The Auxiliary input display can be set only when the built-in auxiliary input or the auxiliary input of optional KCA-S220A is used. On the KCA-S220A, "AUX EXT" is displayed by default. English | 9
-
 1
1 -
2
-
3
-
 4
4 -
 5
5 -
 6
6 -
 7
7 -
 8
8 -
 9
9 -
 10
10 -
 11
11 -
 12
12 -
 13
13 -
 14
14 -
15
-
16
-
17
-
18
-
19
-
20
-
21
-
22
-
23
-
24
-
25
-
26
-
27
-
28
-
29
-
30
-
31
-
32
-
33
-
34
-
35
-
36
-
37
-
38
-
39
-
40
-
41
-
42
-
43
-
44
-
45
-
46
-
47
-
48
-
49
-
50
-
51
-
52
-
53
-
54
-
55
-
56
-
57
-
58
-
59
-
60
-
61
-
62
-
63
-
64
-
65
-
66
-
67
-
68
-
69
-
70
-
71
-
72
-
73
-
74
-
75
-
76
-
77
-
78
-
79
-
80
-
81
-
82
-
83
-
84
-
85
-
86
-
87
-
88
-
89
-
90
-
91
-
92
-
93
-
94
-
95
-
96
-
97
-
98
-
99
-
100
-
101
-
102
-
103
-
104
-
105
-
106
-
107
-
108
-
109
-
110
-
111
-
112
-
113
-
114
-
115
-
116
-
117
-
118
-
119
-
120
-
121
-
122
-
123
-
124
-
125
-
126
-
127
-
128
 |
 |
