Kenwood TS-2000 Operation Manual - Page 108
MB-430 MOBILE BRACKET, RC-2000 REMOTE PANEL, remove the front screws, then loosen the rear screws
 |
View all Kenwood TS-2000 manuals
Add to My Manuals
Save this manual to your list of manuals |
Page 108 highlights
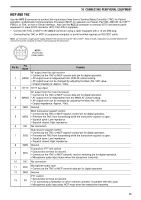
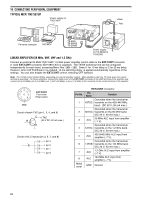
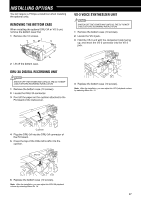
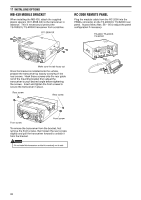
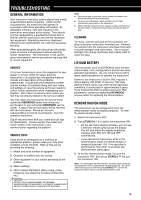
17 INSTALLING OPTIONS MB-430 MOBILE BRACKET When installing the MB-430, attach the supplied plastic spacers (G11-2698-XX) to the transceiver in advance. This is necessary to protect the TS-2000(X)/ TS-B2000 transceiver from scratches. G11-2698-XX RC-2000 REMOTE PANEL Plug the modular cable from the RC-2000 into the PANEL connector on the TS-2000(X)/ TS-B2000 rear panel. Access Menu Nos. 58 ~ 60 to adjust the panel configuration if necessary. TS-2000/ TS-2000X TS-B2000 Make sure the tab faces out Once the bracket is installed onto the vehicle, prepare the transceiver by loosely screwing in the rear screws. Hook those screws onto the rear guide rail of the mounting bracket then adjust the transceiver to your desired angle before tightening the screws. Insert and tighten the front screws to secure the transceiver in place. Rear screw Rear screw Front screw Front screw To remove the transceiver from the bracket, first remove the front screws, then loosen the rear screws slightly and pull the transceiver forward to unlatch it from the bracket. Do not install the transceiver so that it is vertically on its side. 98
-
 1
1 -
2
-
3
-
4
-
5
-
6
-
7
-
8
-
9
-
10
-
11
-
12
-
13
-
14
-
15
-
16
-
17
-
18
-
19
-
20
-
21
-
22
-
23
-
24
-
25
-
26
-
27
-
28
-
29
-
30
-
31
-
32
-
33
-
34
-
35
-
36
-
37
-
38
-
39
-
40
-
41
-
42
-
43
-
44
-
45
-
46
-
47
-
48
-
49
-
50
-
51
-
52
-
53
-
54
-
55
-
56
-
57
-
58
-
59
-
60
-
61
-
62
-
63
-
64
-
65
-
66
-
67
-
68
-
69
-
70
-
71
-
72
-
73
-
74
-
75
-
76
-
77
-
78
-
79
-
80
-
81
-
82
-
83
-
84
-
85
-
86
-
87
-
88
-
89
-
90
-
91
-
92
-
93
-
94
-
95
-
96
-
97
-
98
-
99
-
100
-
101
-
102
-
 103
103 -
 104
104 -
 105
105 -
 106
106 -
 107
107 -
 108
108 -
 109
109 -
 110
110 -
 111
111 -
 112
112 -
 113
113 -
114
-
115
-
116
-
117
-
118
-
119
-
120
-
121
-
122
-
123
-
124
-
125
-
126
-
127
-
128
-
129
-
130
-
131
-
132
-
133
-
134
-
135
-
136
-
137
-
138
-
139
-
140
-
141
-
142
-
143
-
144
-
145
-
146
-
147
-
148
-
149
-
150
-
151
-
152
-
153
-
154
-
155
-
156
 |
 |
