KitchenAid KEBS209BSS Use & Care Guide - Page 17
General Cleaning, Oven Lights
 |
View all KitchenAid KEBS209BSS manuals
Add to My Manuals
Save this manual to your list of manuals |
Page 17 highlights
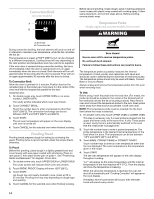
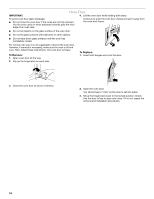
General Cleaning IMPORTANT: Before cleaning, make sure all controls are off and the oven is cool. Always follow label instructions on cleaning products. Soap, water and a soft cloth or sponge are suggested first unless otherwise noted. STAINLESS STEEL (on some models) To avoid damage to stainless steel surfaces, do not use soapfilled scouring pads, abrasive cleaners, Cooktop Cleaner, steelwool pads, gritty washcloths or abrasive paper towels. Cleaning Method: Rub in direction of grain to avoid damaging. ■ affresh™ Stainless Steel Cleaner Part Number W10355016 (not included) or affresh™ Stainless Steel Cleaning Wipes Part Number W10355049 (not included): See "Assistance or Service" section to order. ■ Liquid detergent or all-purpose cleaner: Rinse with clean water and dry with soft, lint-free cloth. OVEN DOOR EXTERIOR Cleaning Method: ■ Glass cleaner and a soft cloth or sponge: Apply glass cleaner to soft cloth or sponge, not directly on panel. ■ affresh™ Kitchen and Appliance Cleaner Part Number W10355010 (not included): See "Assistance or Service" section to order. OVEN DOOR INTERIOR Cleaning Method: ■ Self-Cleaning cycle: For optimal door cleaning result, wipe away any deposits with a damp sponge before running cycle. CONTROL PANEL To avoid damage to the control panel, do not use abrasive cleaners, steel-wool pads, gritty washcloths or abrasive paper towels. Cleaning Method: ■ Glass cleaner and soft cloth or sponge: Apply glass cleaner to soft cloth or sponge, not directly on panel. ■ affresh™ Kitchen and Appliance Cleaner Part Number W10355010 (not included): See "Assistance or Service" section to order. OVEN CAVITY Do not use oven cleaners. Food spills should be cleaned when oven cools. At high temperatures, foods react with porcelain and staining, etching, pitting or faint white spots can result. Cleaning Method: ■ Self-Cleaning cycle: See "Self-Cleaning Cycle" first. OVEN RACKS Cleaning Method: ■ Self-Cleaning cycle: See "Self-Cleaning Cycle" first. Remove racks or they will discolor and become harder to slide. If this happens, a light coating of vegetable oil applied to the rack guides will help them slide. ■ Steel-wool pad Oven Lights The oven lights are 120-volt, 5-watt maximum halogen bulbs. They will come on when the oven door is opened. On double oven models, both upper and lower lights will come on when either door is opened. The oven lights will not work during the Self-Cleaning cycle. When the oven door is closed, touch Oven Light to turn light on or off. To Replace: Before replacing the bulb, make sure the oven is off and cool. 1. Disconnect power. 2. Remove glass light cover by grasping the front edge and pulling away from oven. 3. Remove bulb from socket. 4. Replace bulb, using tissue or wearing cotton gloves to handle bulb. To avoid damage to or decreasing the life of the new bulb, do not touch bulb with bare fingers. 5. Replace bulb cover by snapping back into wall. 6. Reconnect power. 17
-
 1
1 -
2
-
3
-
4
-
5
-
6
-
7
-
8
-
9
-
10
-
11
-
 12
12 -
 13
13 -
 14
14 -
 15
15 -
 16
16 -
 17
17 -
 18
18 -
 19
19 -
 20
20 -
 21
21 -
 22
22 -
23
-
24
-
25
-
26
-
27
-
28
-
29
-
30
-
31
-
32
-
33
-
34
-
35
-
36
-
37
-
38
-
39
-
40
-
41
-
42
-
43
-
44
-
45
-
46
-
47
-
48
 |
 |