Kodak M1093 Extended User Guide - Page 54
Direct printing PictBridge enabled printer problems, halfway, completely down, Status, Solution
 |
UPC - 041771910334
View all Kodak M1093 manuals
Add to My Manuals
Save this manual to your list of manuals |
Page 54 highlights
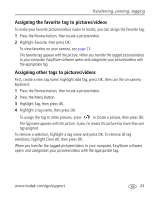
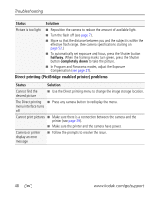
Troubleshooting Status Solution Picture is too light ■ Reposition the camera to reduce the amount of available light. ■ Turn the flash off (see page 7). ■ Move so that the distance between you and the subject is within the effective flash range. (See camera specifications starting on page 52.) ■ To automatically set exposure and focus, press the Shutter button halfway. When the framing marks turn green, press the Shutter button completely down to take the picture. ■ In Program and Panorama modes, adjust the Exposure Compensation (see page 27). Direct printing (PictBridge enabled printer) problems Status Solution Cannot find the desired picture ■ Use the Direct printing menu to change the image storage location. The Direct printing ■ Press any camera button to redisplay the menu. menu interface turns off Cannot print pictures ■ Make sure there is a connection between the camera and the printer (see page 39). ■ Make sure the printer and the camera have power. Camera or printer display an error message ■ Follow the prompts to resolve the issue. 48 www.kodak.com/go/support
-
 1
1 -
2
-
3
-
4
-
5
-
6
-
7
-
8
-
9
-
10
-
11
-
12
-
13
-
14
-
15
-
16
-
17
-
18
-
19
-
20
-
21
-
22
-
23
-
24
-
25
-
26
-
27
-
28
-
29
-
30
-
31
-
32
-
33
-
34
-
35
-
36
-
37
-
38
-
39
-
40
-
41
-
42
-
43
-
44
-
45
-
46
-
47
-
48
-
 49
49 -
 50
50 -
 51
51 -
 52
52 -
 53
53 -
 54
54 -
 55
55 -
 56
56 -
 57
57 -
 58
58 -
 59
59 -
60
-
61
-
62
-
63
-
64
-
65
-
66
-
67
-
68
-
69
-
70
-
71
-
72
-
73
 |
 |